Build PWA
This document guides you through building your Progressive Web App (PWA).
1. Configuration
If you have already completed the PWA configuration, you can skip these steps and proceed with the build. Otherwise, please export the env.dart and config_en.json files and follow the steps outlined below.
This is the guide to Export.
Step 1: Deploy Web Proxy
This step is required when the API domain differs from the main website domain. This difference can cause a CORS error (Cross-origin resource sharing).
Open your app on FluxBuilder.
Go to Features. In PWA, open Deploy CORS Server.
Input the Vercel API Key.
Input the Website URL if you want to generate a unique project based on your domain.
Click Deploy CORS Server button.
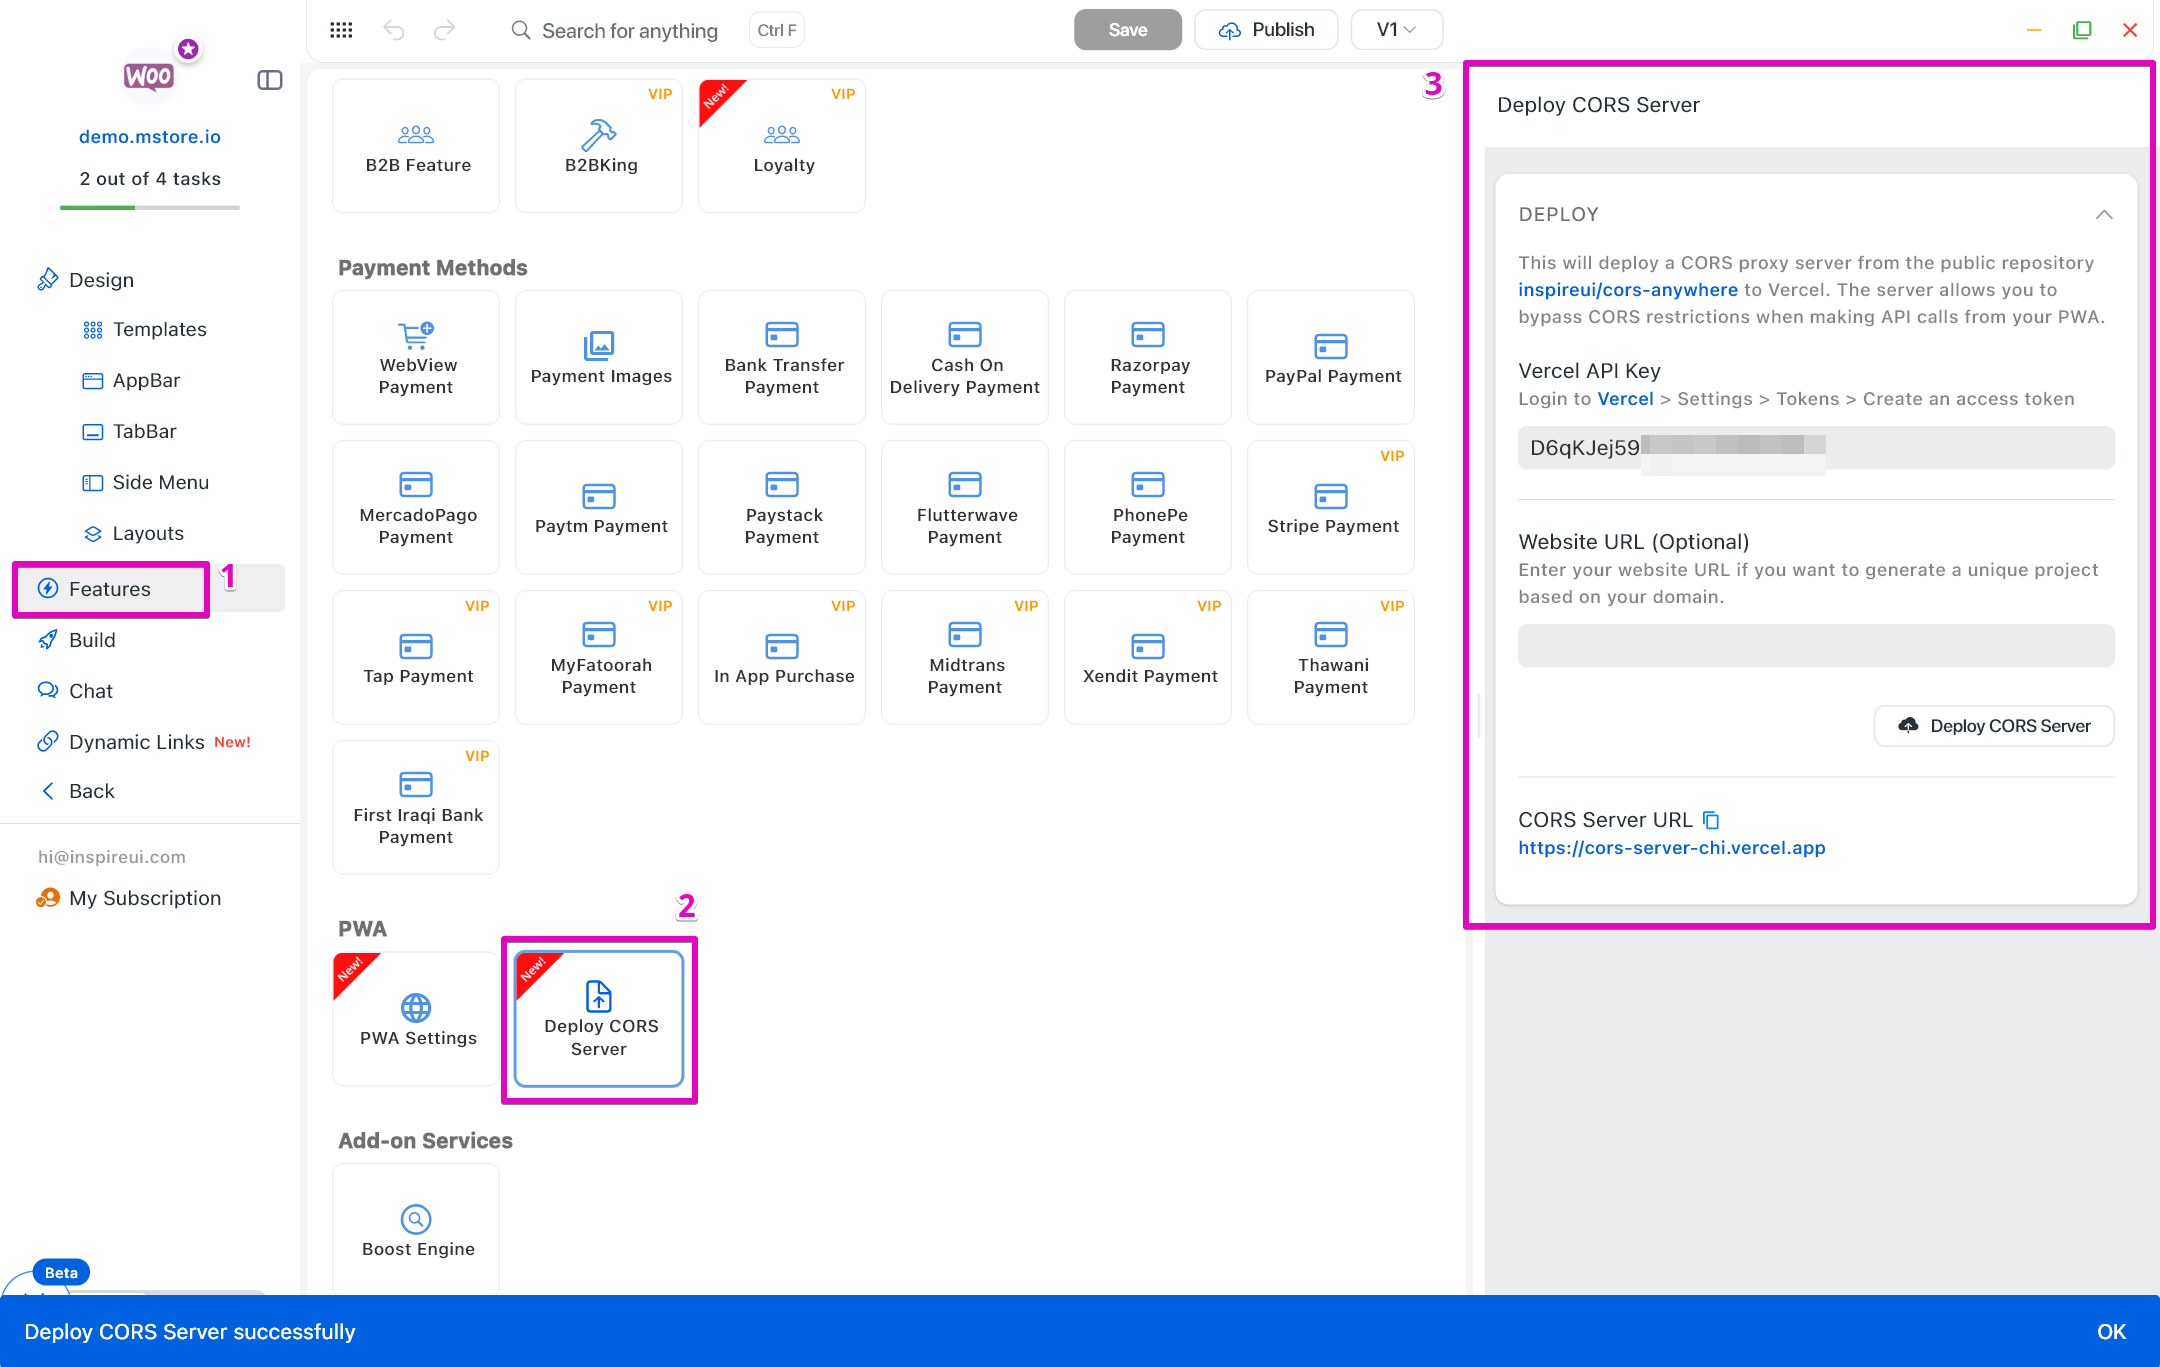
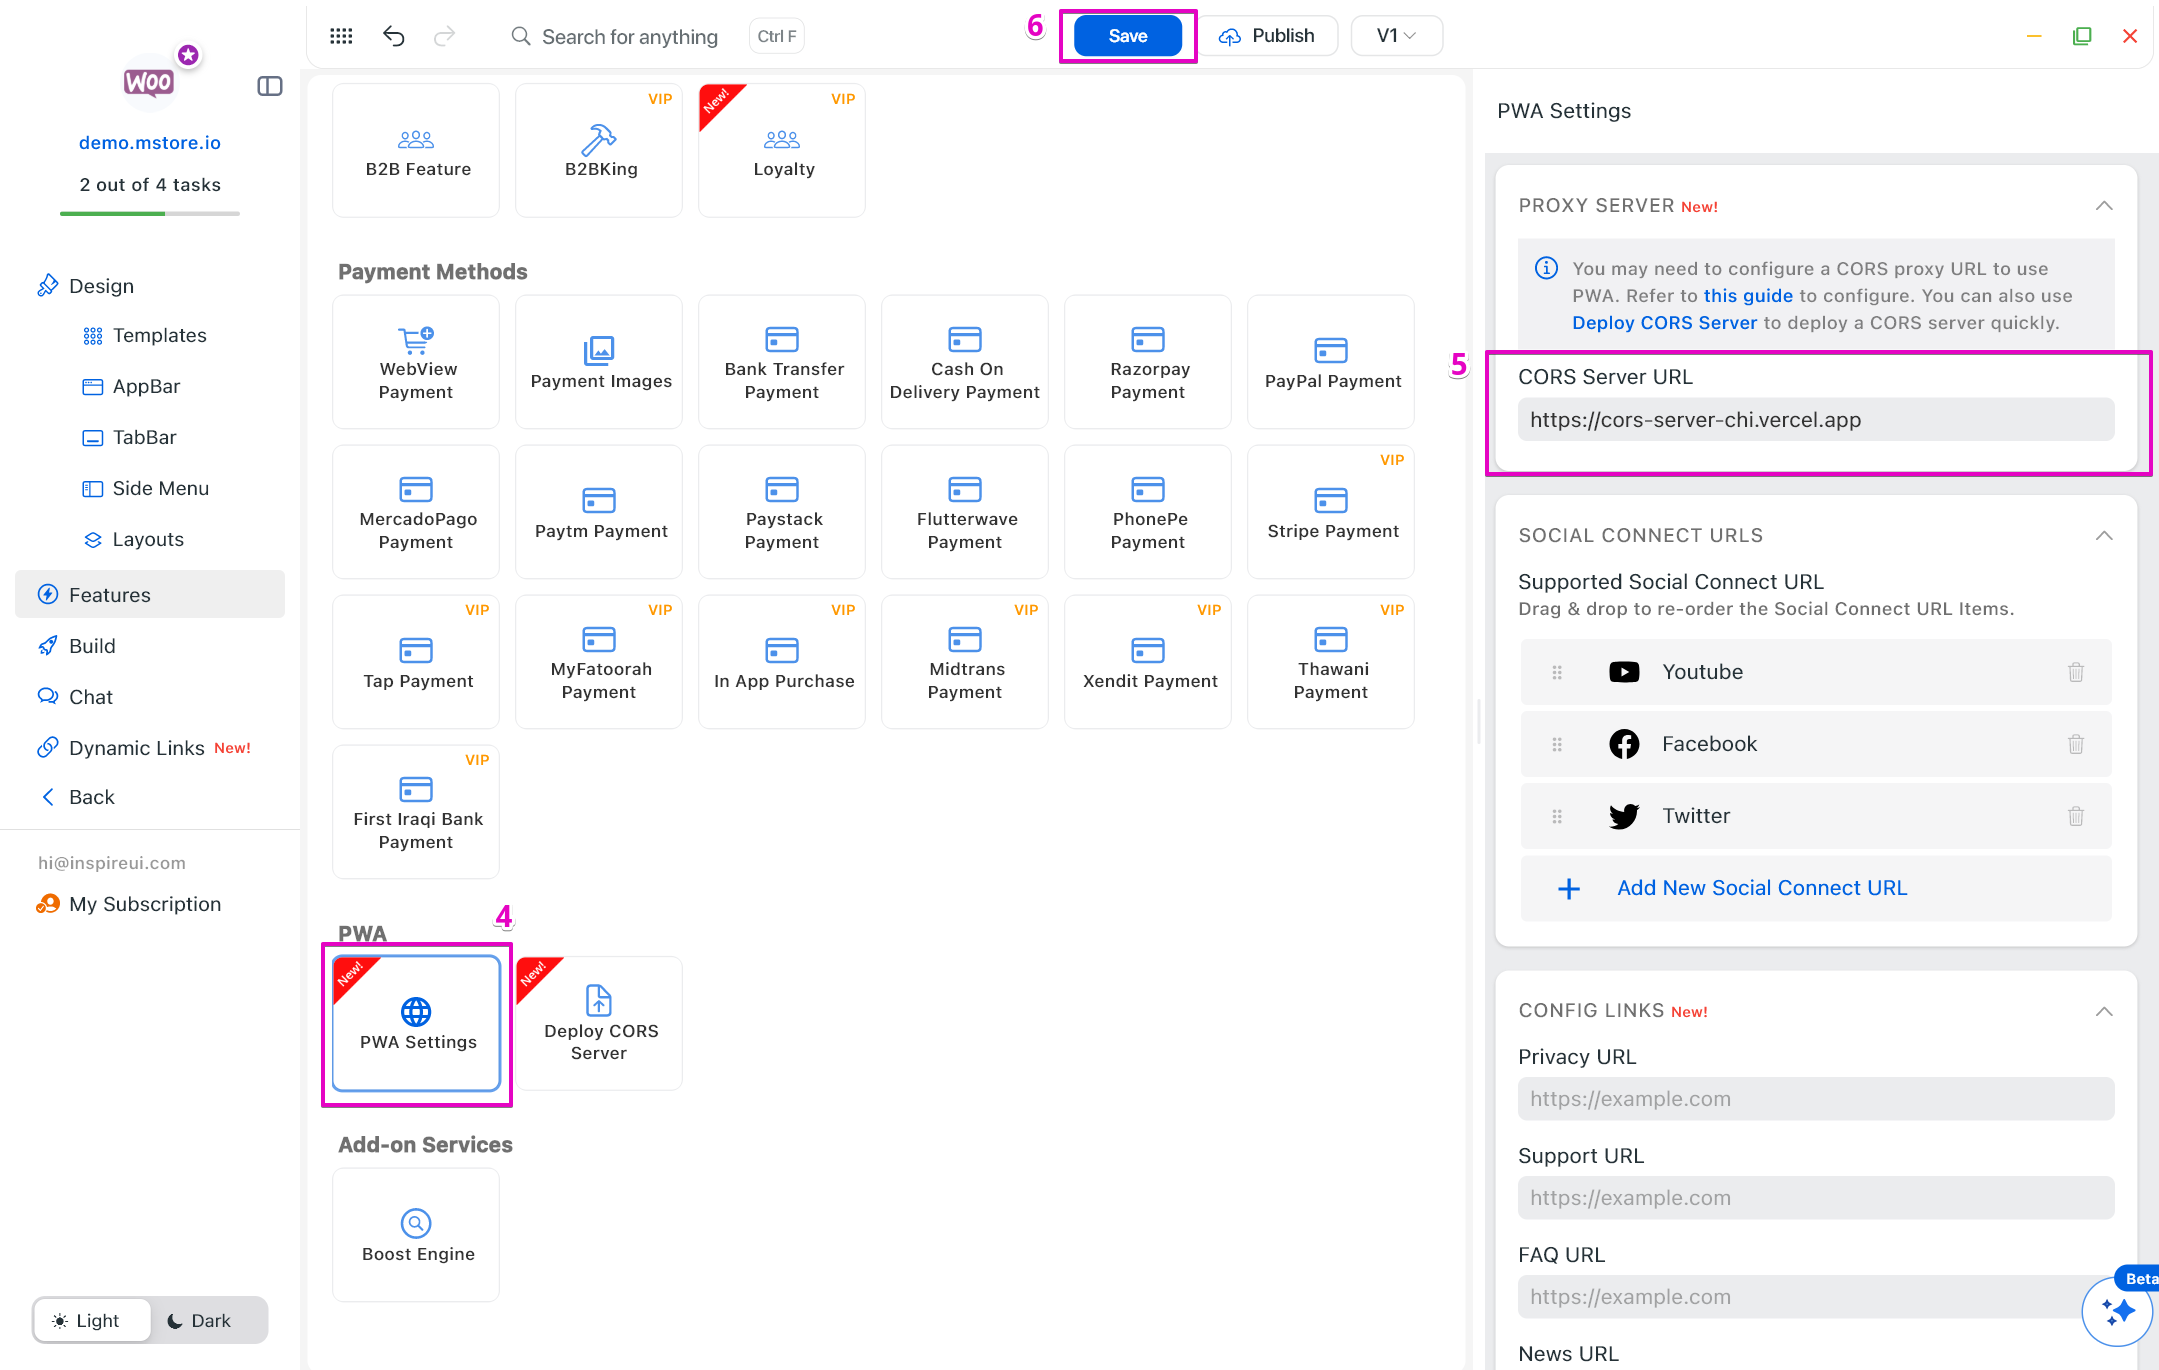
Copy the CORS Server URL and open PWA Settings.
Input the CORS Server URL.
Click Save button.
Step 2: Configure the Design
1. Edit Links on the header and footer
Header:
Footer:

1.1. Config Links: including Download App, Support, News, FAQ, Privacy, About Us.
- Open your app on FluxBuilder.
- Go to Features on the side menu.
- Open PWA Settings.
- Input all fields in the CONFIG LINKS.

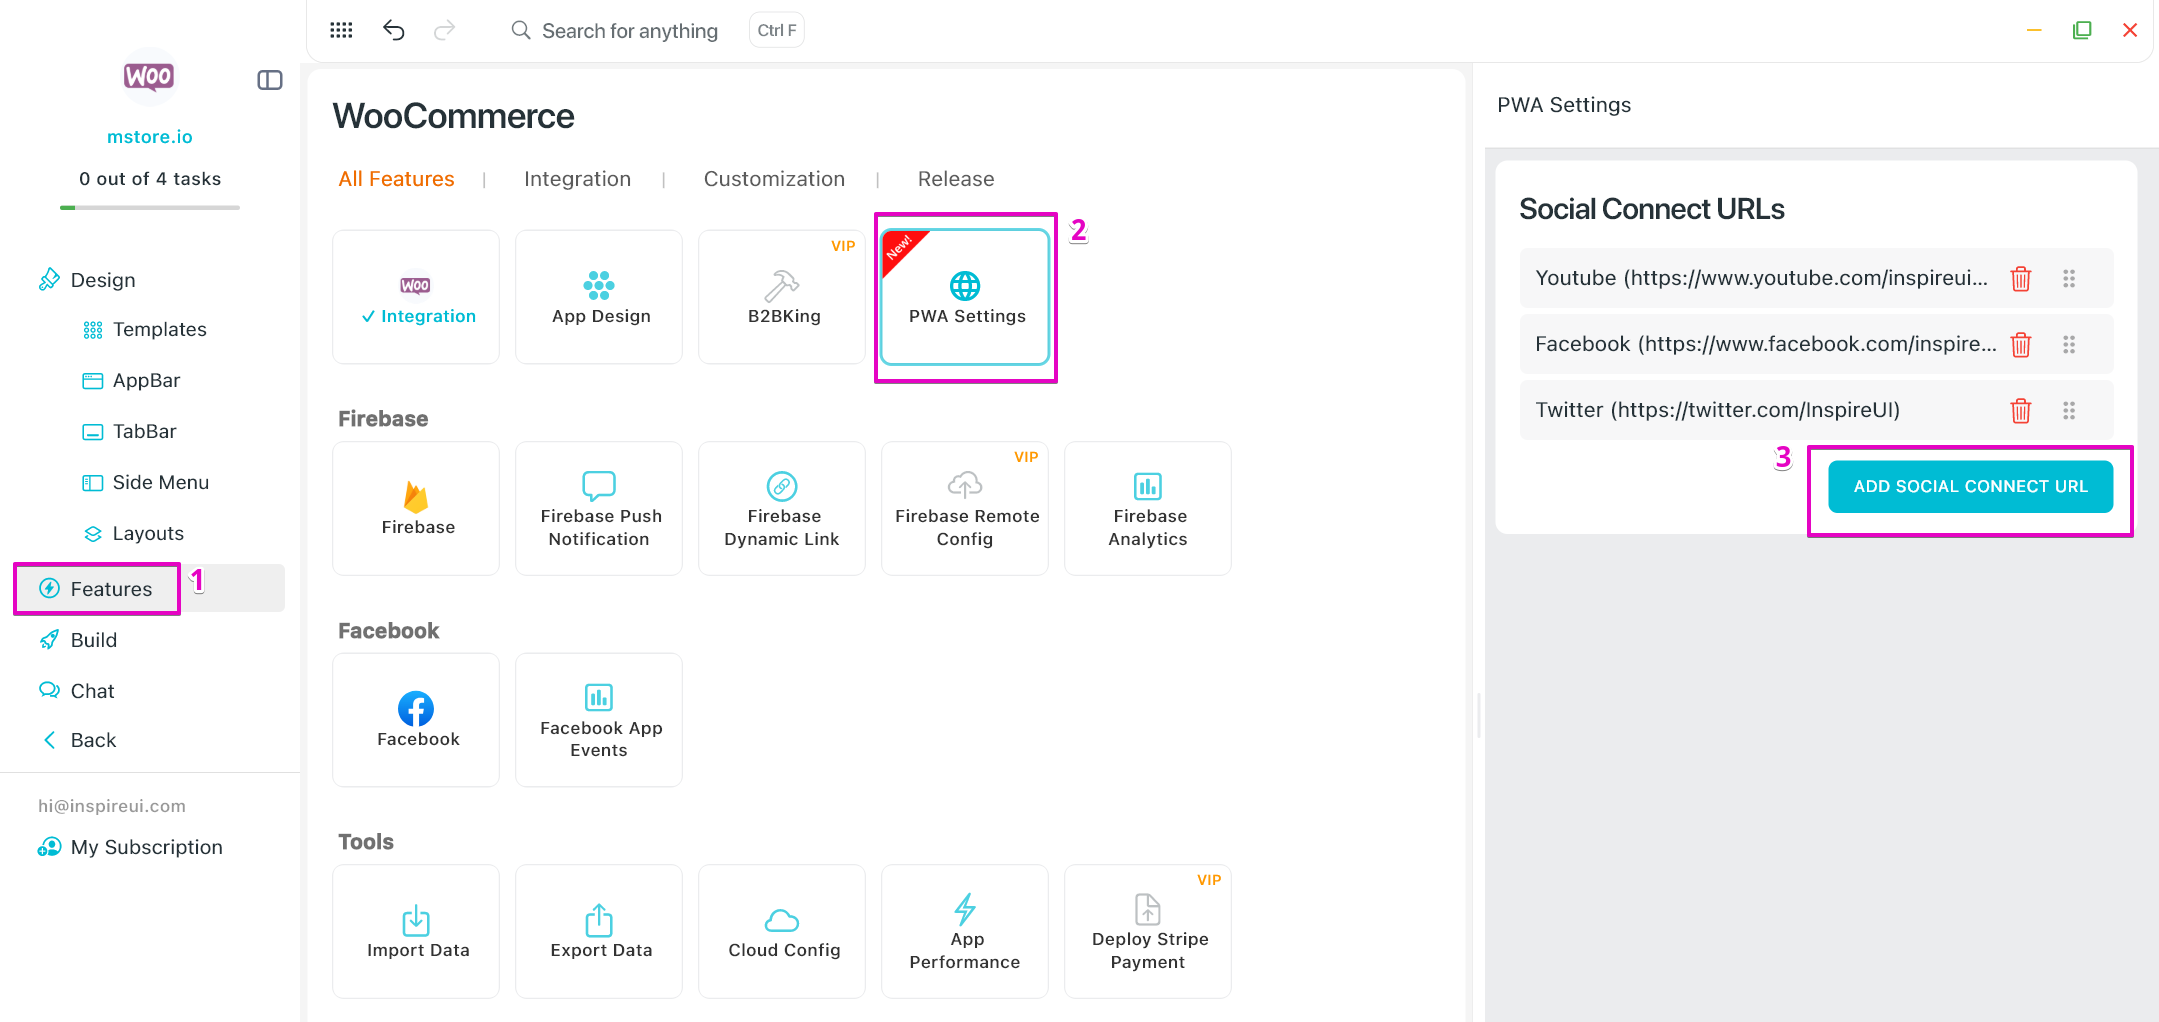
1.2. Config Social Connect Links:
Open your app on FluxBuilder.
Go to Features on the side menu.
Open PWA Settings.
Click ADD SOCIAL CONNECT URL button.
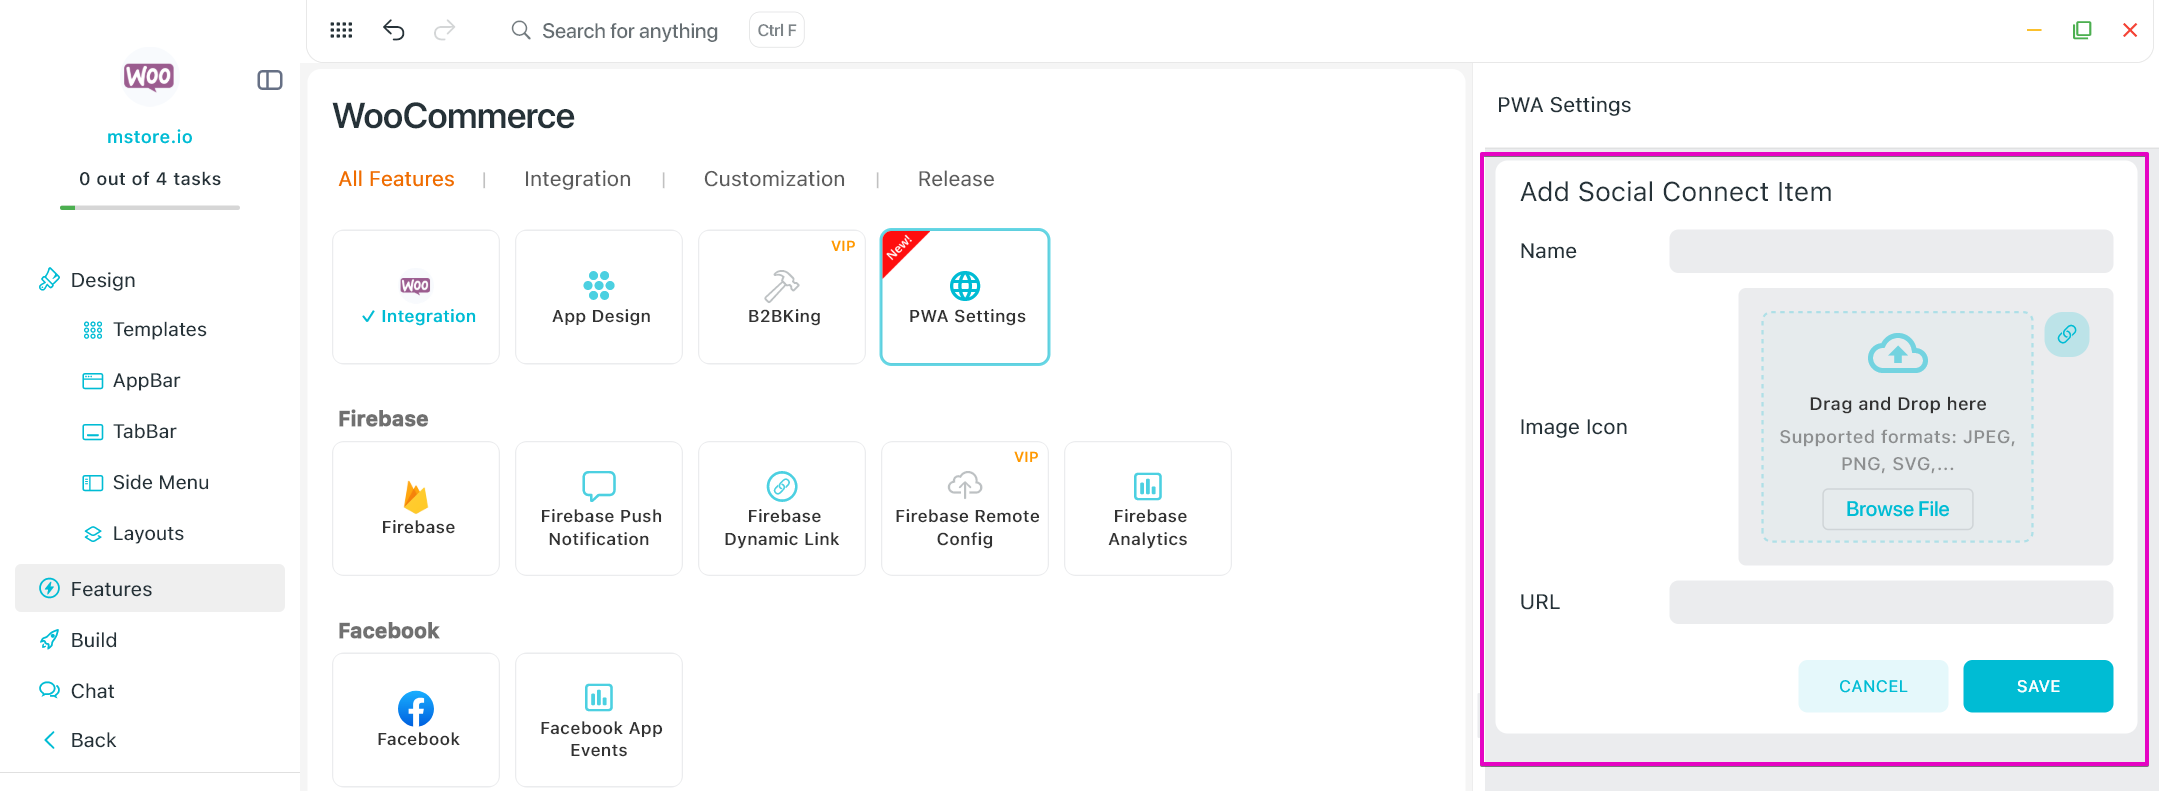
Input Name, Image Icon and URL. Then, click Save button.
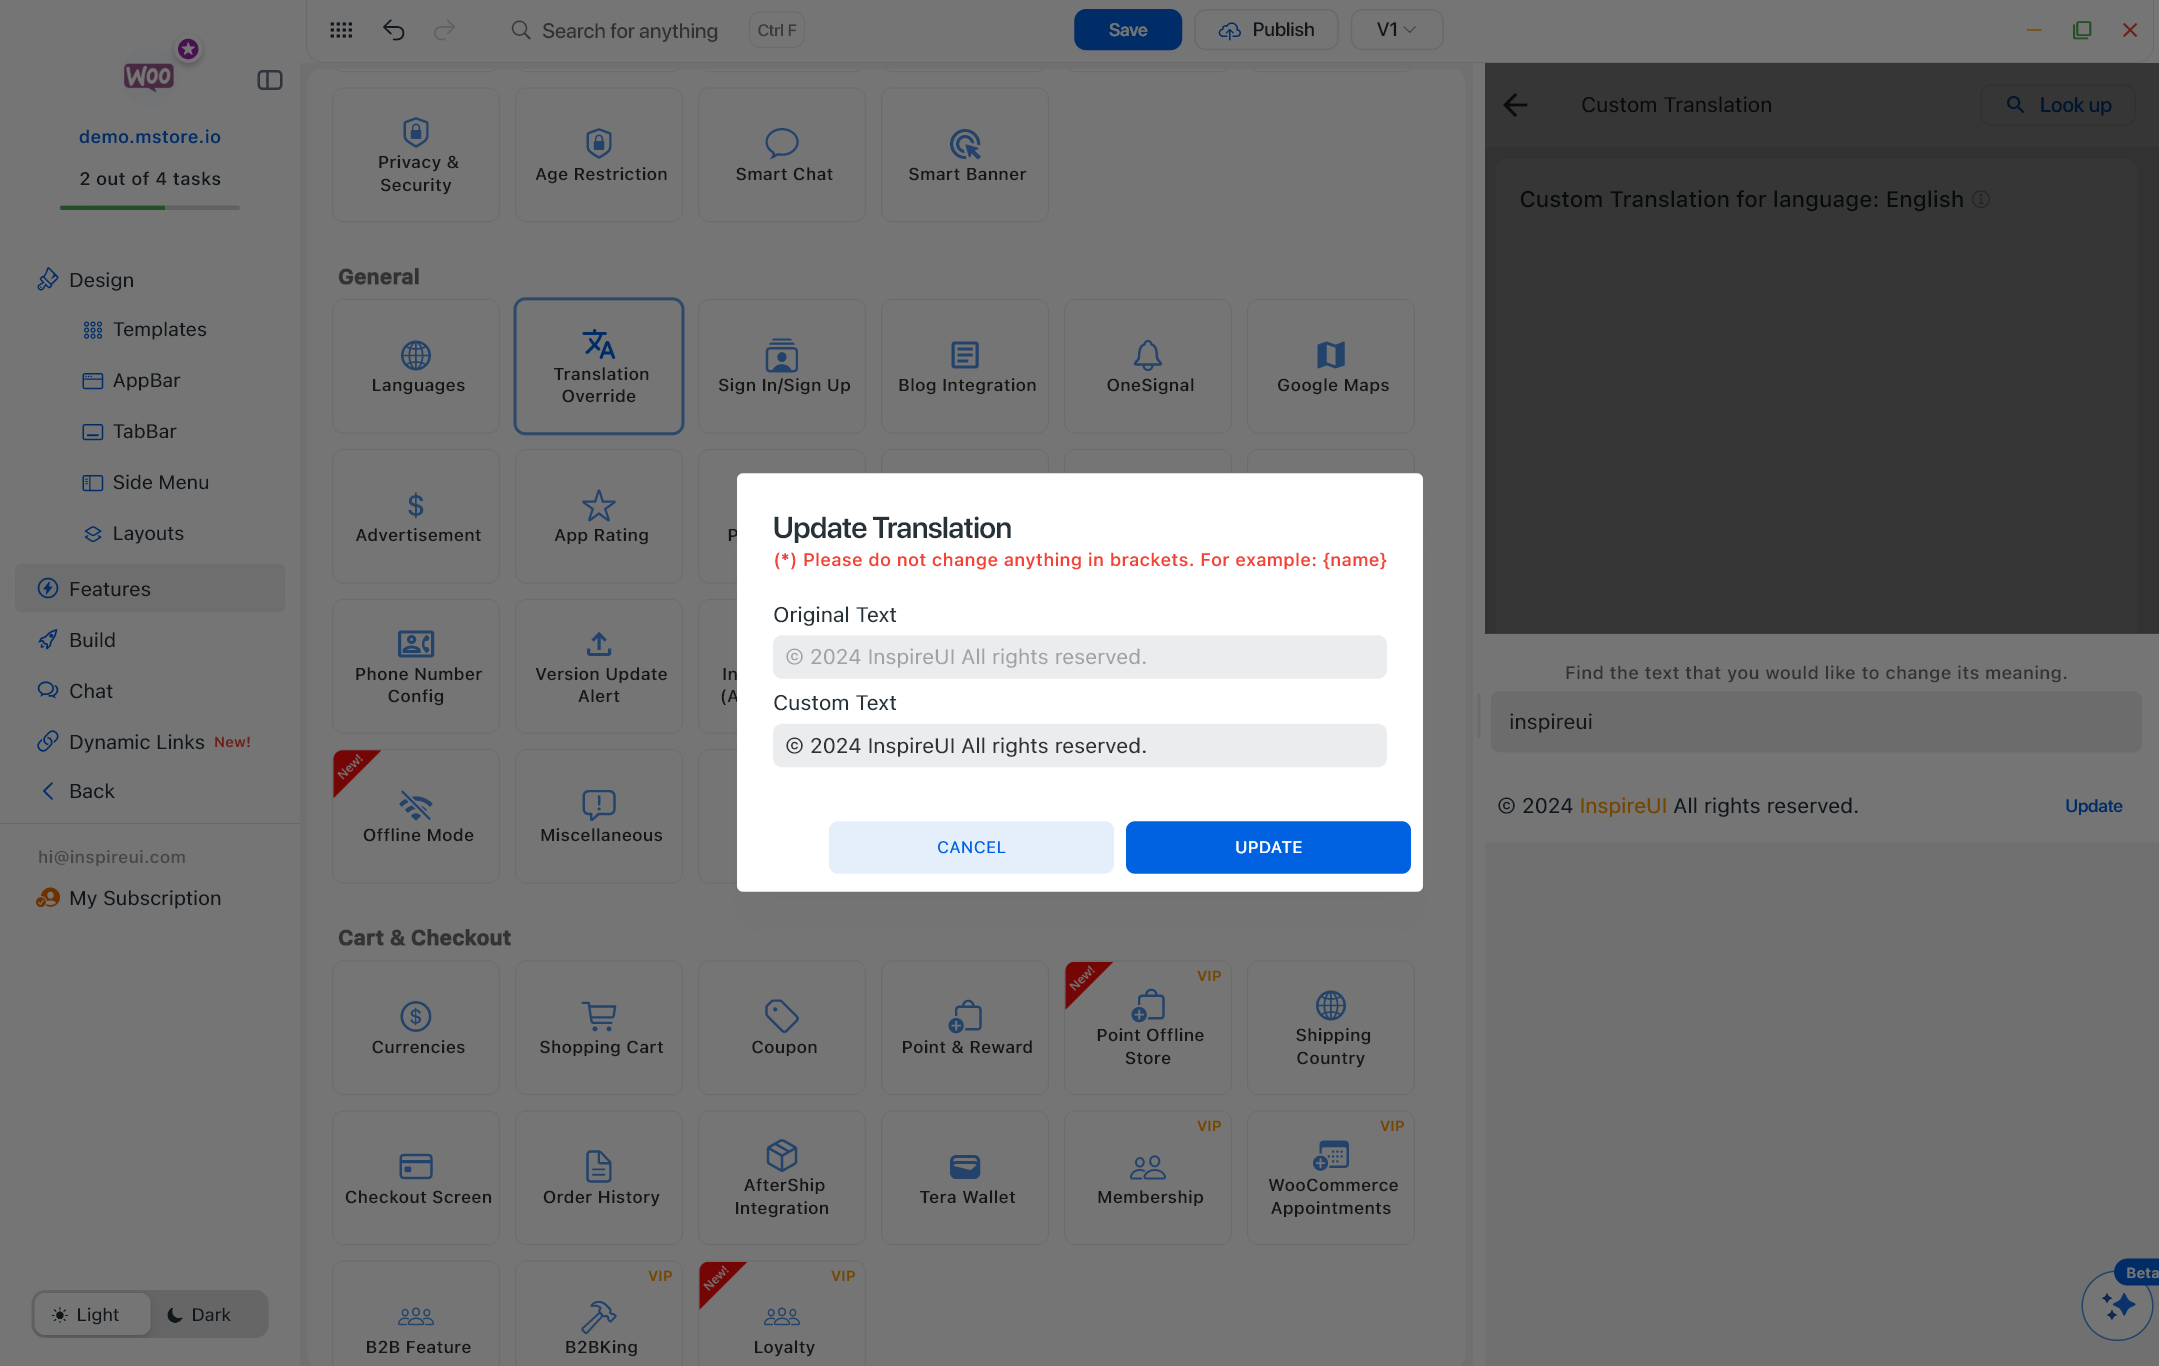
1.3. Override the Copy Right:
- Open your app on FluxBuilder.
- Go to Features on the side menu.
- In General, open Translation Override.
- Click CUSTOM button of App Translation.
- Click Look Up and search for “© 2024 InspireUI All rights reserved.”
- Update the text.
- Click Save.
2. Edit the Home page
The layout configuration for the web version of the Home UI will closely resemble that of the app version. To get the configuration of Home Layouts, please follow the guidelines outlined in the Home screen guide.
Important Note:
- Some layouts will be adjusted to fit the requirements of the web platform. Please refer to the table below for an overview of the specific layout conversions for the web version:
Layouts support Web:
| Layout | Only Support Web | Support Web & Mobile | Note |
|---|---|---|---|
| webColumn | ✅ | Product layout for web. | |
| blogWeb | ✅ | Blog layout for web. | |
| fourColumn | ✅ | Product layout. Will automatically convert to “webColumn” layout when used on the web. | |
| threeColumn | ✅ | Product layout. Will automatically convert to “webColumn” layout when used on the web. | |
| twoColumn | ✅ | Product layout. Will automatically convert to “webColumn” layout when used on the web. | |
| staggered | ✅ | Product layout. Will automatically convert to “webColumn” layout when used on the web. | |
| card | ✅ | Product layout. Will automatically convert to “webColumn” layout when used on the web. | |
| listTile | ✅ | Product layout. Will automatically convert to “webColumn” layout when used on the web. | |
| quiltedGridTile | ✅ | Product layout. Will automatically convert to “webColumn” layout when used on the web. | |
| bannerImage | ✅ | There is an additional “itemsWeb” property to set the image for the web. “itemsWeb” is similar to the config of “items”. | |
| blog | ✅ | Will automatically convert to “blogWeb” layout when used on the web. | |
| category with type “twoRow” | ✅ |
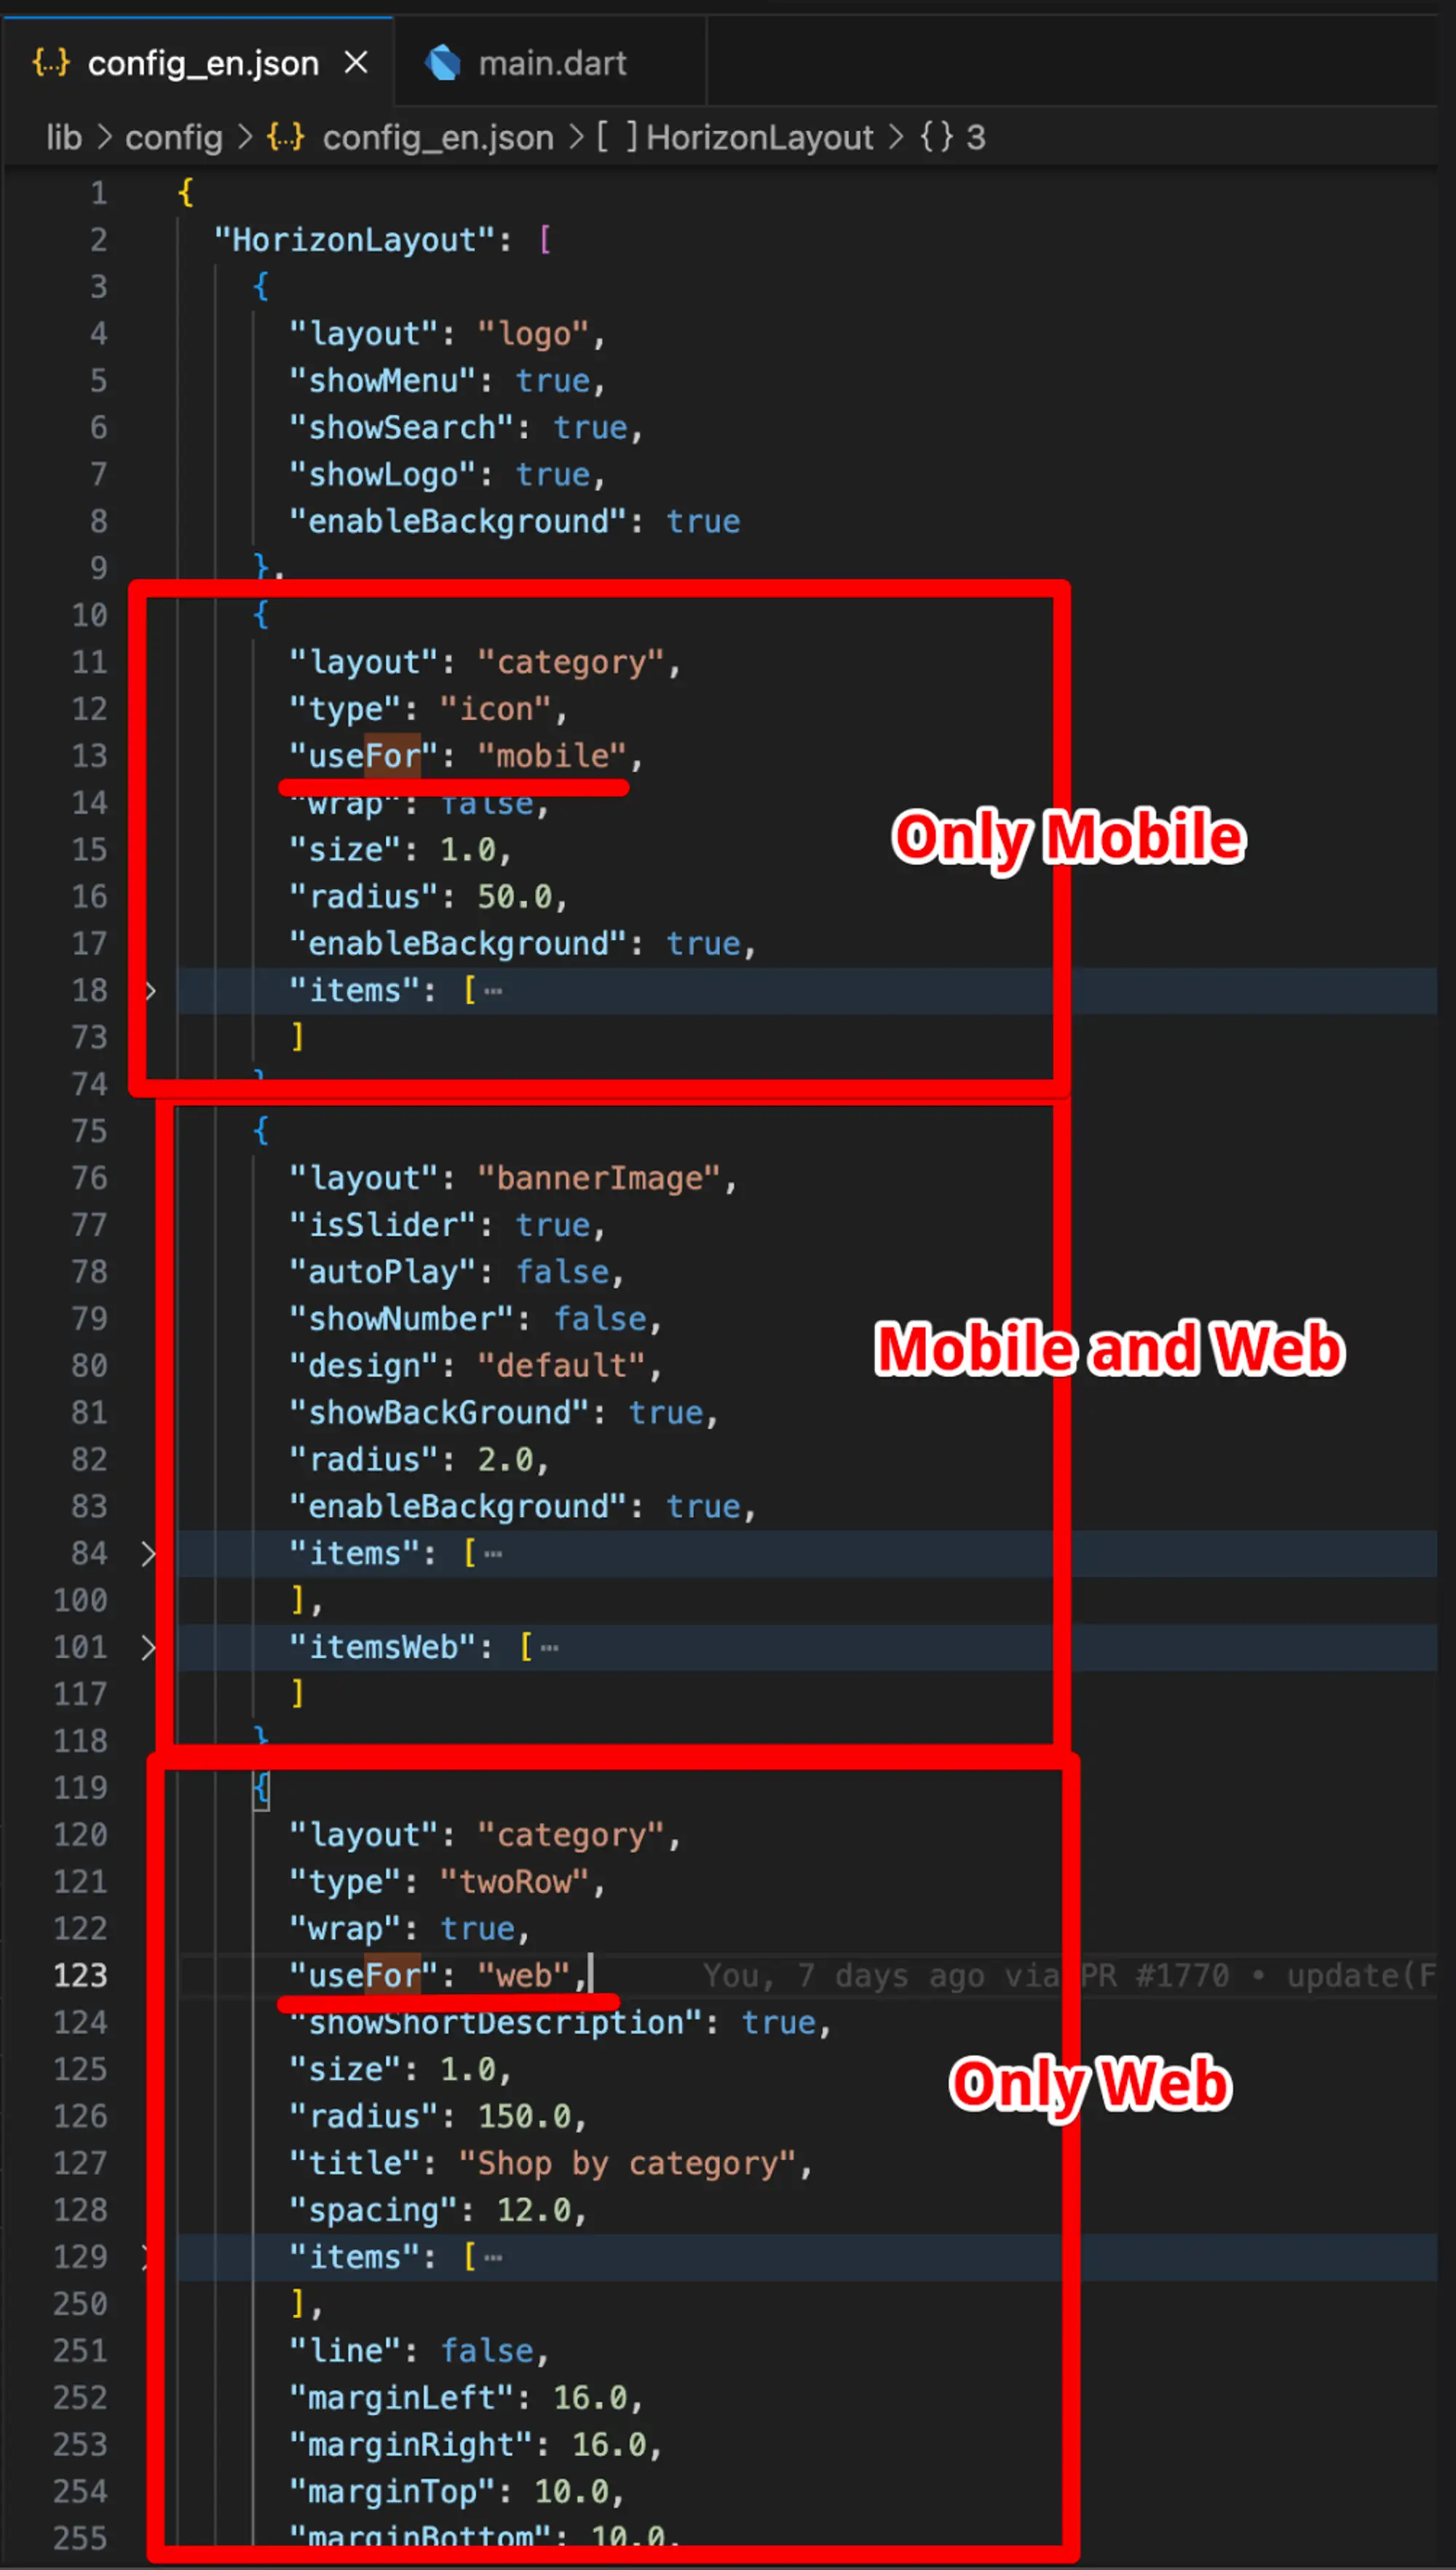
- If you wish to have separate designs for the app and web versions, you have the option to selectively hide or show elements for each platform. This can be achieved by adding the
"useFor"as shown below:
"useFor": "web" - indicating that the layout is intended for web-only usage.
"useFor": "mobile" - indicating that the layout is intended for the mobile app only.
Open your app on FluxBuilder. Go to Features on the side menu. Open Export and export the Design config file. Open the file on your device and add “useFor” as below.
If the "useFor" is not added, the layout will be utilized for both the web and mobile app versions.
2. Build the PWA
Video Guide:
Manual Guide:
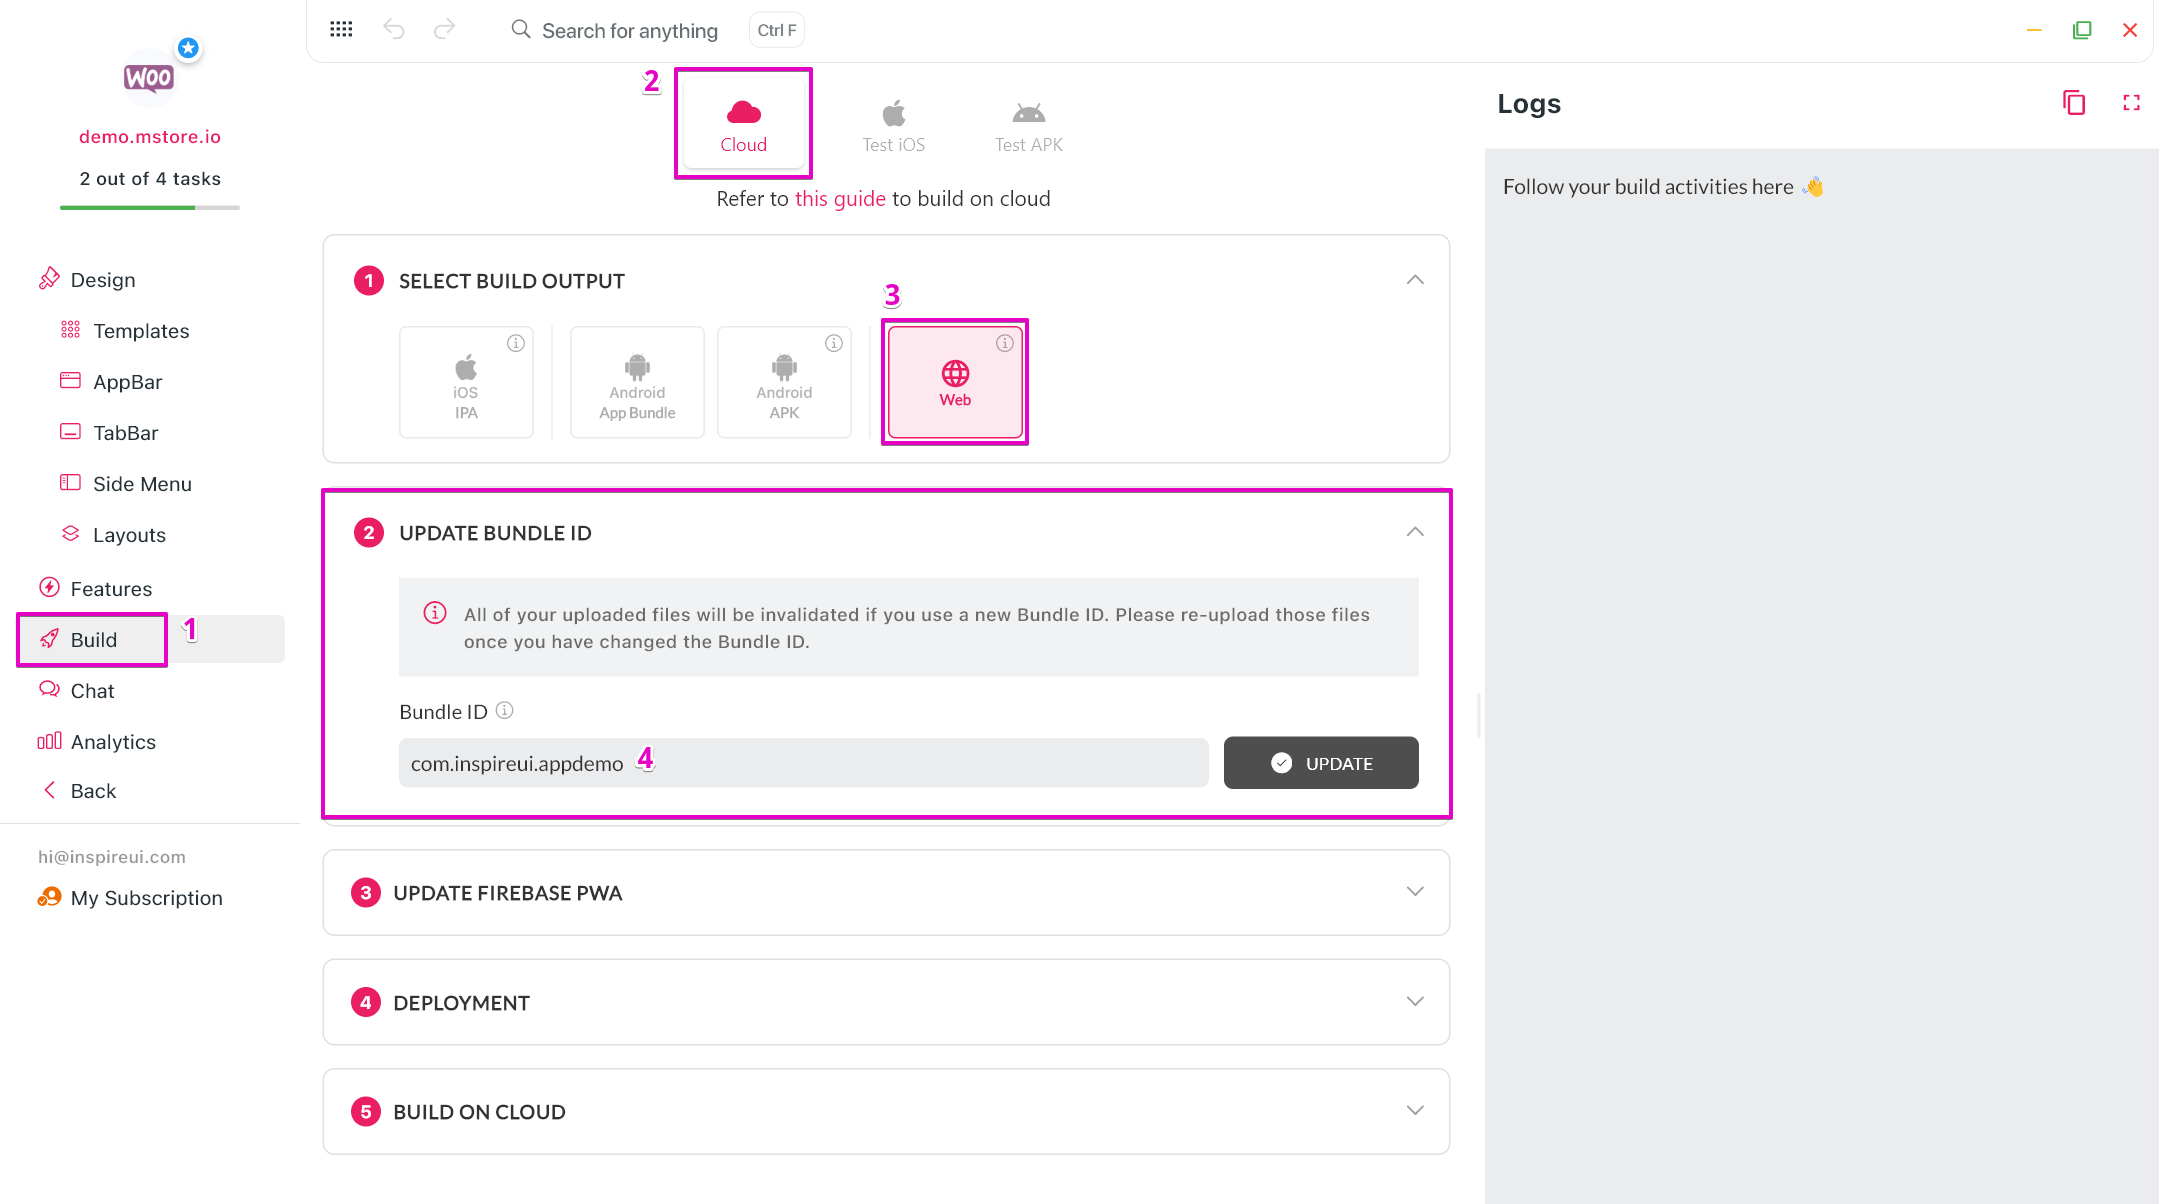
Step 1: Update bundle ID
- Open your app on FluxBuilder. Go to Build screen
- Open Cloud, select Web. Then, update Bundle ID and click
UPDATE. Your Bundle ID must not include reserved keywords.
Step 2: Update Firebase PWA
- Open your project on Firebase Console.
- Click on the gear icon, select Project Settings.
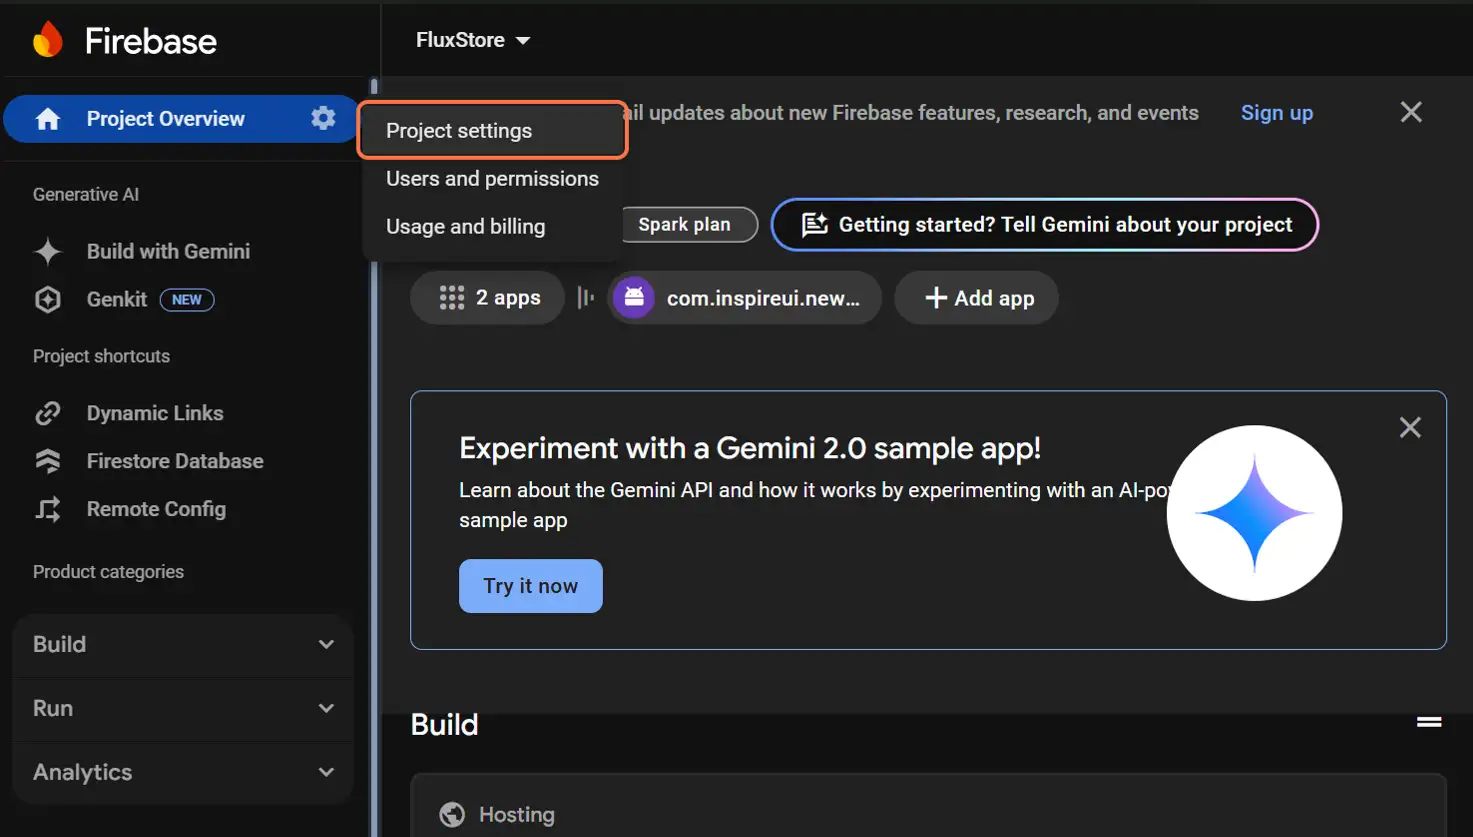
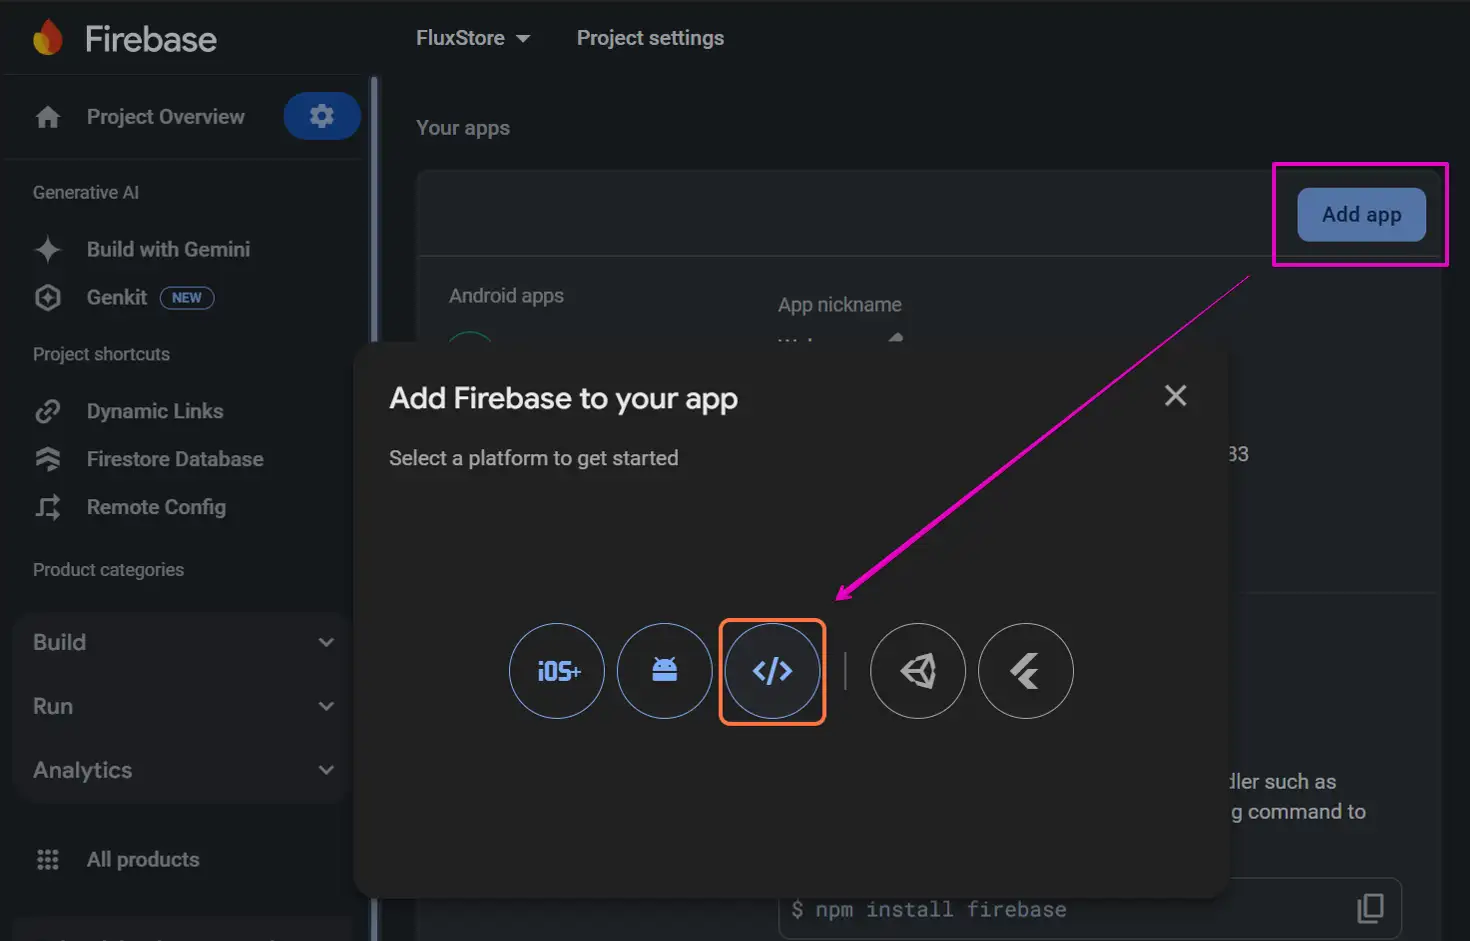
- In General, scroll down and select Web App (If you have no web app, click on Add app button to create a new one).

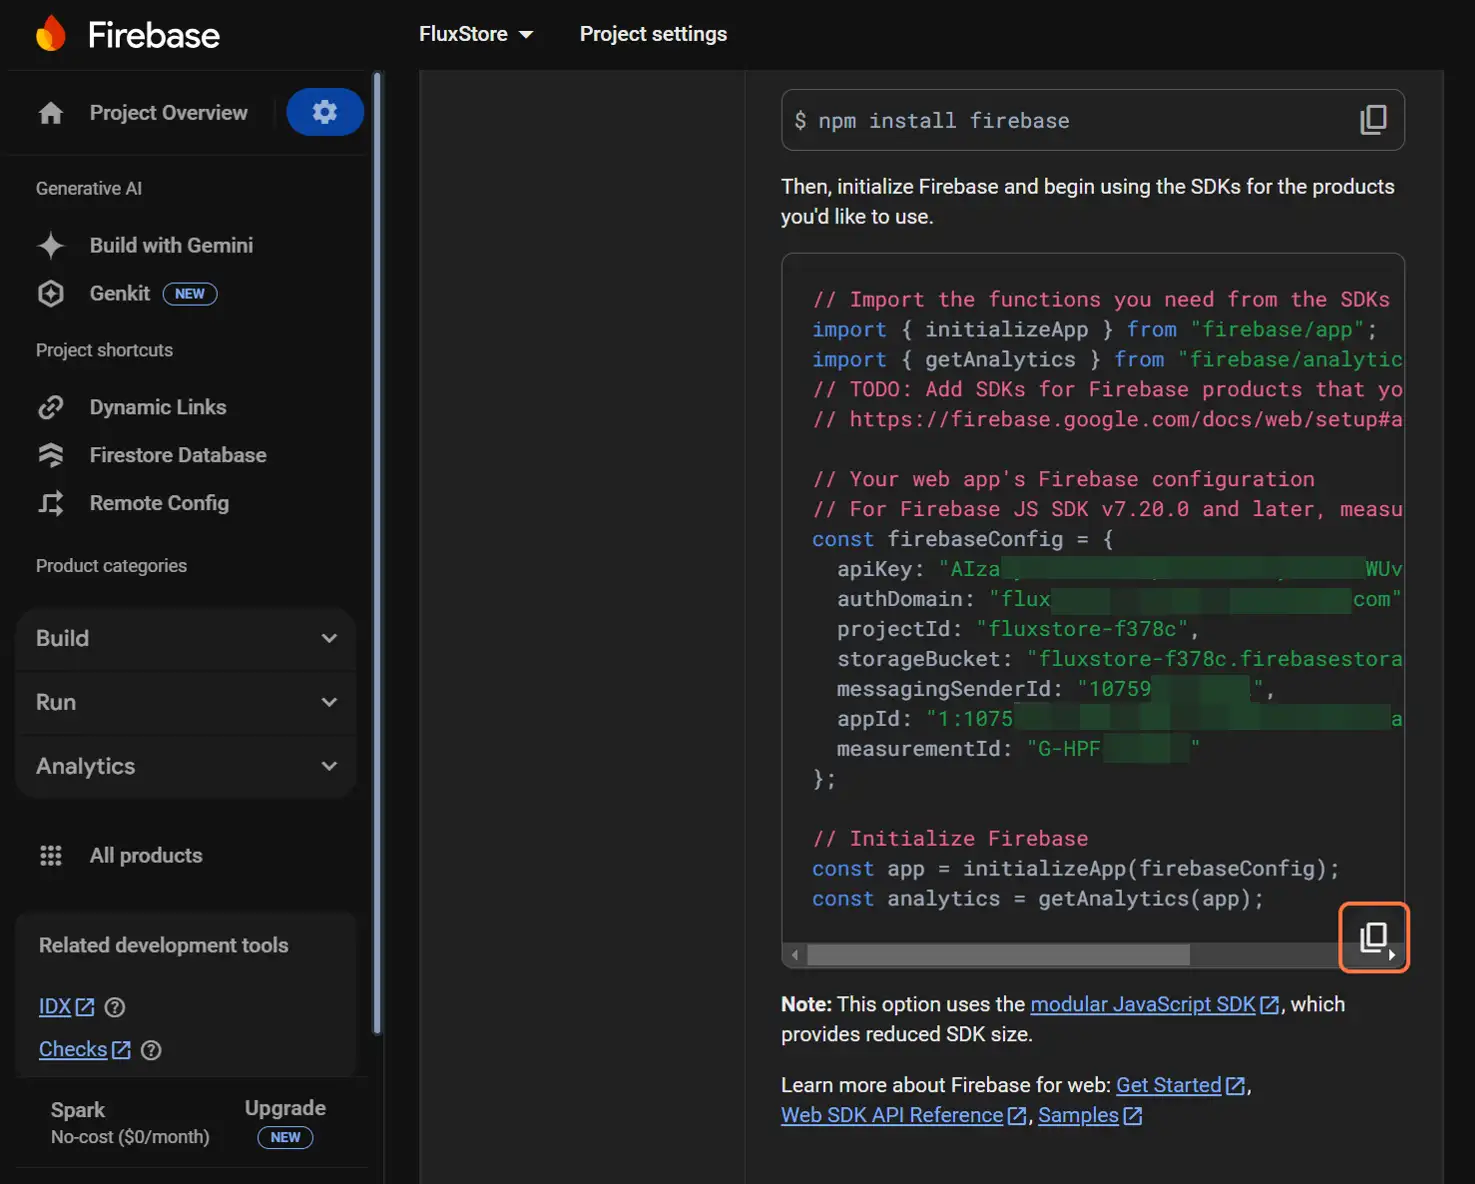
- Click copy button to save the config.
- Paste the config into FluxBuilder.
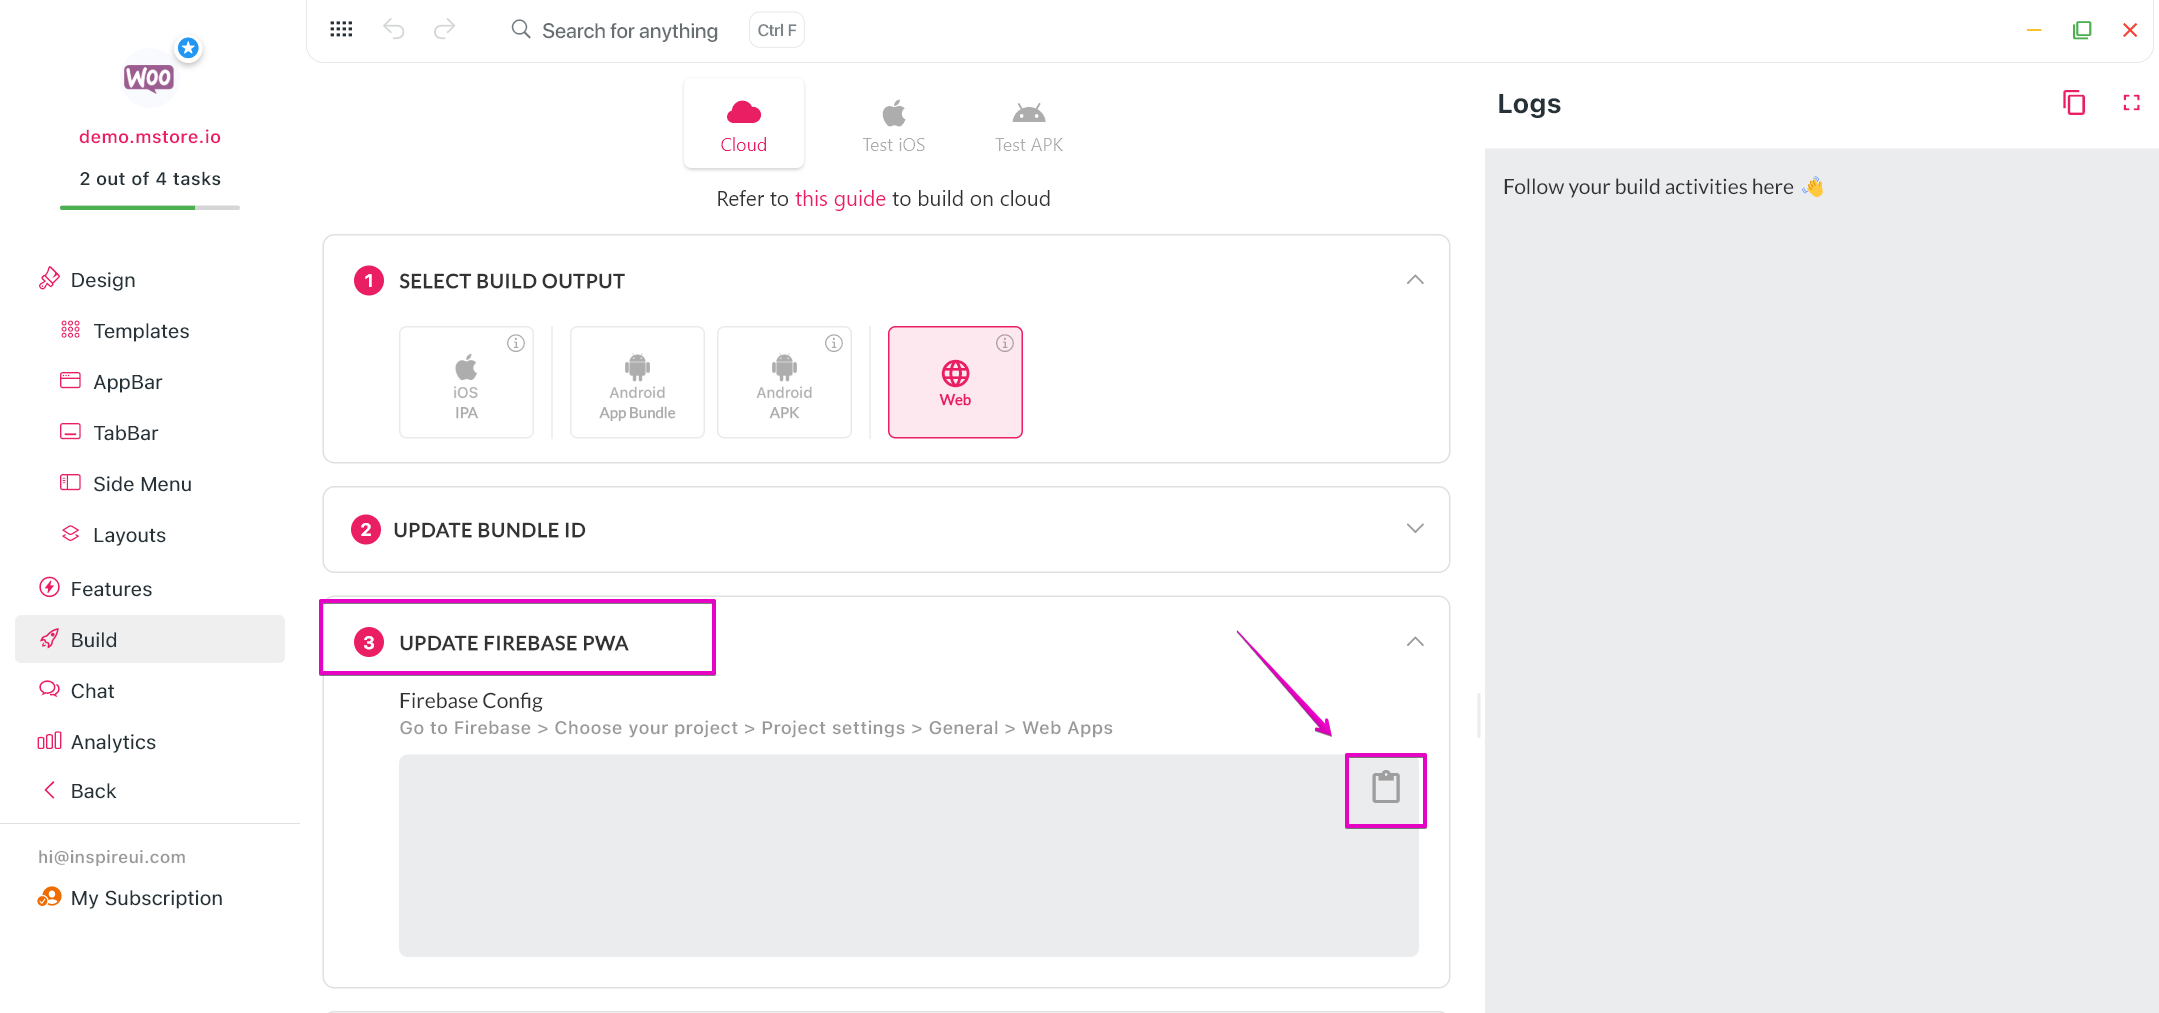
Note: This config will support the app management on Firebase (ex: sign in, sign up). In case you do not need it, it is possible to ignore the step.
Step 3: Deployment (Optional)
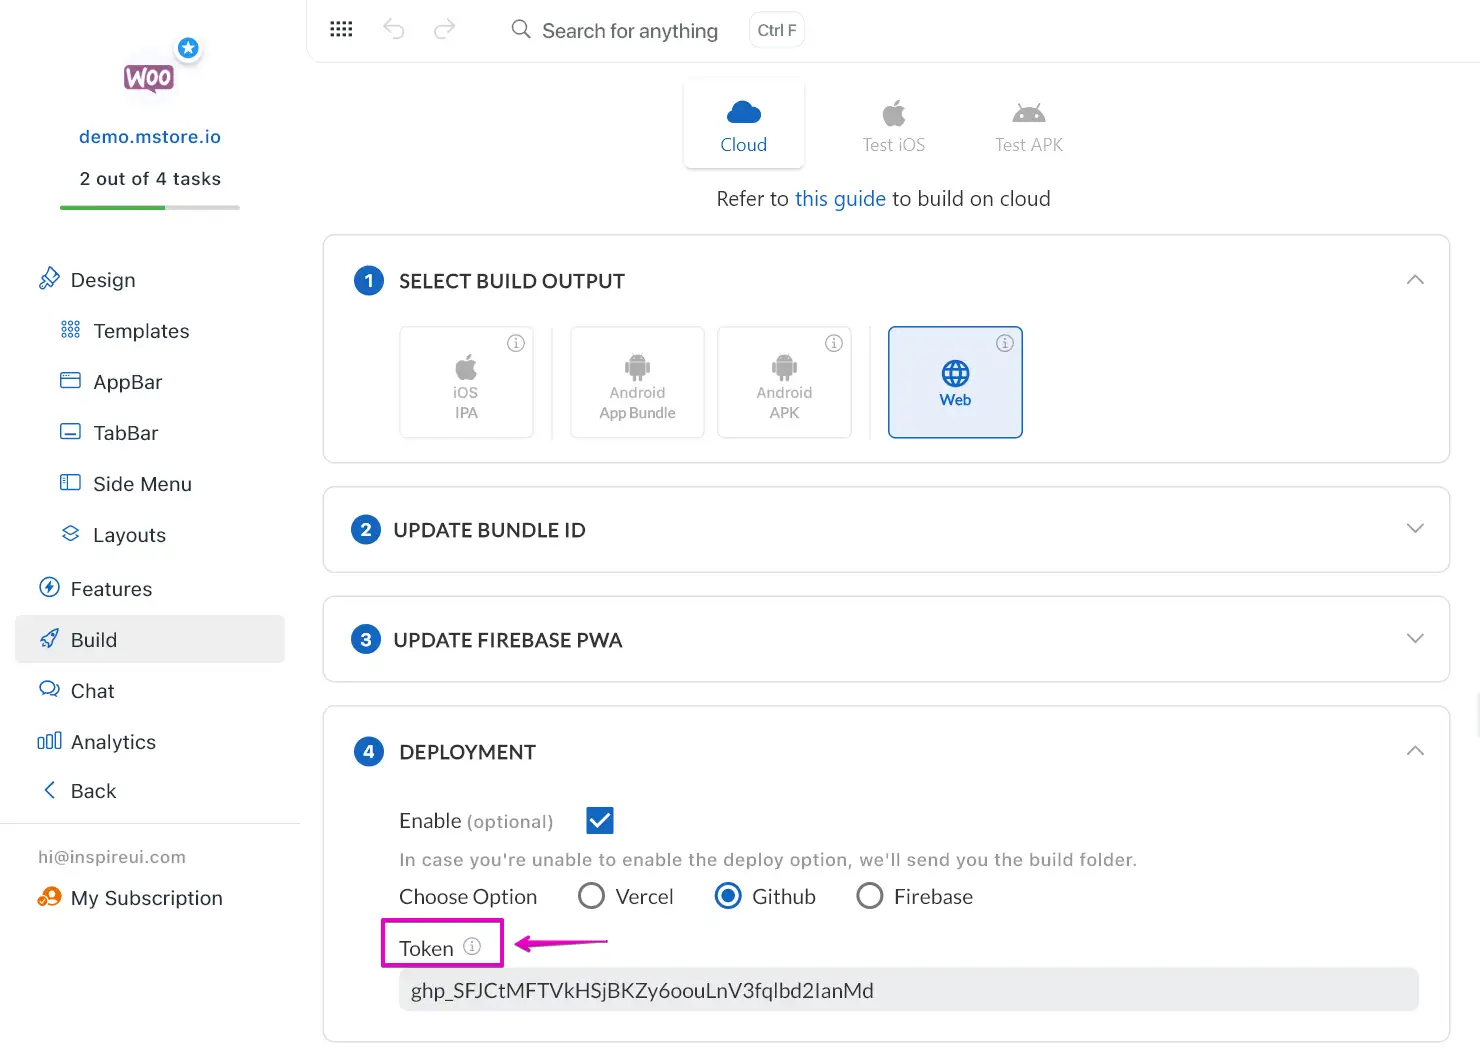
In case you are unable to enable the deployment option, we will send you the build folder. Otherwise, the web link will be delivered then.
After choosing the deployment option, you can point tooltip icon to get the corresponding guide to complete the config.
Step 4: Submit Build
- Update the app's information including App Name, App Version, App Icon, and Build Version.
- Disable the option Export env.dart and config JSON automatically. Then, upload the
env.dartandconfig_en.jsonfiles of your web app. - Click Upload Information button. Then click Submit Build button.
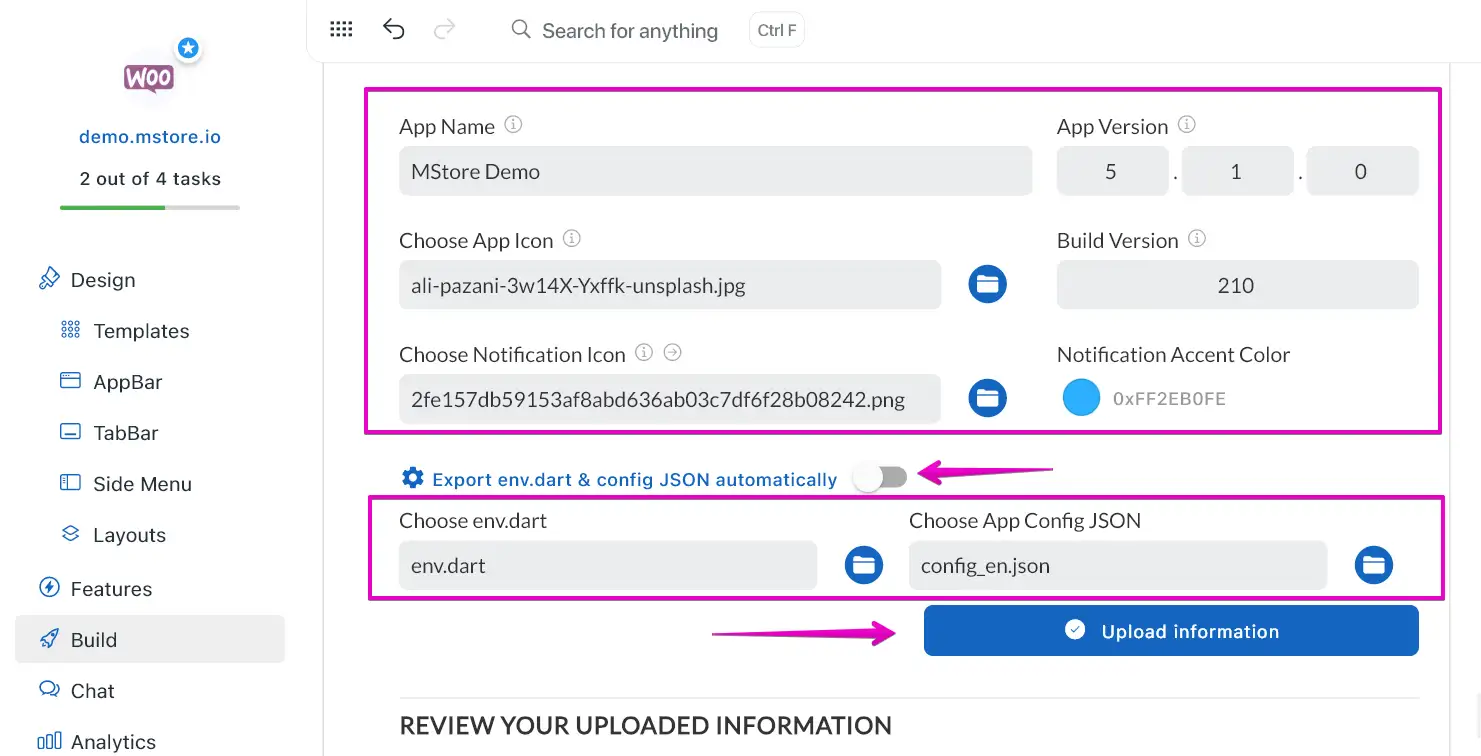
After the build process finishes, a build folder or a web link will be sent via email.
3. Meta SEO Configuration
This guide helps users, especially Application developers using MetaSeo configuration, configure MetaSeo to optimize their application for search engines (SEO).
Part 1: Overview of MetaSeo Configuration
1. MetaSeo: A configuration that allows you to customize the meta tags and other SEO data for your application.
2. app: Contains the general configuration settings for the entire application.
- excludes: A list of routes that will not include the MetaSeo configuration.
- config: Contains detailed settings for the meta tags and other SEO data.
3. routes: Contains specific MetaSeo configurations for each route.
Part 2: Applying MetaSeo Configuration Settings to The Entire Application.
Step 1: Add the MetaSeo configuration to your application's configuration file (config_en.json).
Step 2: In the "app" section, you can set the following settings:
excludes: List the routes that need to be excluded from the MetaSeo configuration.
config: Contains detailed settings for the meta tags and other SEO data, including:
- nameContent: The name and content of the meta tag
"nameContent": {
    "name": "name", // String
    "content": "content" // String
}- propertyContent: The property and content of the meta tag.
"propertyContent": {
    "property": "property", // String
    "content": "content" // String
}- keyValue: Key-value pairs for custom meta tags.
"keyValue": {
    "key": "key", // String
    "value": "value" // String
}- author: The author of the website.
- description: The description of the website.
- keywords: Related keywords to the website.
- viewport: Viewport settings for mobile devices.
- httpEquiv: The http-equiv meta tag.
- facebookAppID: The Facebook app ID.
- ogTitle: The Open Graph title.
- ogDescription: The Open Graph description.
- ogImage: The Open Graph image.
- twitter: Twitter Card settings.
"twitter": {
    "card": "twitterCard", // TWITTER CARD
    "title": "twitterTitle", // String
    "description": "twitterDescription", // String
    "image": "twitterImage" // String
 }
```javascript
TWITTER CARD
/// Define enum options for Twitter Card
/// Only one card type per-page is supported.
/// If more than one twitter:card value exists in the page,
/// the “last” one in sequence will take priority.
/// https://developer.twitter.com/en/docs/twitter-for-websites/cards/guides/getting-started
enum TwitterCard {
  /// The card type, which will be one of
  summary,

  /// or will be one of
  summaryLargeImage,

  /// or will be one of
  app,

  /// or will be one of
  player;

  /// Define the [TwitterCard] constructor
  const TwitterCard();
}
```

- **robots**: Robots meta tag settings.

```javascript
/// Definition of [robotsName] meta tag attribute
/// Definition of [content] meta tag attribute
/// https://developers.google.com/search/docs/crawling-indexing/robots-meta-tag
/// Add web mata data of [robotsName] attribute
/// Add web mata data of [content] attribute
"robots": {
      "name": "name", // ROBOTS NAME
      "content": "content" // String
}
```


```javascript
    ROBOTS NAME
  /// The robots meta tag lets you utilize a granular,
  /// page-specific approach to controlling how an individual page should
  /// be indexed and served to users in Google Search results.
  /// https://developers.google.com/search/docs/crawling-indexing/robots-meta-tag
  robots,

  /// When users search for your site, Google Search results sometimes
  /// display a search box specific to your site, along with other
  /// direct links to your site. This tag tells Google not
  /// to show the sitelinks search box.
  /// https://developers.google.com/search/docs/crawling-indexing/special-tags
  google,

  /// Google's standard web crawler has the user agent name Googlebot
  /// https://developers.google.com/search/docs/crawling-indexing/robots-meta-tag
  googleBot,

  /// Search engines may have different crawlers for different purposes.
  /// https://developers.google.com/search/docs/crawling-indexing/robots-meta-tag
  googleBotNews,

  /// You can use this tag on the top-level page of your site to verify
  /// ownership for Search Console.
  /// https://developers.google.com/search/docs/crawling-indexing/special-tags
  googleSiteVerification;
```
Part 3: Setting Up Configurations for Specific Routes.
In the "routes" section, you can define specific MetaSeo configurations for each route.
For each route, you can set the same settings as in the "app" section.
Example:
JSON
"MetaSeo": {
  "app": {
    "excludes": ["checkout"],
    "config": {
     "author": "InspireUI",
        "description": "All-in-one mobile solutions and services for Startups, Developers, Entrepreneurs & more…",
        "keywords": [
          "Flutter",
          "Dart",
          "SEO",
          "Meta",
          "Web",
          "FluxStore",
          "FluxBuilder"
        ]
        ...
    }
  },
  "routes": [
    {
      "route": "dashboard",
      "config": {
       "author": "InspireUI",
        "description": "All-in-one mobile solutions and services for Startups, Developers, Entrepreneurs & more…",
        "keywords": [
          "Flutter",
          "Dart",
          "SEO",
          "Meta",
          "Web",
          "FluxStore"
        ]
          ...
      }
    }
  ]
}
Notes
- Replace the placeholder values with appropriate information for your application.
- Refer to the specific documentation for the MetaSeo package you are using for more details and advanced configuration options.