Create an App Without a Website
No website yet? You can still build an app. With FluxBuilder, you can build your iOS and Android apps without setting up a website or online store first.
Is this you?
- You don't have a website, and don't plan to build one.
- You're starting a new business or project from scratch.
- You want to launch your app quickly without managing a website or hosting.
Build Android • iOS • PWA apps ✨ AI-powered app building
⚡ CLI & MCP support
🎨 Drag-and-drop UI design
🔔 Push notifications for Free
FluxBuilder provides three options that allow you to build your app without setting up a website first:
- Want to build AI Assistant apps support ChatGPT & OpenAI.
- Serverless App: Set up your Serverless App with Firebase, then use FluxBuilder to customize and build your app. You can upload and manage products and assets directly on FluxBuilder.
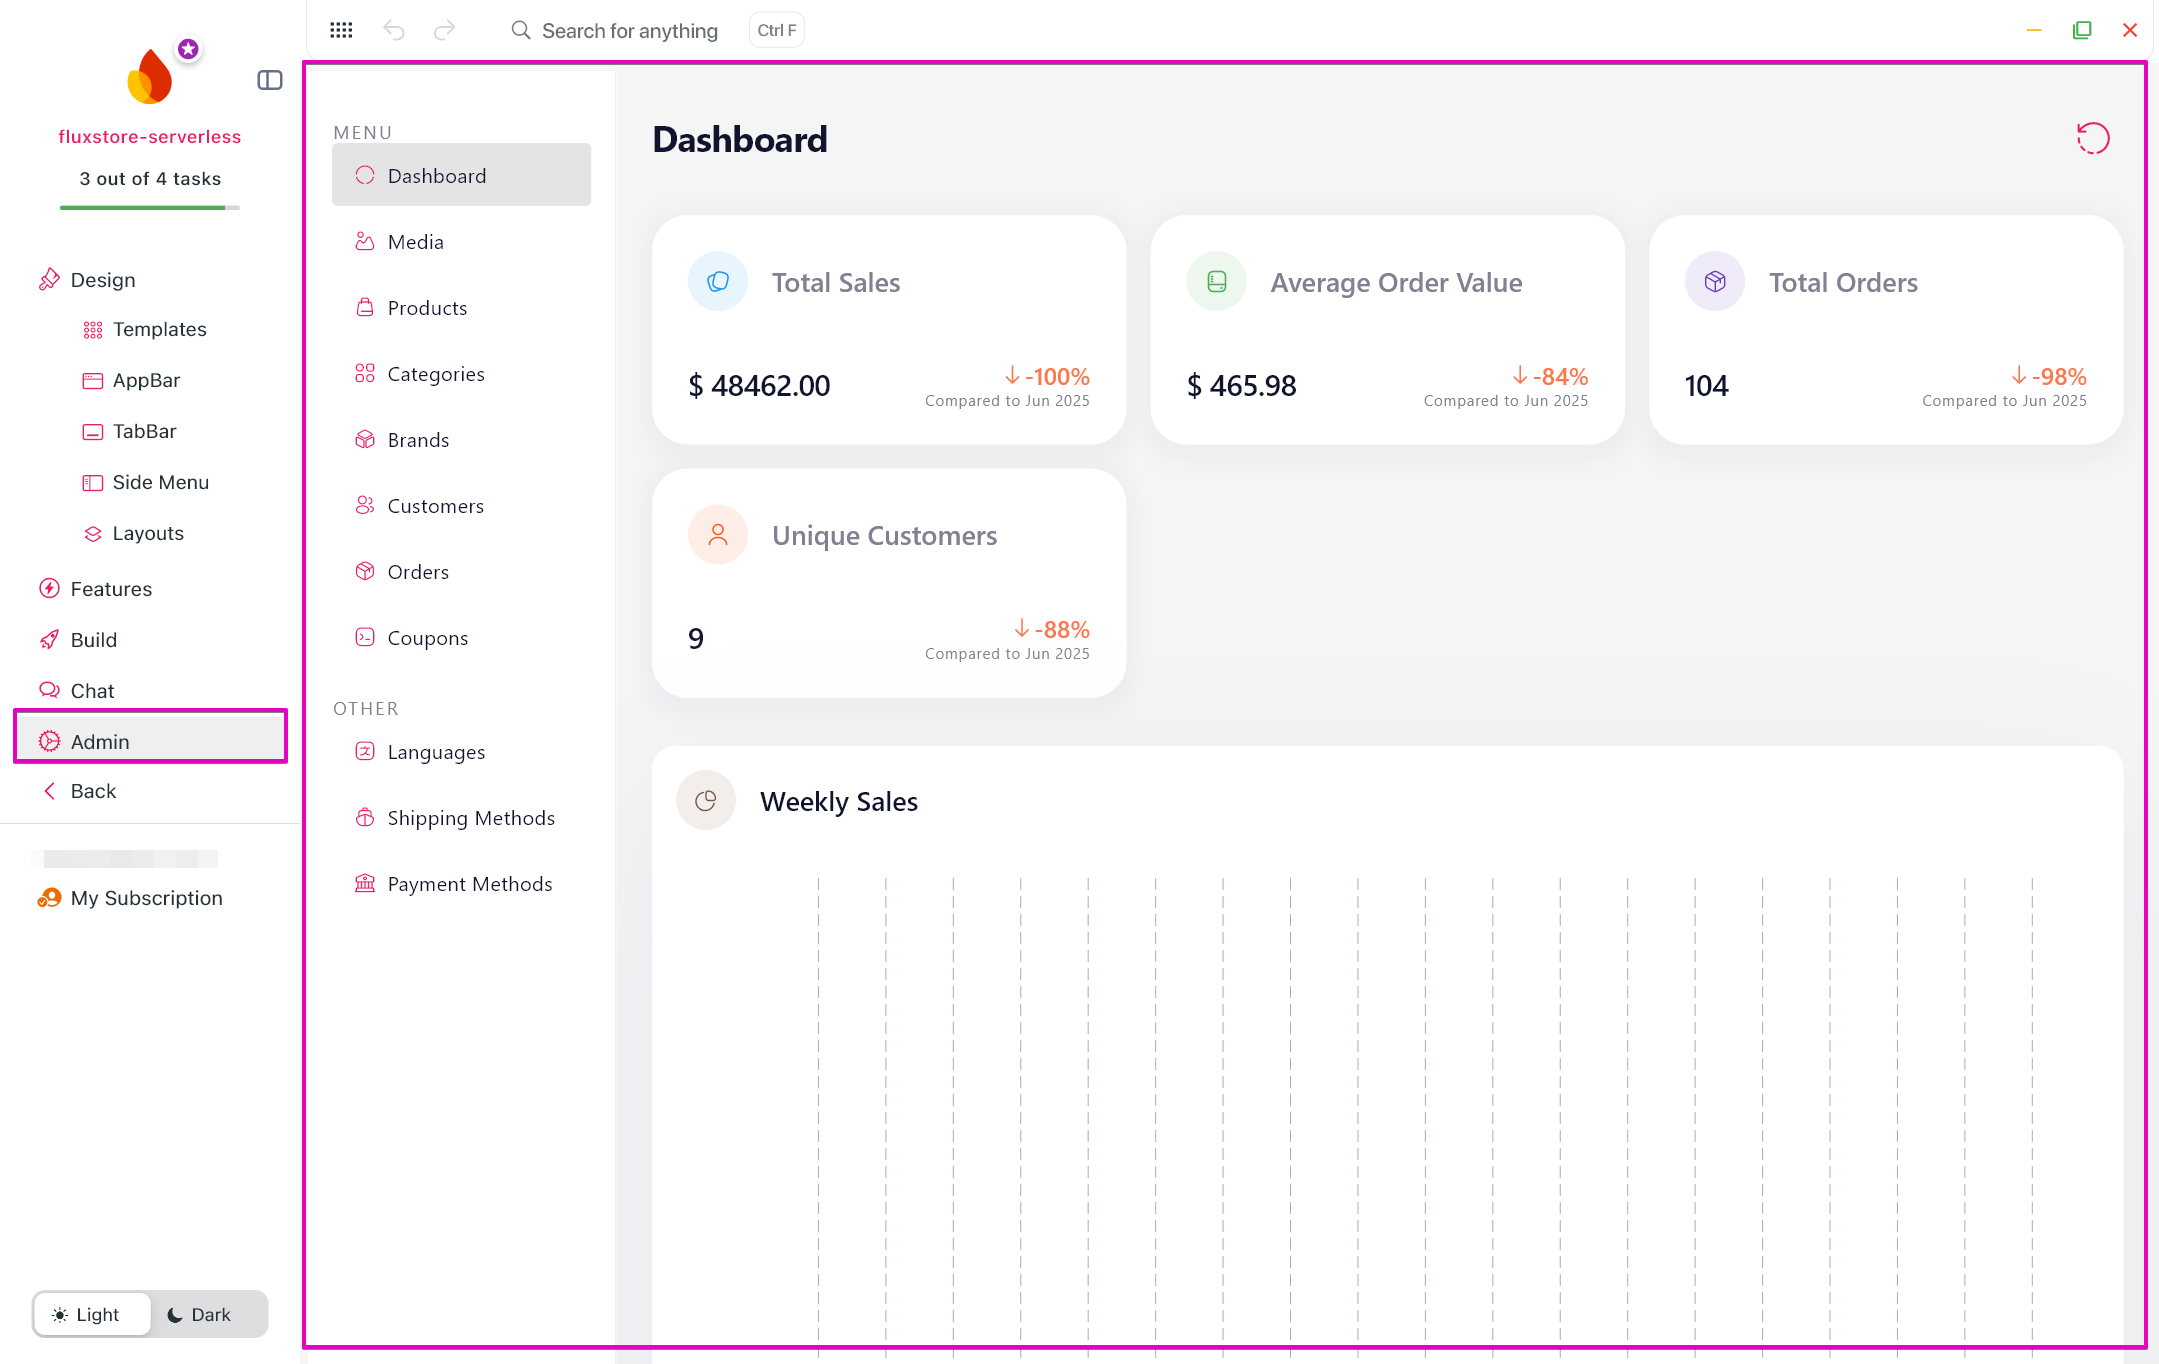
- HTML/CSS App: Create your app directly in FluxBuilder using HTML/CSS code, without needing a website URL.
- Notion App: Use Notion as your app's database to store and manage your data without setting up a website. Then use FluxBuilder to customize and build your app.
Not sure this is you?
If you're planning to use Shopify, WooCommerce, or another platform, create your store/website first, then turn it into a native mobile app with FluxBuilder. Go to Create a Native App for Your Website 🚀
Option 1 - Serverless App
Build your mobile app with a Firebase backend, without needing a website or online store. 👉 Learn more about Serverless App
Follow these steps to take you from connecting your Firebase backend to build and publish apps on the App Store and Google Play:
Step 1: Prepare Your Firebase
- A Google account to create and manage your Firebase project.
- Prepare your app name, logo, and basic information.
Step 2: Create an app project
Follow this step-by-step guide to create a new serverless app using FluxBuilder. This setup allows you to launch a fully functional app powered by cloud services—no backend coding required.
After finish the guide, now your app project has been created successfully and this is the FluxBuilder editor:
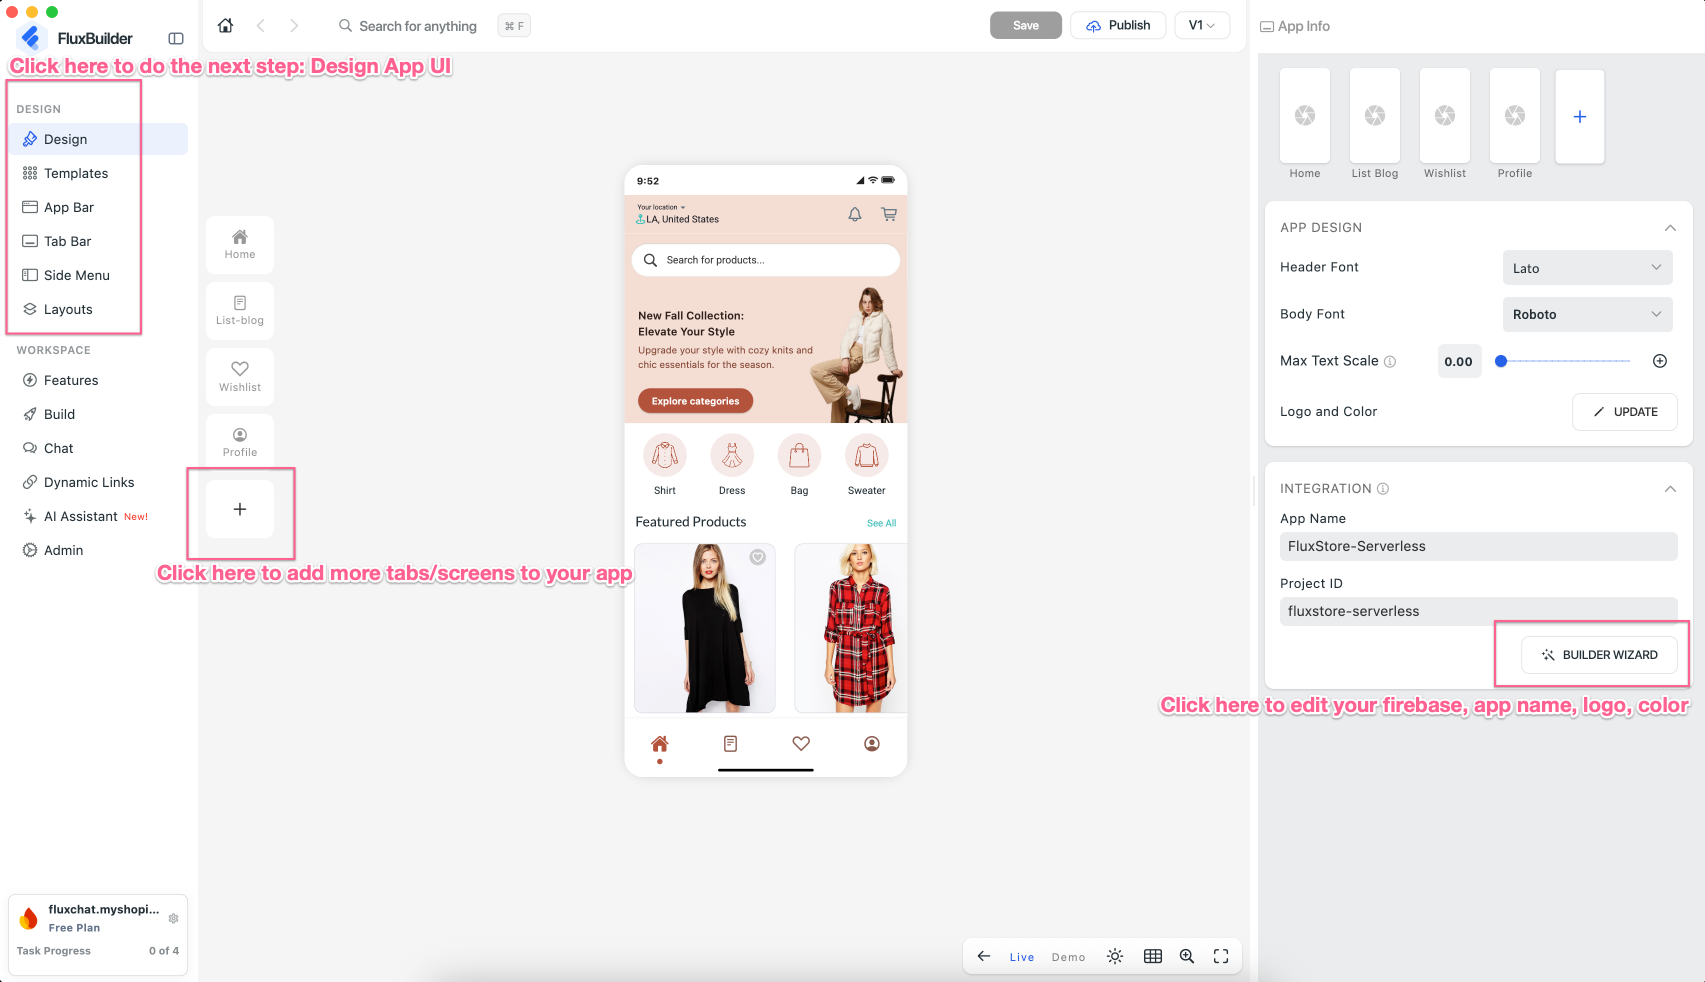
Step 3: Customize your app
Customize your app’s UI and features by drag-and-drop on FluxBuilder to create an experience that fits your needs.
👉 Learn how to customize your app
Step 4: Build Apps and Release
Once your app UI and features are ready, it’s time to build, test, and release your app.
- Generate Demo App for Free and test on phone.
- Build and Publish Apps on both Google Play and App Store.
🎉 You’re all set! Your app is ready to launch.
Option 2 - HTML/CSS App
Build your mobile app directly with HTML/CSS in FluxBuilder, without needing a website or online store.
Follow these steps to build and publish apps on the App Store and Google Play:
Step 1: Preparation
- Basic HTML/CSS knowledge.
- Prepare your app name, logo, basic information, app content.
Step 2: Create an app project
Create a new app project in FluxBuilder. Follow this guide to install and run FluxBuilder in your devices successfully.
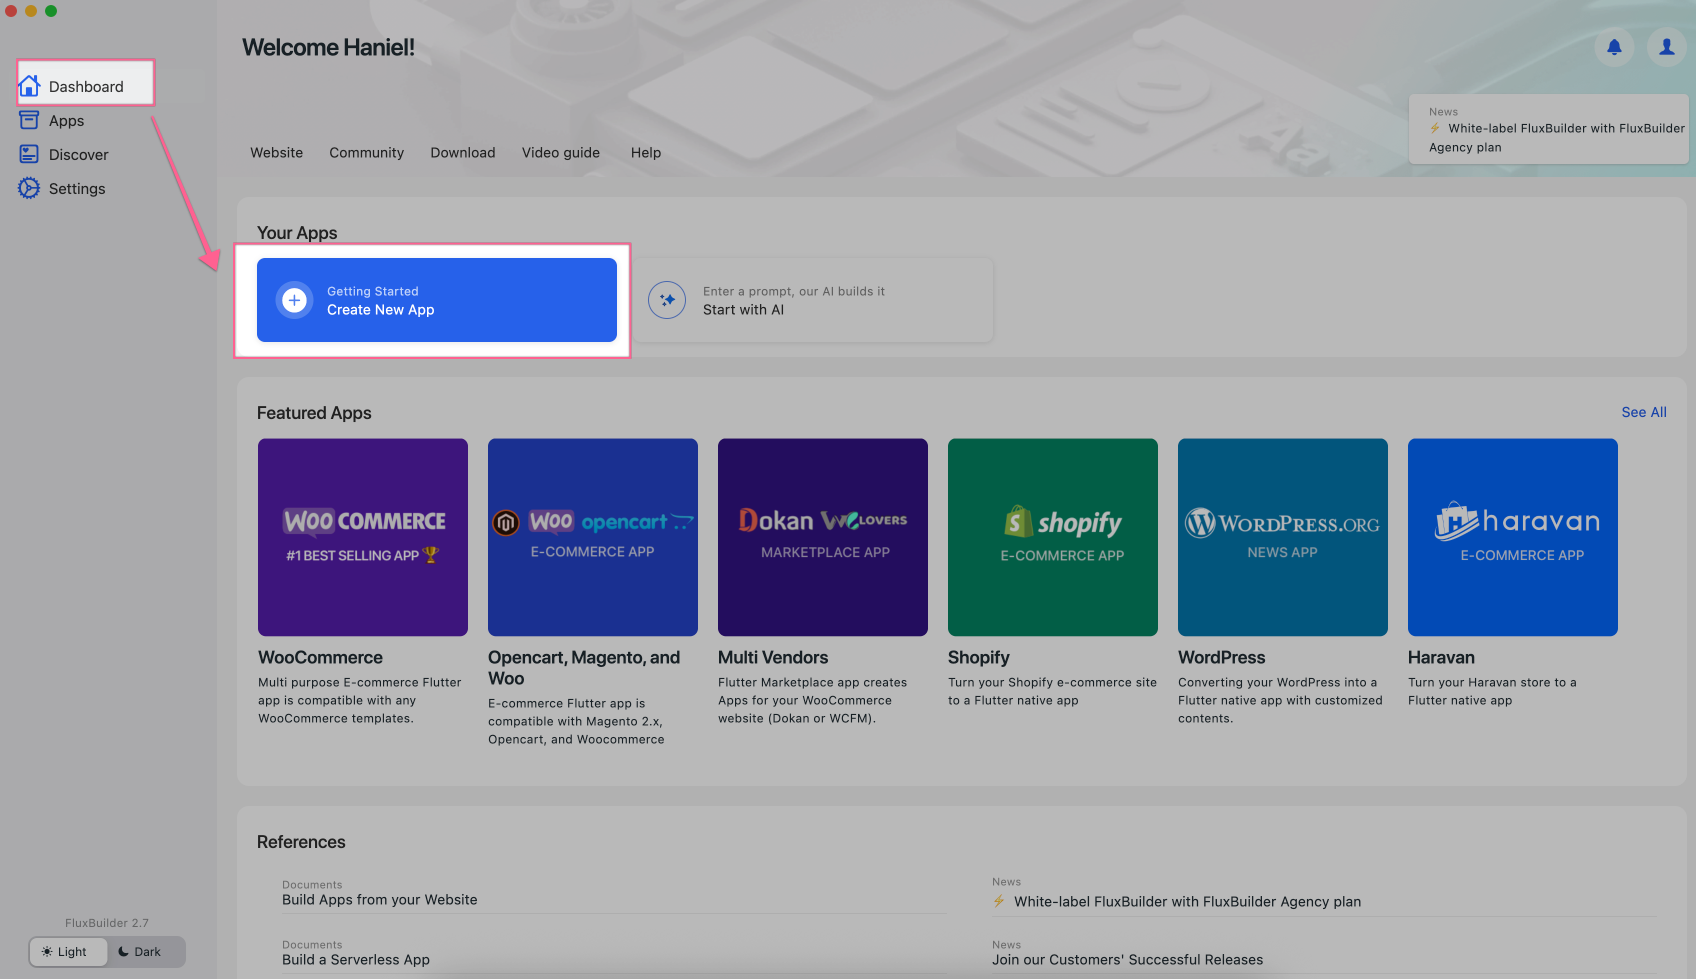
✨ If using the FluxBuilder Desktop version, open FluxBuilder, then select Dashboard > choose Create New App:
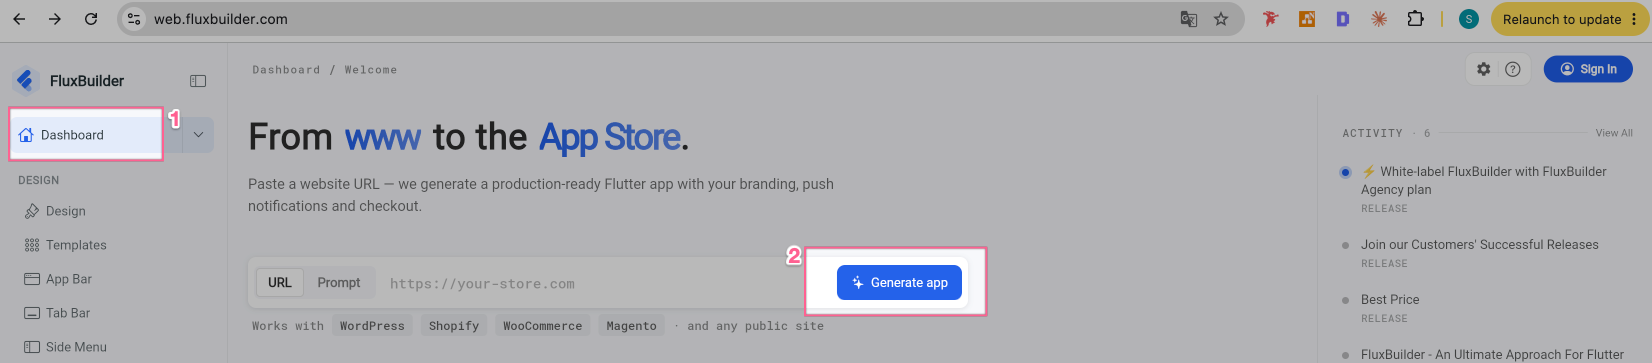
✨ If using the FluxBuilder Web version https://web.fluxbuilder.com : select Dashboard, and click Generate App:
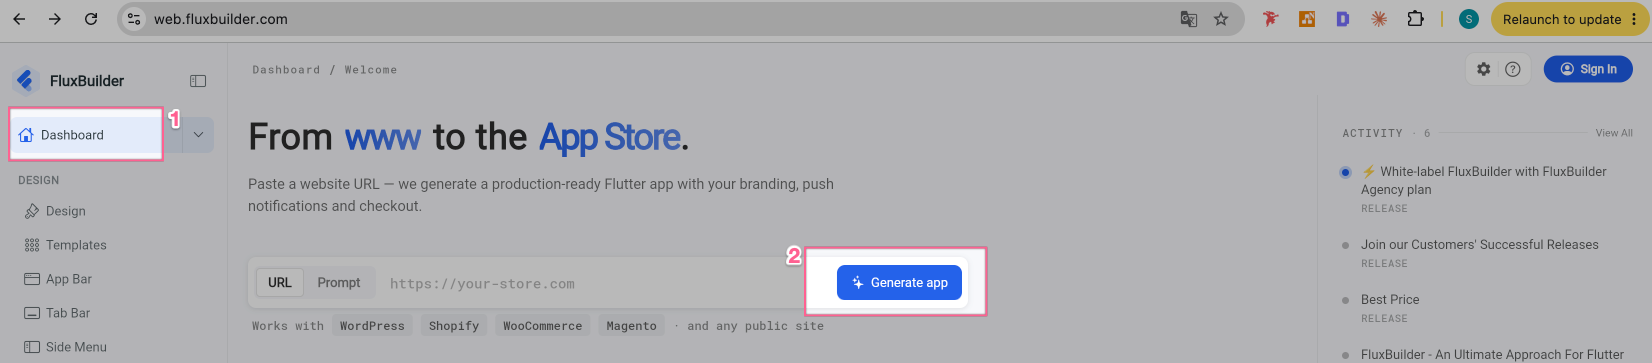
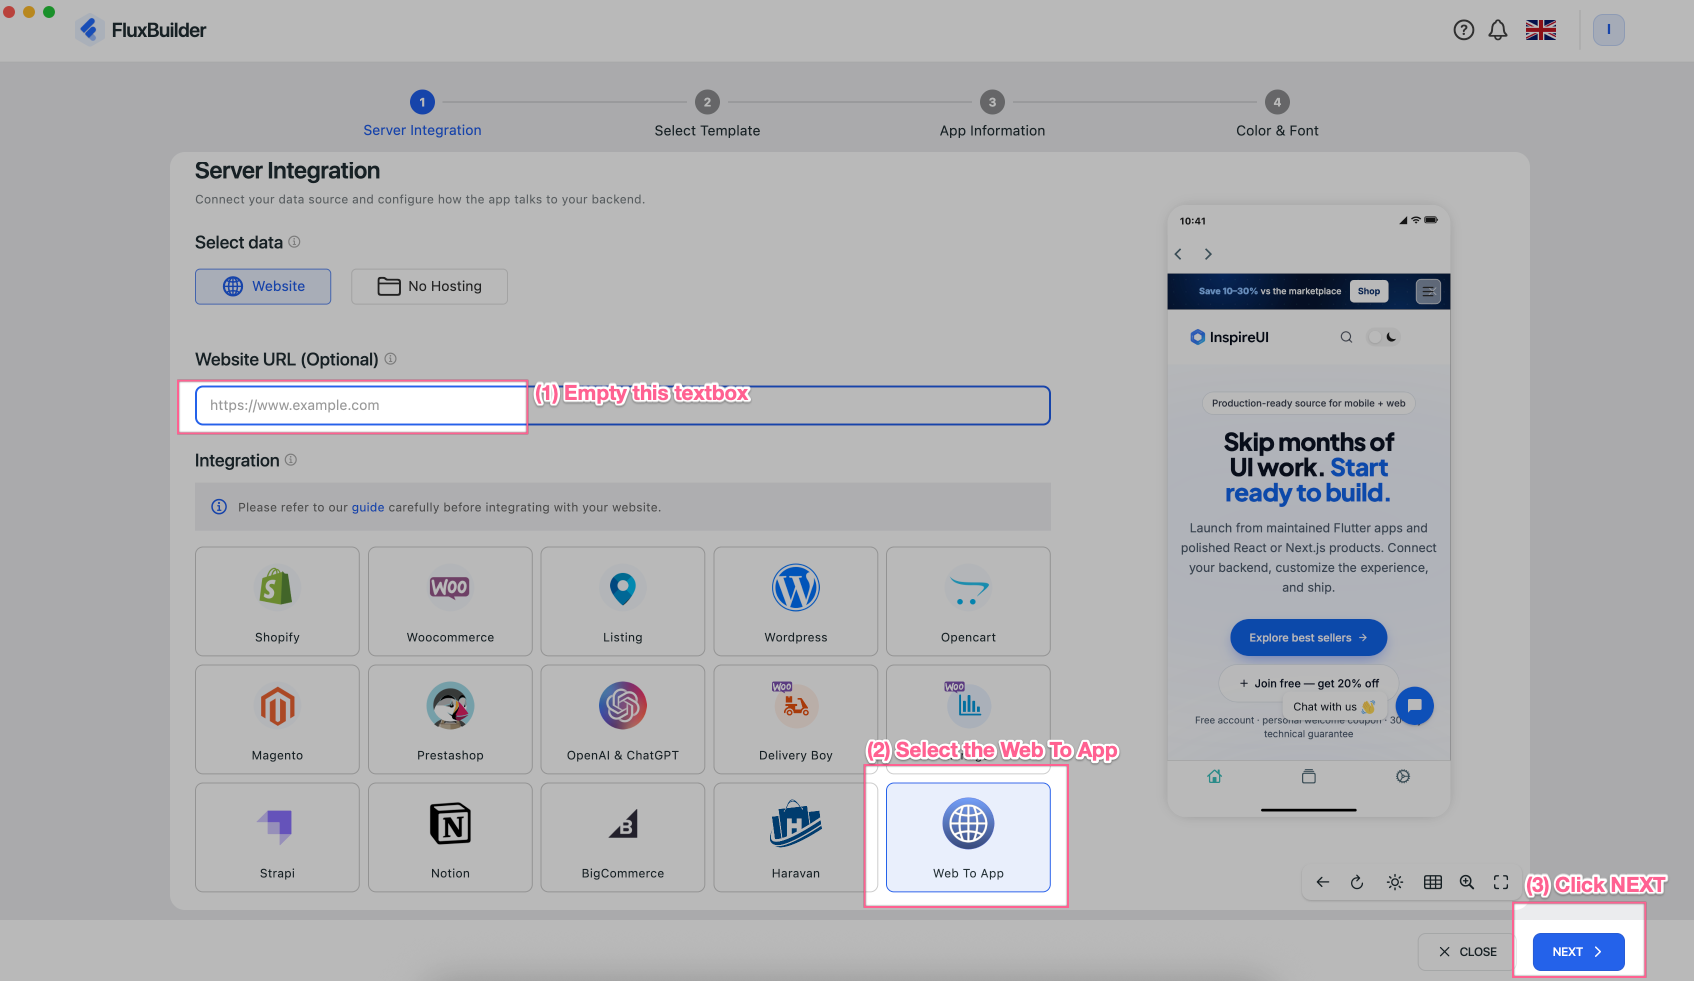
Then empty the Website URL textbox. Select Web To App and NEXT button:
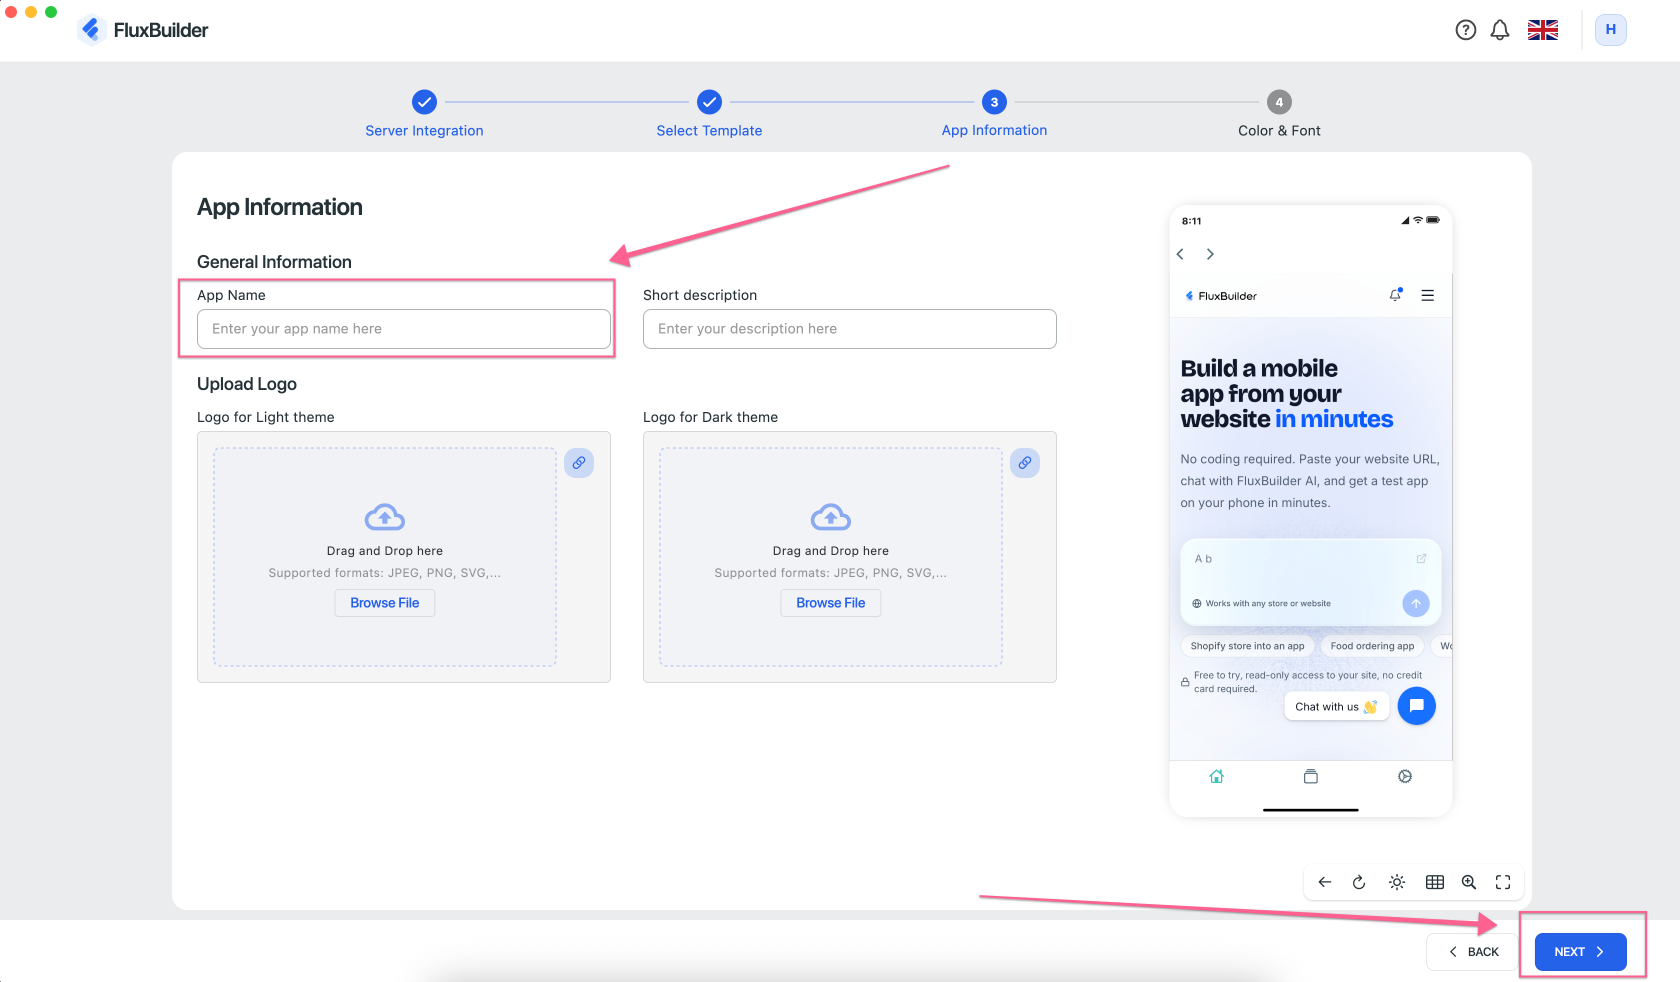
Click NEXT twice to open the App Information screen:
App Name(required): Enter the name of your App.Short Description(optional): Enter a brief description of your app.Upload Logo(optional): Upload your app logo for both Light and Dark themes. You can change it later.
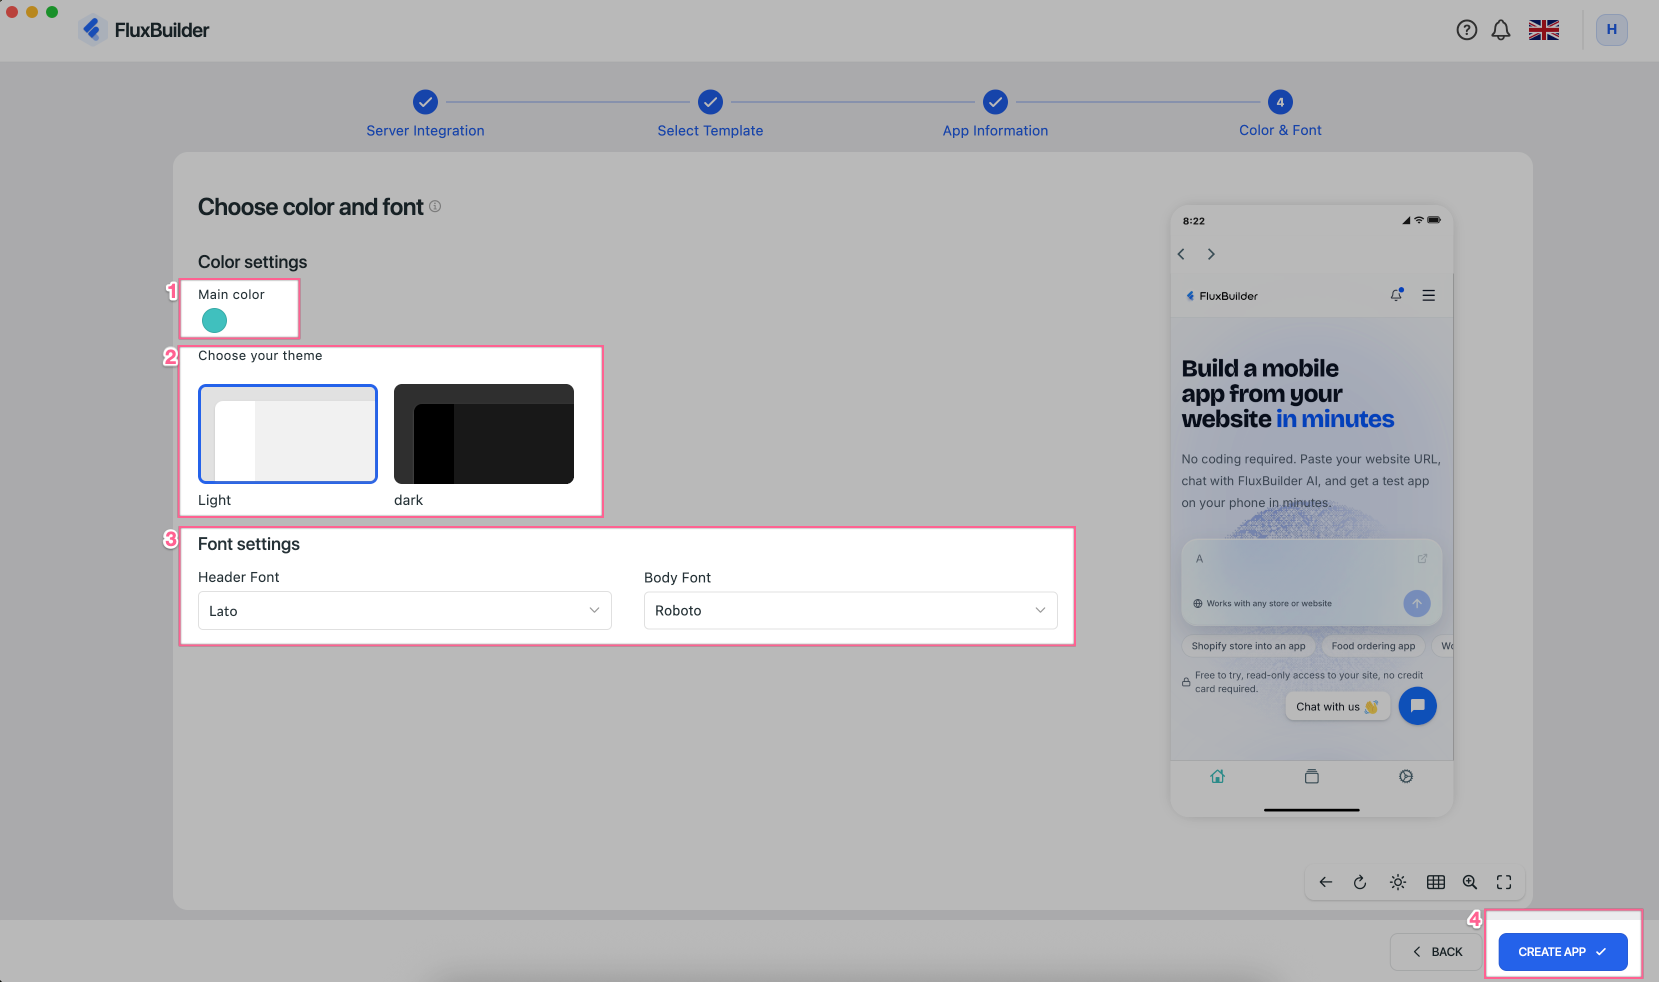
Choose a color, font, and default Light/Dark theme (optional — you can edit these settings later). Then click CREATE APP :
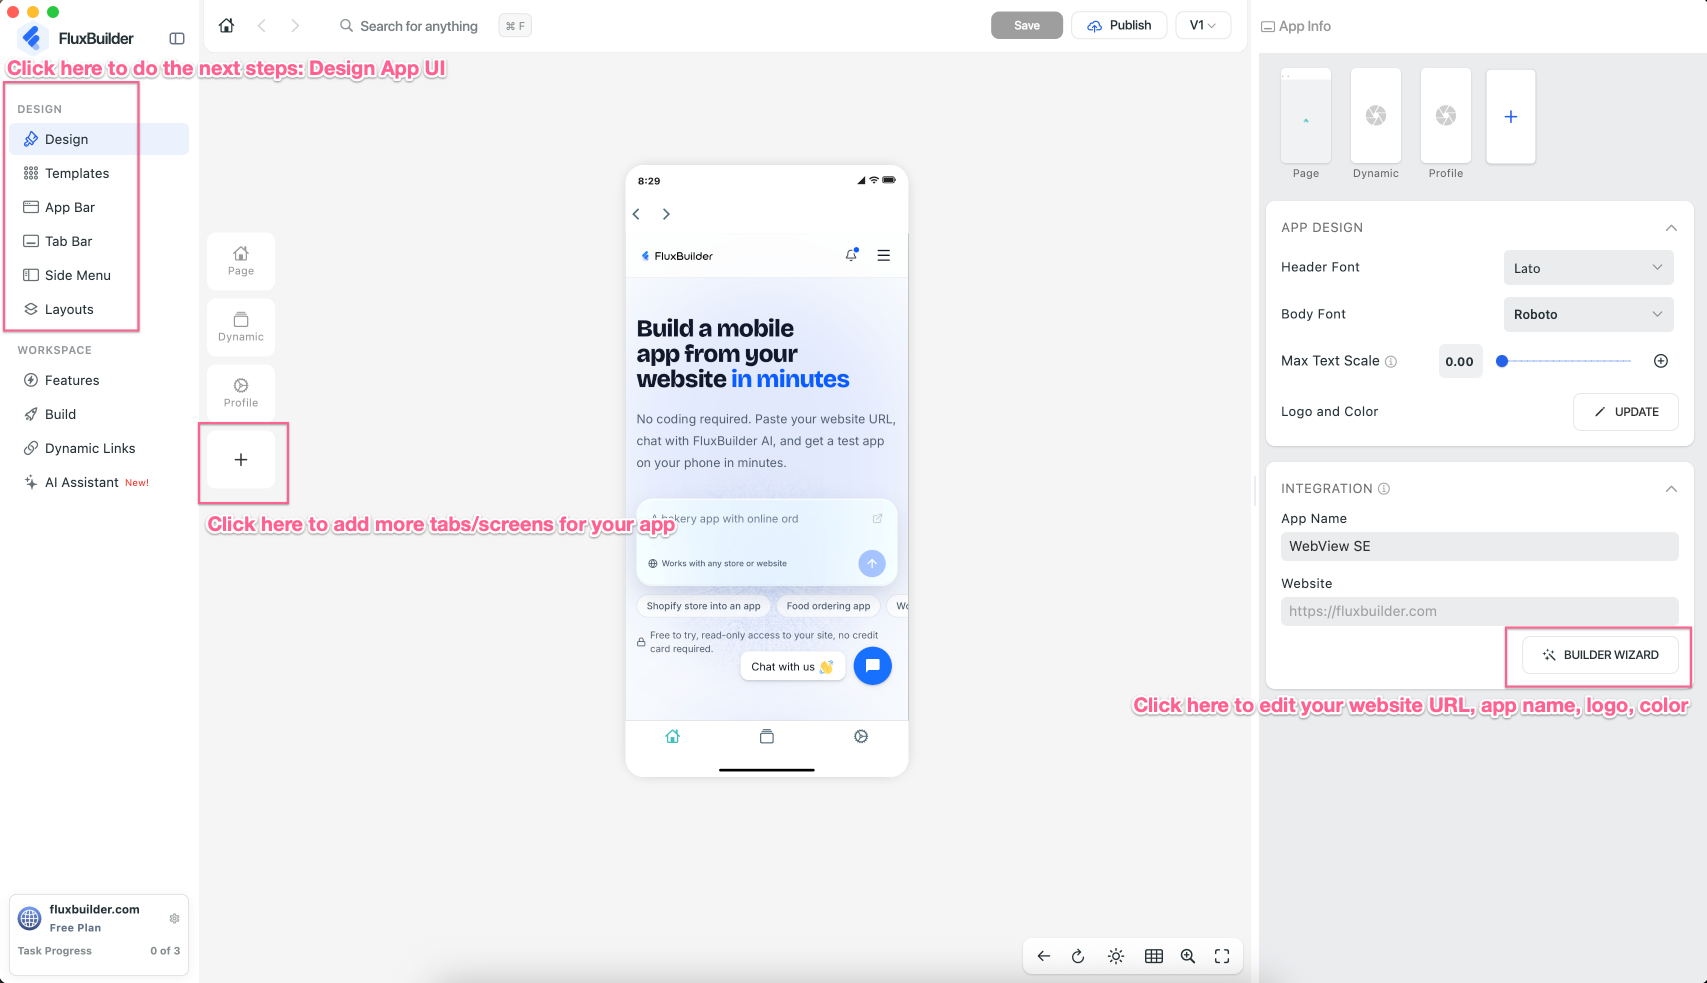
Your app project has been created successfully and this is the FluxBuilder editor:
Step 3: Customize your app
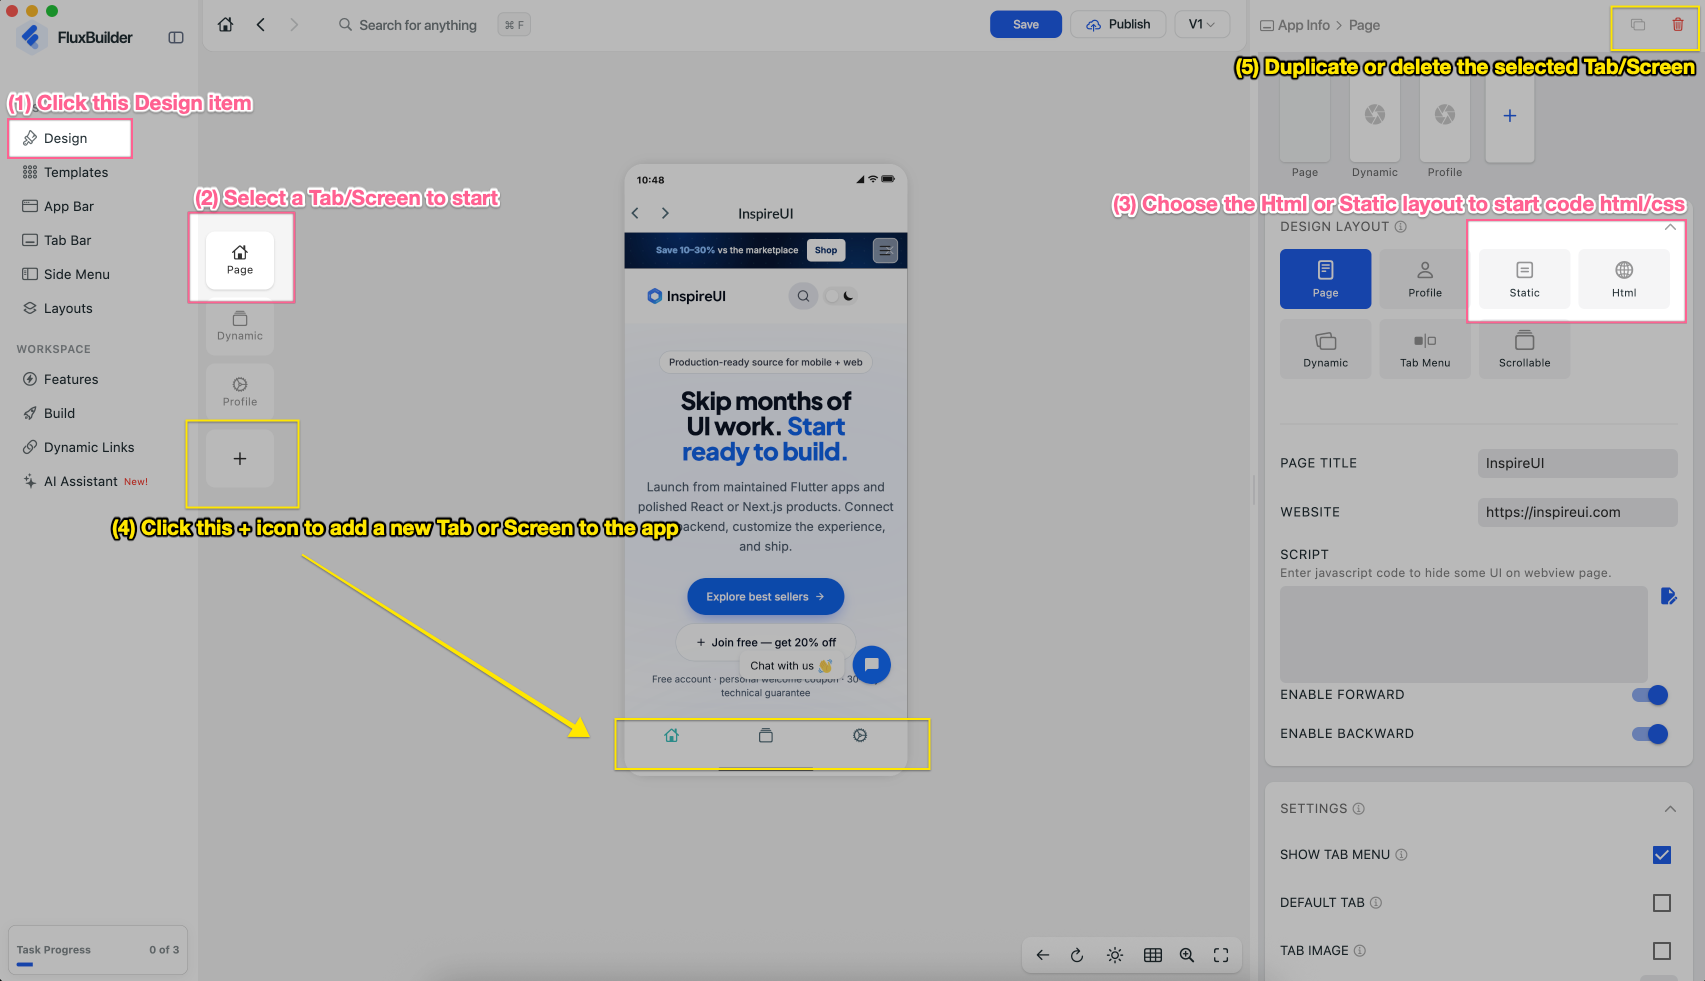
(1) Click Design → (2) Click a Tab/Screen to start → (3) Choose the Html or Static layout to start code Html/css → (4) Click the + icon to add a new Tab/Screen → (5) Click the Duplicate or Delete icon to manage the selected Tab/Screen:
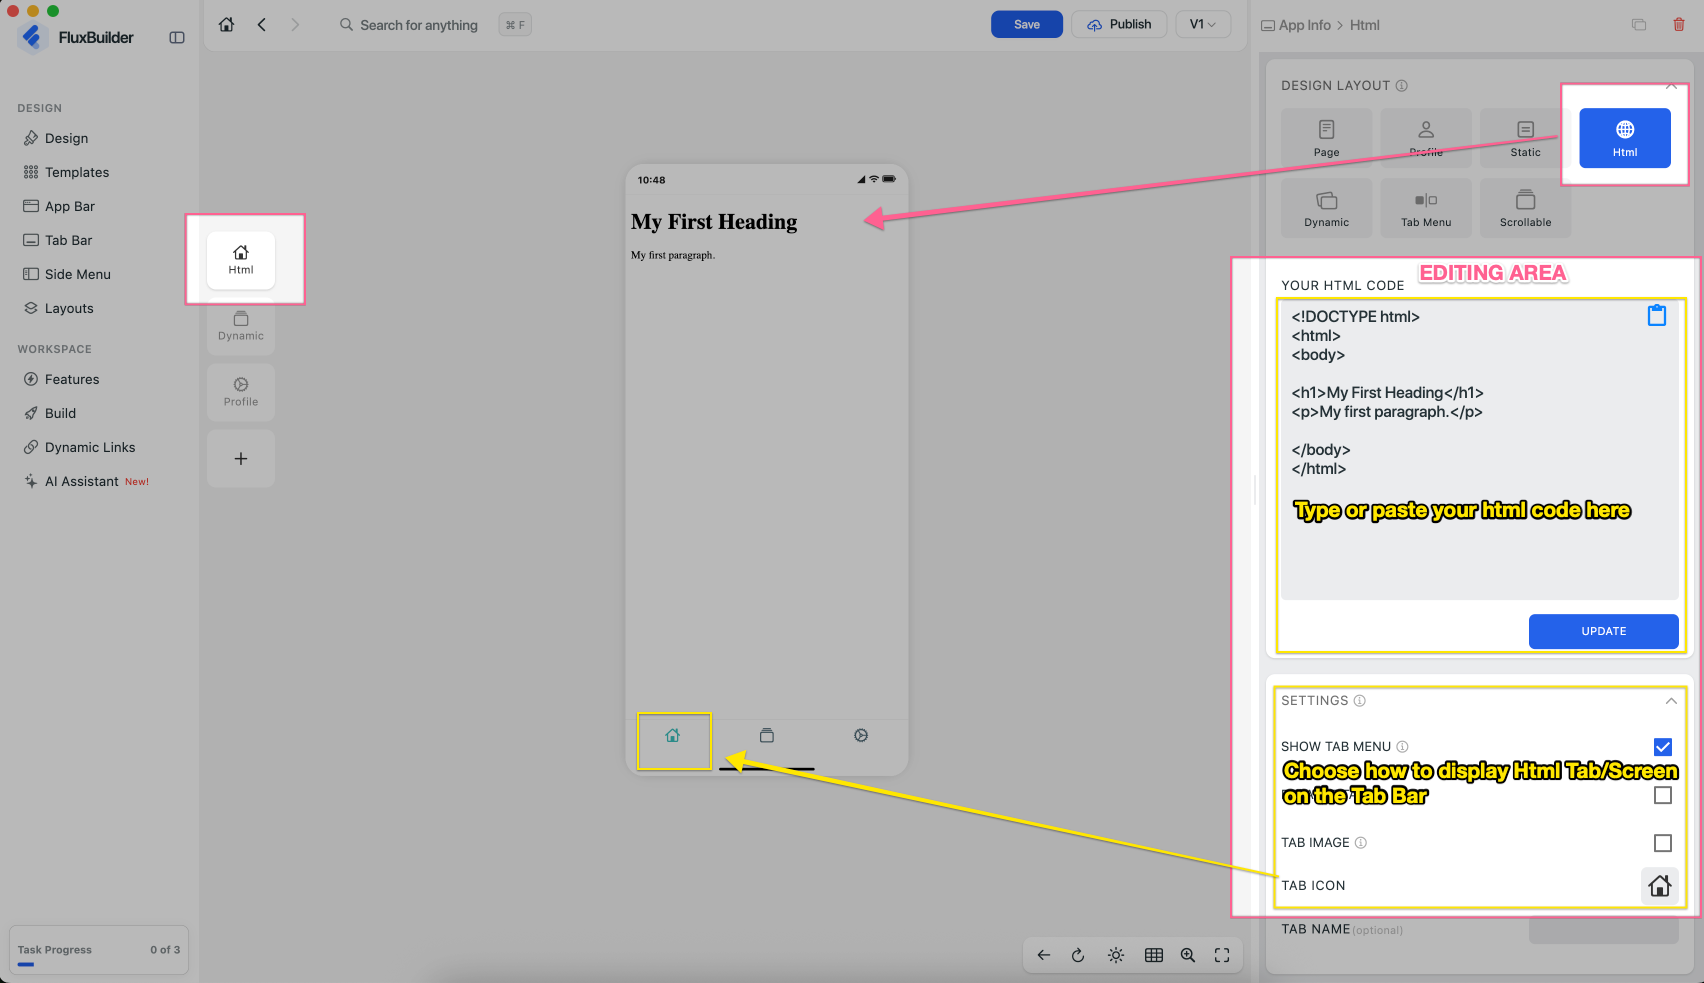
At (3), when choosing the Html layout, the selected Tab/Screen will change to Html and now you can code anything to display on your app:
After that, customize your app’s UI and features by drag-and-drop on FluxBuilder to create an experience that fits your needs.
👉 Learn how to customize your app
Step 4: Build Apps and Release
Once your app UI and features are ready, it’s time to build, test, and release your app.
- Generate Demo App for Free and test on phone.
- Build and Publish Apps on both Google Play and App Store.
🎉 You’re all set! Your app is ready to launch.
Option 3 - Notion App
Build your mobile app from your Notion workspace using FluxBuilder, without needing a website or online store.
Follow these steps to build and publish apps on the App Store and Google Play:
Step 1: Prepare Notion
- Set up a Notion integration for use with FluxBuilder
- Prepare your app name, logo, and basic information.
Step 2: Create an app project
Create a new app project in FluxBuilder. Follow this guide to install and run FluxBuilder in your devices successfully.
✨ If using the FluxBuilder Desktop version, open FluxBuilder, then select Dashboard > choose Create New App:
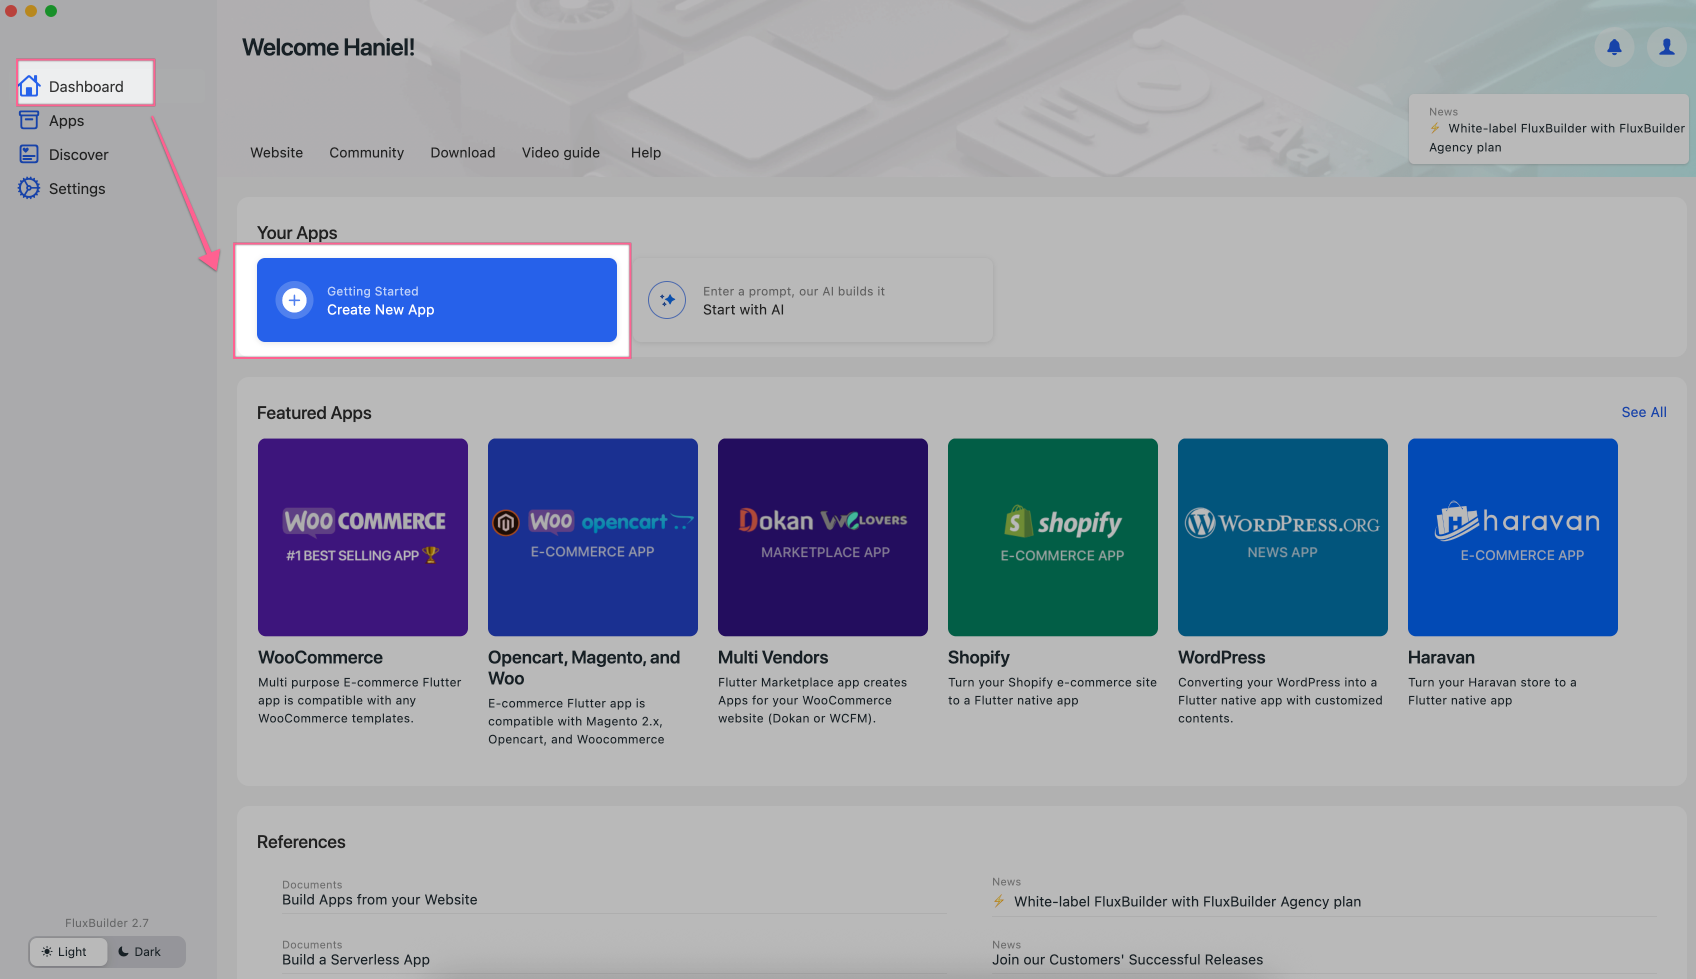
✨ If using the FluxBuilder Web version https://web.fluxbuilder.com : select Dashboard, and click Generate App:
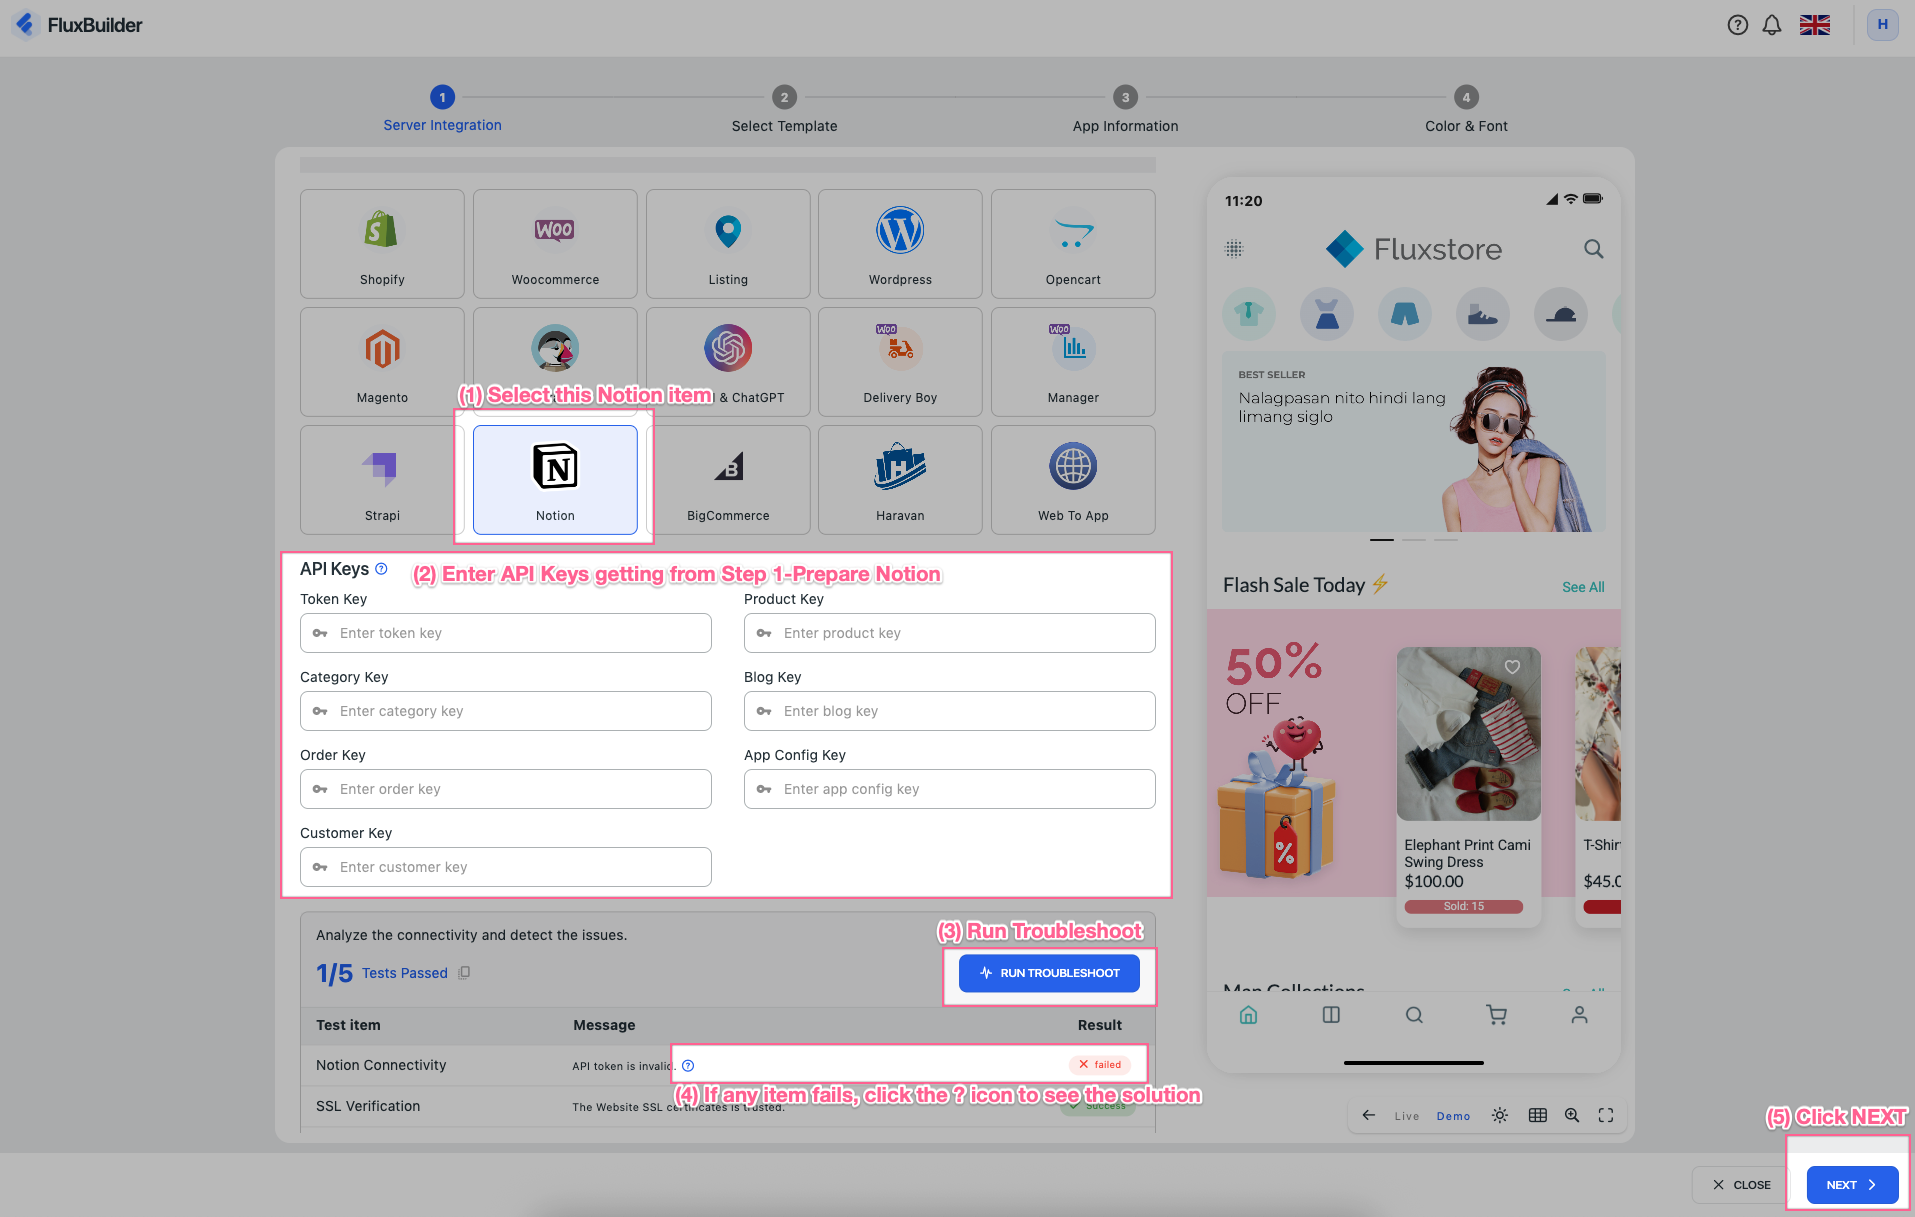
Then, (1) Scroll down and select Notion → (2) Enter the API Keys using the information from “Step 1: Prepare Notion” → (3) Click RUN TROUBLESHOOT → (4) If any item fails, click the ? icon to see how to fix it → (5) Select NEXT:
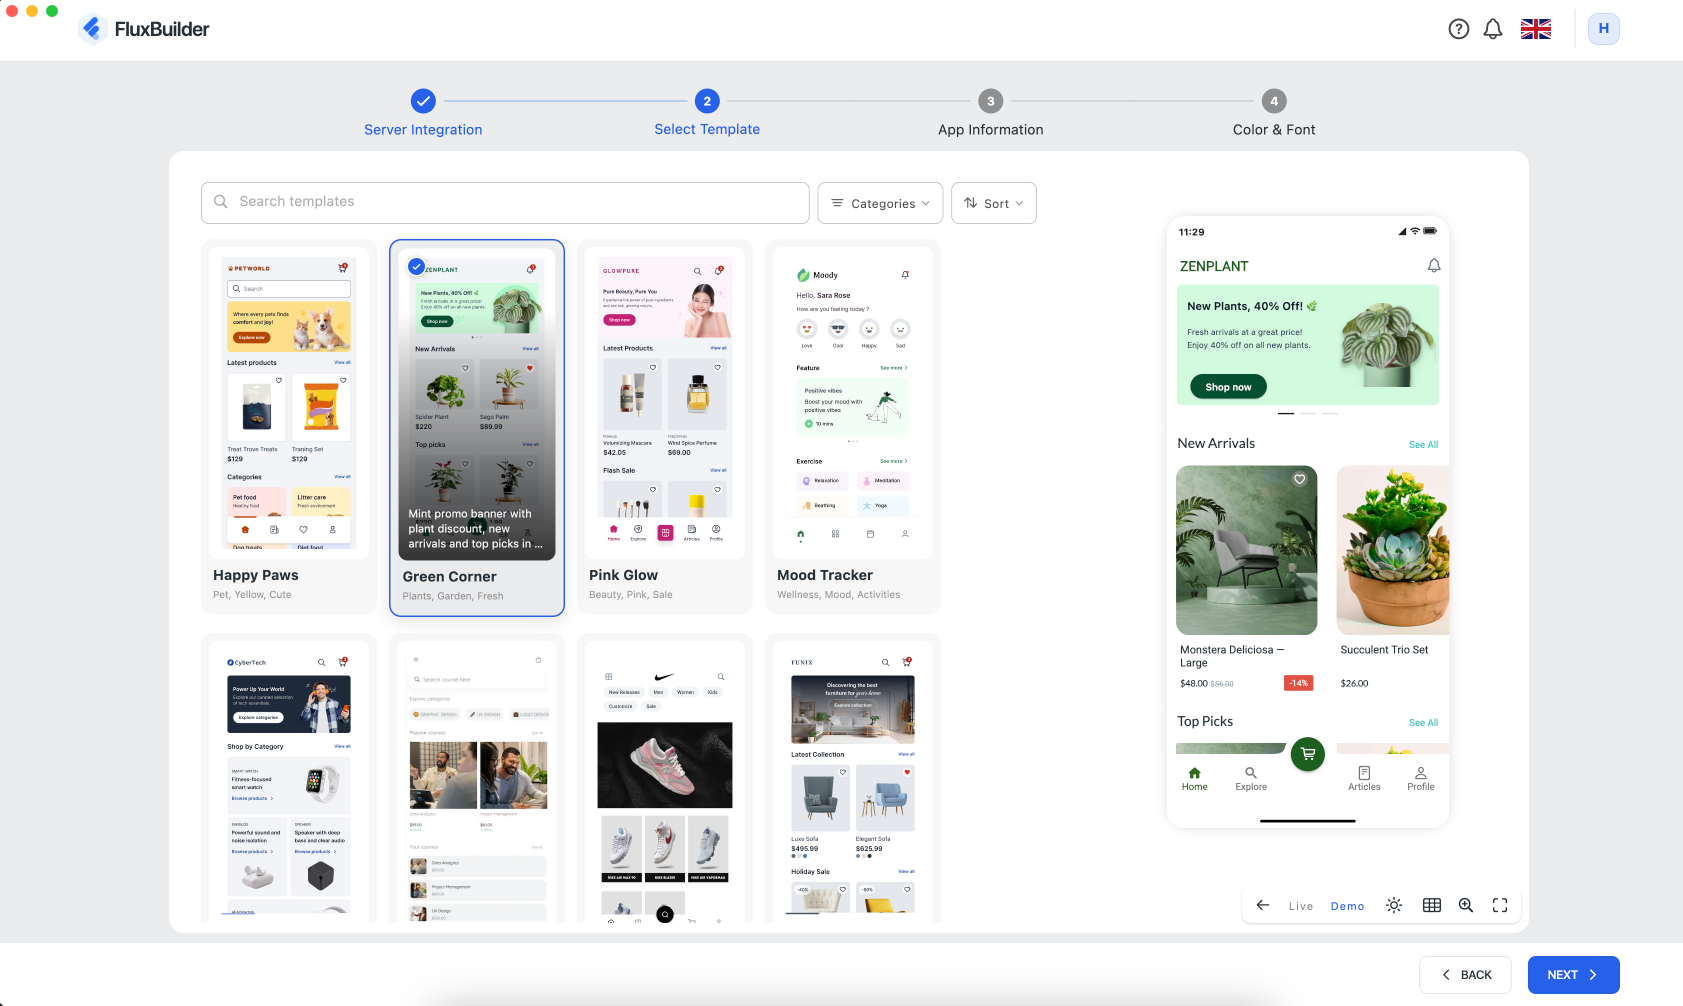
Select a Template and click NEXT:
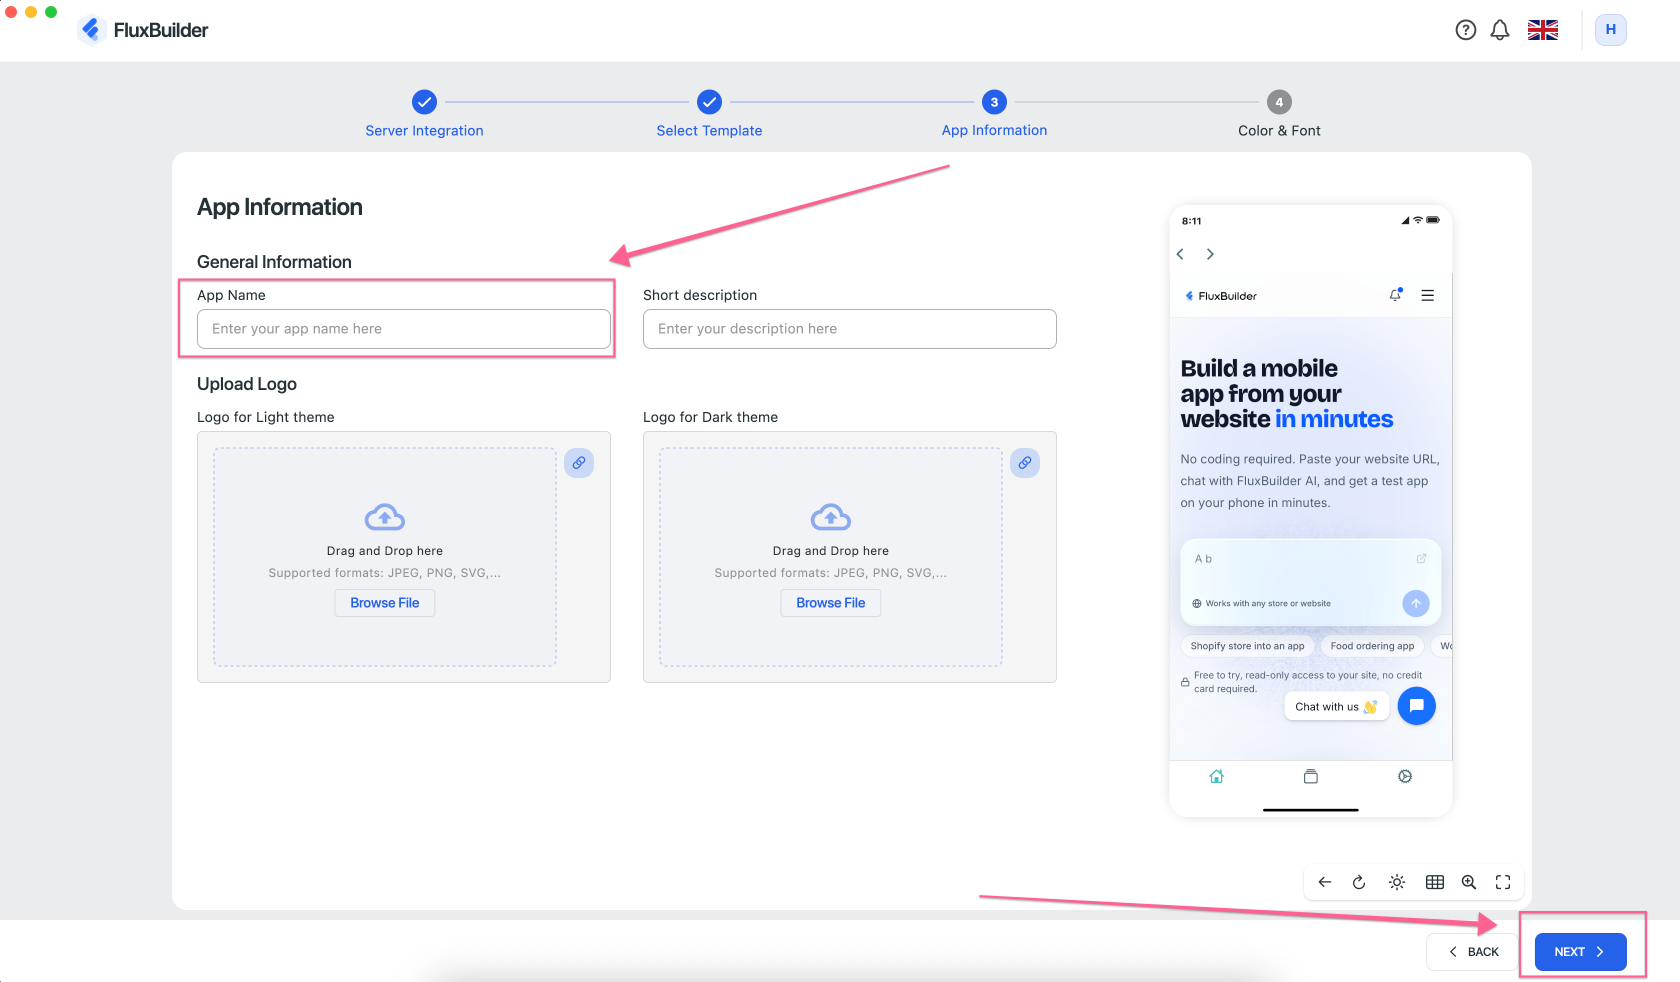
Next, enter your app information:
App Name(required): Enter the name of your App.Short Description(optional): Enter a brief description of your app.Upload Logo(optional): Upload your app logo for both Light and Dark themes. You can change it later.
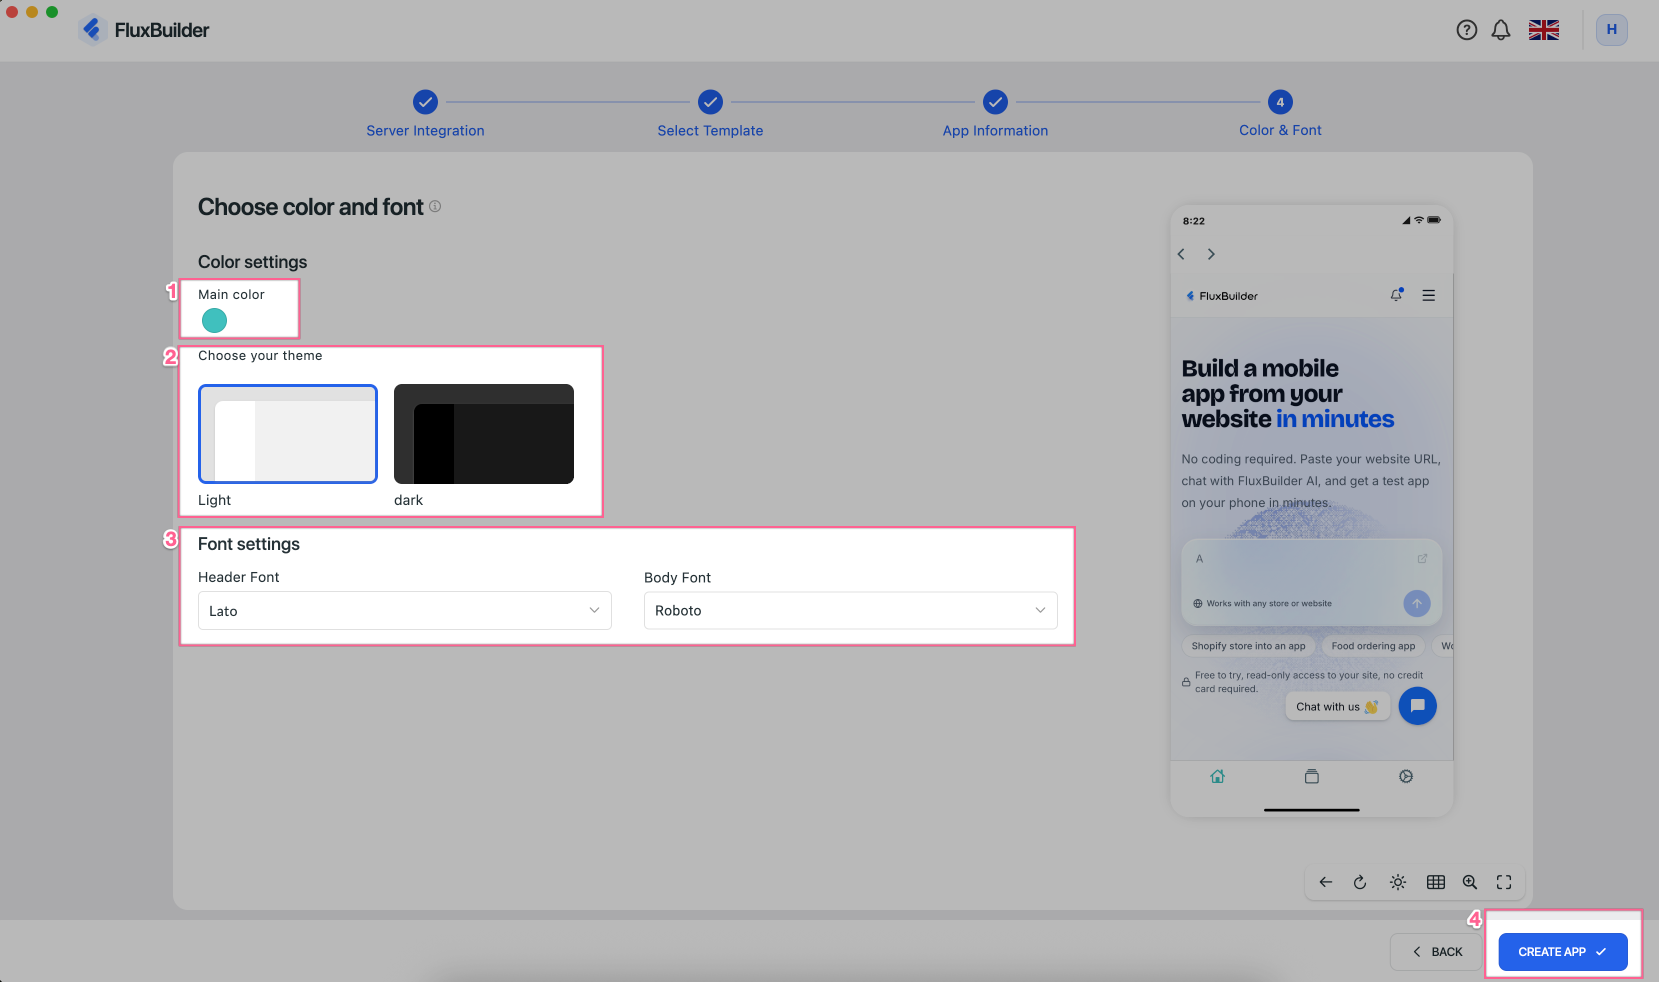
Choose a color, font, and default Light/Dark theme (optional — you can edit these settings later). Then click CREATE APP :
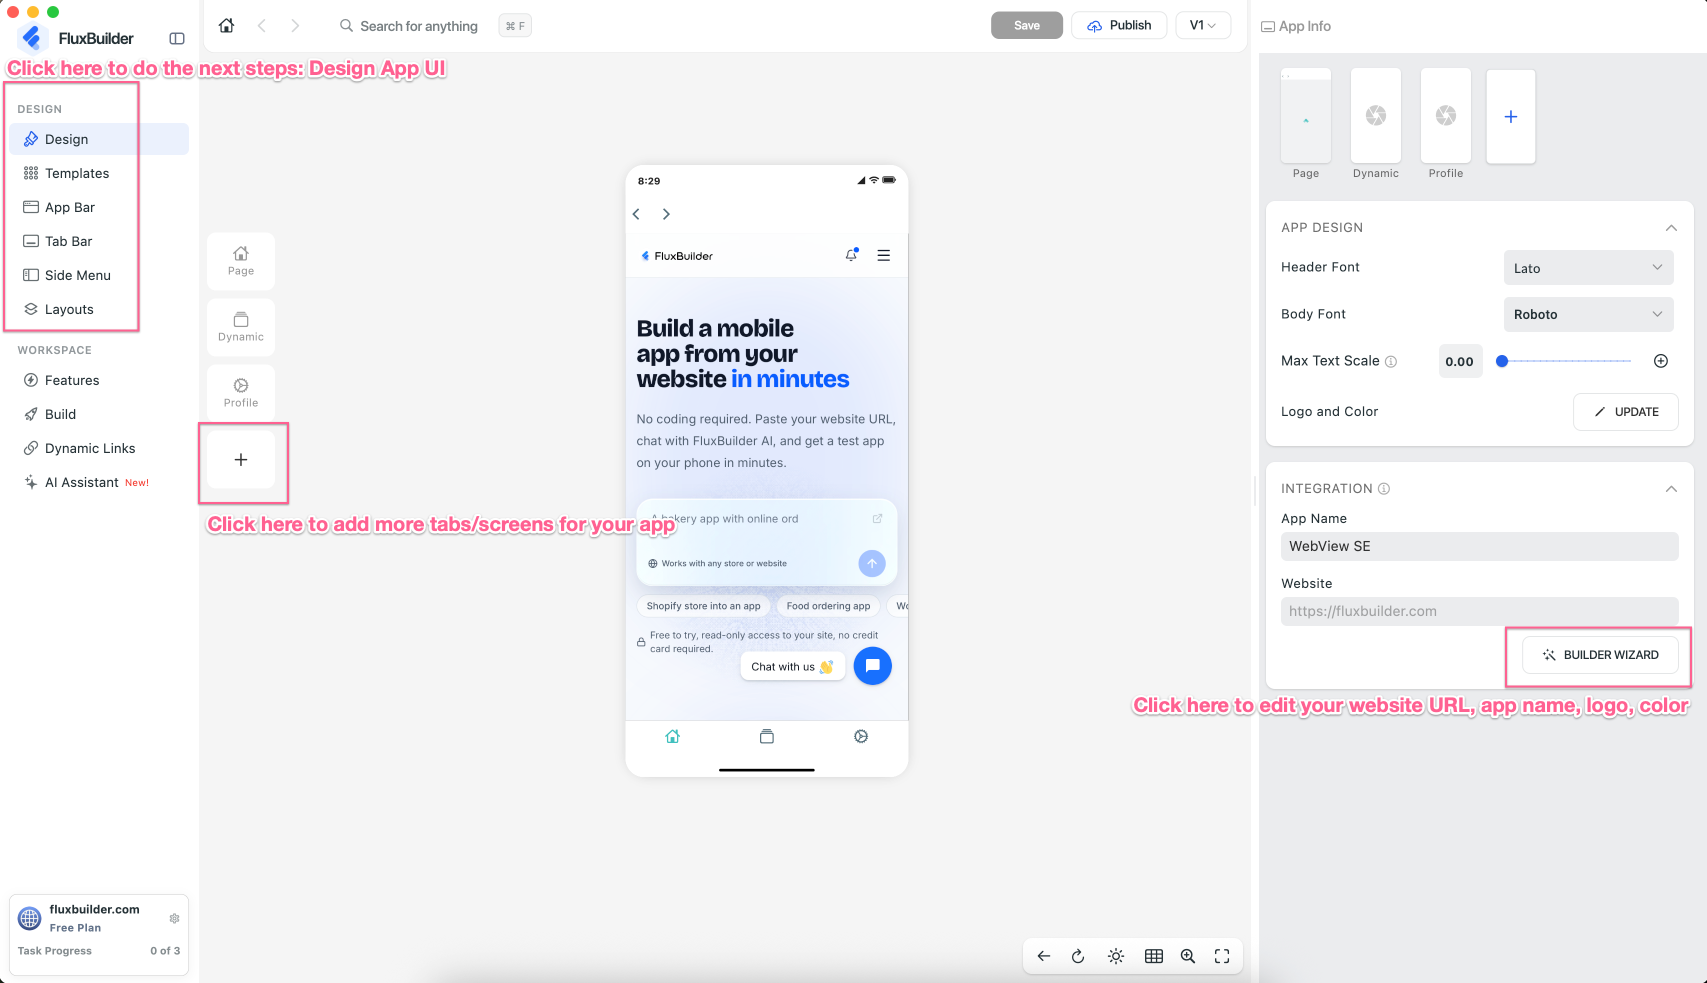
Your app project has been created successfully and this is the FluxBuilder editor:
Step 3: Customize your app
Customize your app’s UI and features by drag-and-drop on FluxBuilder to create an experience that fits your needs.
👉 Learn how to customize your app
Step 4: Build Apps and Release
Once your app UI and features are ready, it’s time to build, test, and release your app.
- Generate Demo App for Free and test on phone.
- Build and Publish Apps on both Google Play and App Store.
🎉 You’re all set! Your app is ready to launch