Create a Native App for Your Website
Is this you?
- You already run a website or online store.
- You want a full app with your own design, not just a webview app.
- You want Native Apps for iOS, Android, and PWA in Hours - No Coding Required.
Your website is built on one of the following platforms:
- E-commerce site — WooCommerce (single-vendor or multivendor stores using WCFM or Dokan), Shopify, Magento, OpenCart, PrestaShop, BigCommerce, Strapi, or Haravan.
- Listing or Booking site — for properties, businesses, travel, or classifieds, powered by Listeo, MyListing, or ListingPro.
- Delivery Boy and Admin (Manager) apps — for single-vendor or multivendor stores using WCFM or Dokan.
- WordPress site (not e-commerce — recipe, news, music, etc.)
- Want to build AI Assistant apps support ChatGPT & OpenAI.
Not sure what your platform is? Ask whoever manages your website, or check the admin login page — it usually shows the platform name.
All Supported Plugins and the Index of Features 📱 Build Android • iOS • PWA apps
✨ AI-powered app building
⚡ CLI & MCP support
🎨 Drag-and-drop UI design
💳 Support all local payment methods
🔔 Push notifications for Free
Don’t see your payment method? No worries — it’s still supported via WebView payment 💙
Not sure this is you?
Want your website to load inside an app, exactly as it looks now, with no extra design work? Go to Create a WebView App instead.
Don't have a website at all? Go to Create an App Without a Website.
Create with AI
- This guide shows you how to use AI to create and build your Native app faster.
- Choose one of the two methods to create your Native app: “Create with AI” or “Create Manually — Drag & Drop” (below).
Follow these steps to take you from connecting your website to build and publish apps on the App Store and Google Play:
Step 1: Prepare your website
To ensure that all products and images from your website are displayed correctly on your iOS and Android apps and that data stays synchronized, install the required plugins and complete the necessary configurations on your website.
Pick one guide that matches your site:
- WooCommerce API Setup Guide
- Shopify Access Token Guide
- Opencart API Setup Guide
- Magento API Setup Guide
- PrestaShop API Setup Guide
- Strapi API Setup Guide
- Listing API Setup Guide
- Delivery Boy API Setup Guide
- Admin (Manager) API Setup Guide
- WordPress API Setup Guide — for WordPress site (not e-commerce — recipe, news, music, etc.)
- OpenAI- Setup Supabase Server — want to build AI Assistant apps support ChatGPT & OpenAI.
- Other sites do not require installing API.
Step 2: Create an app project
Create a new app project in FluxBuilder. Follow this guide to install and run FluxBuilder in your devices successfully.
✨ If using the FluxBuilder Desktop version, open FluxBuilder, then select Dashboard > choose Start with AI:
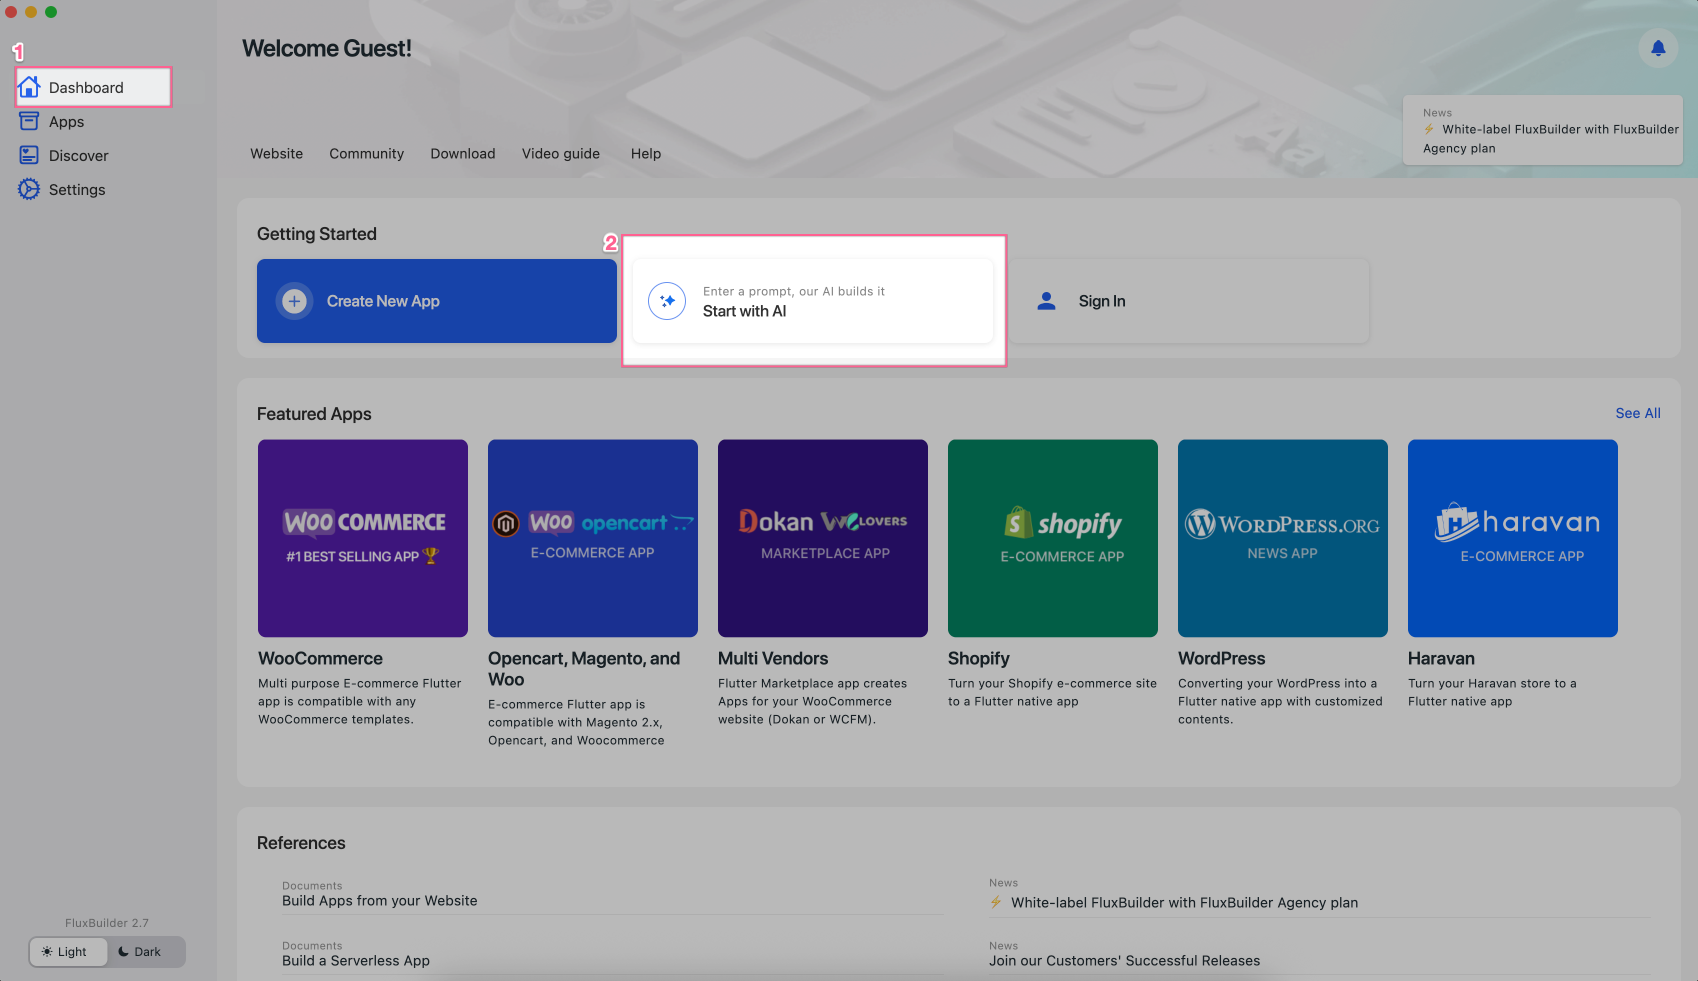
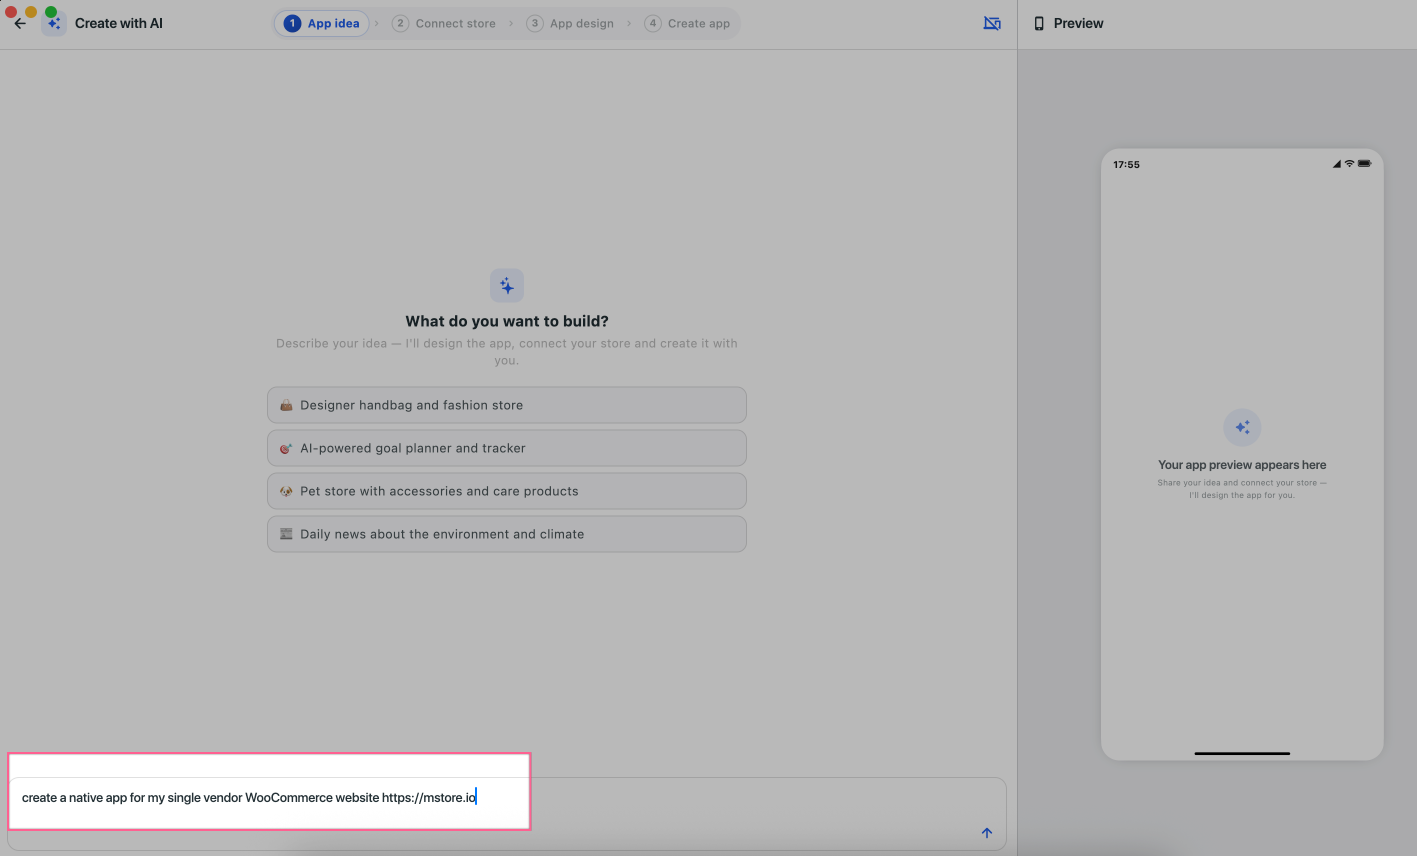
Type your request and press ENTER: (e.g., create a native app for my single-vendor WooCommerce website https://mstore.io )
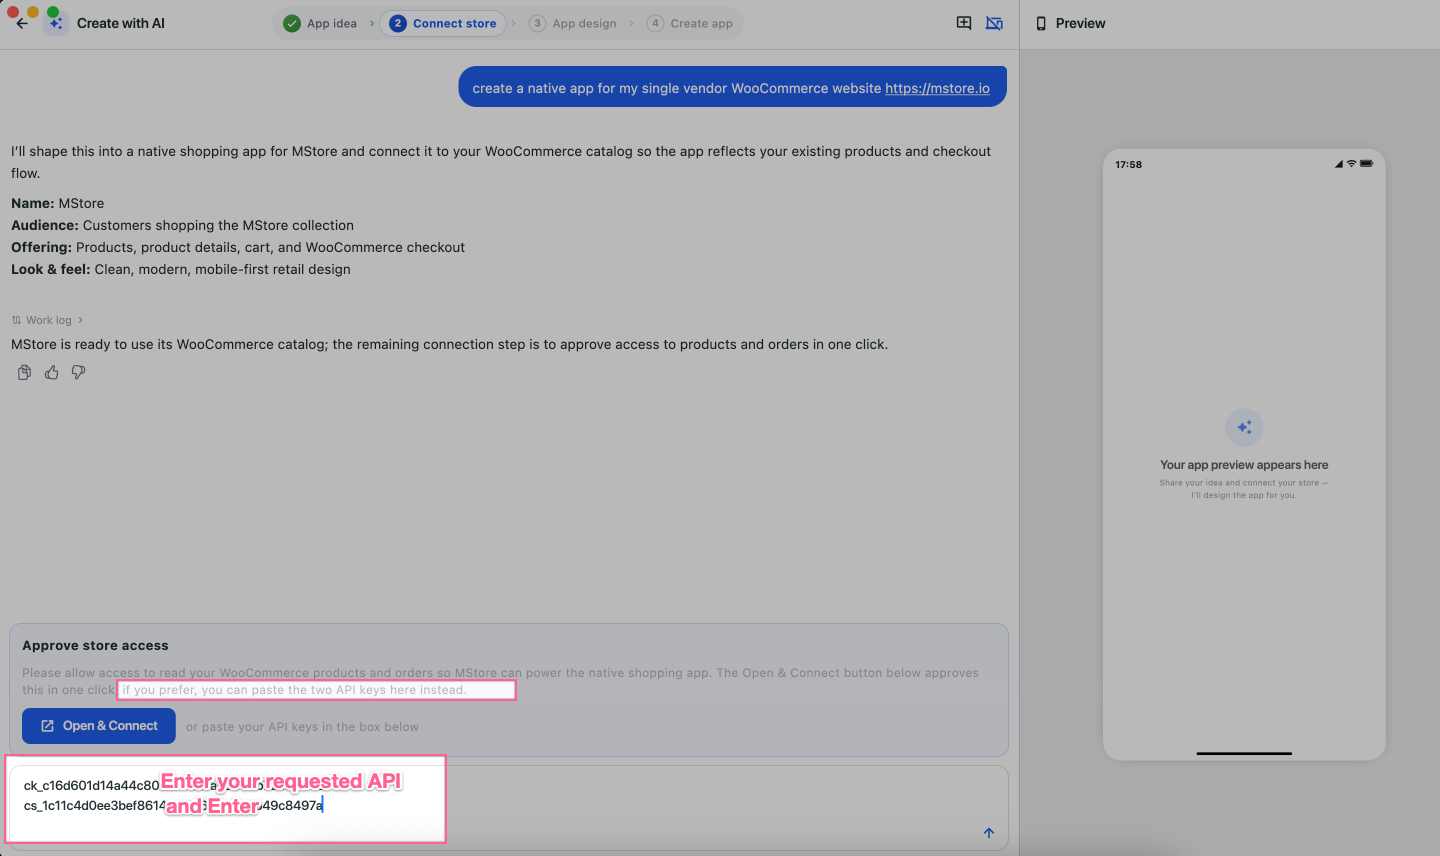
Enter your Key APIs (getting from Step 1 above) if they are requested:
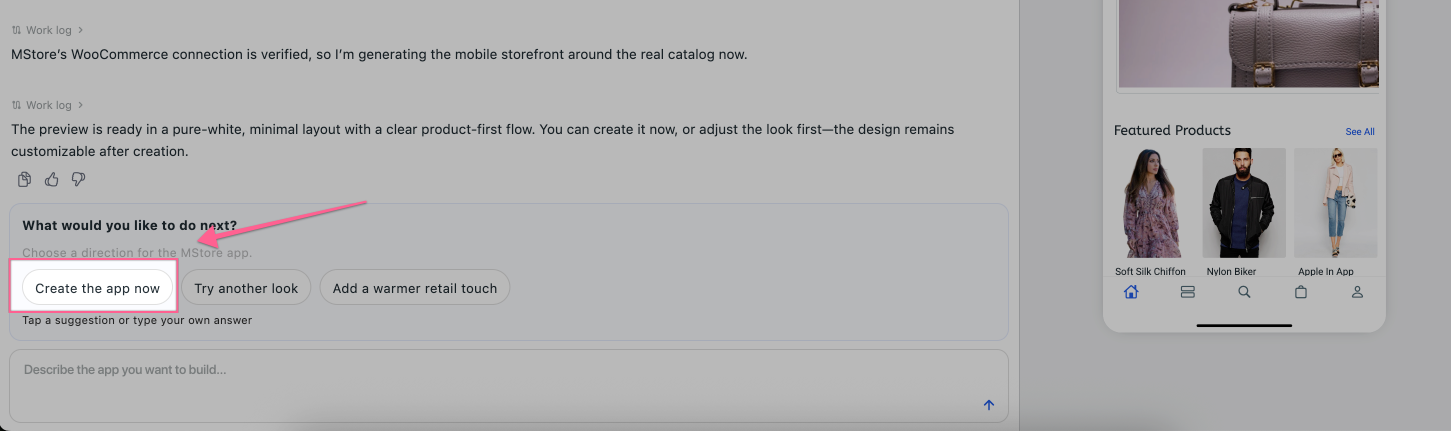
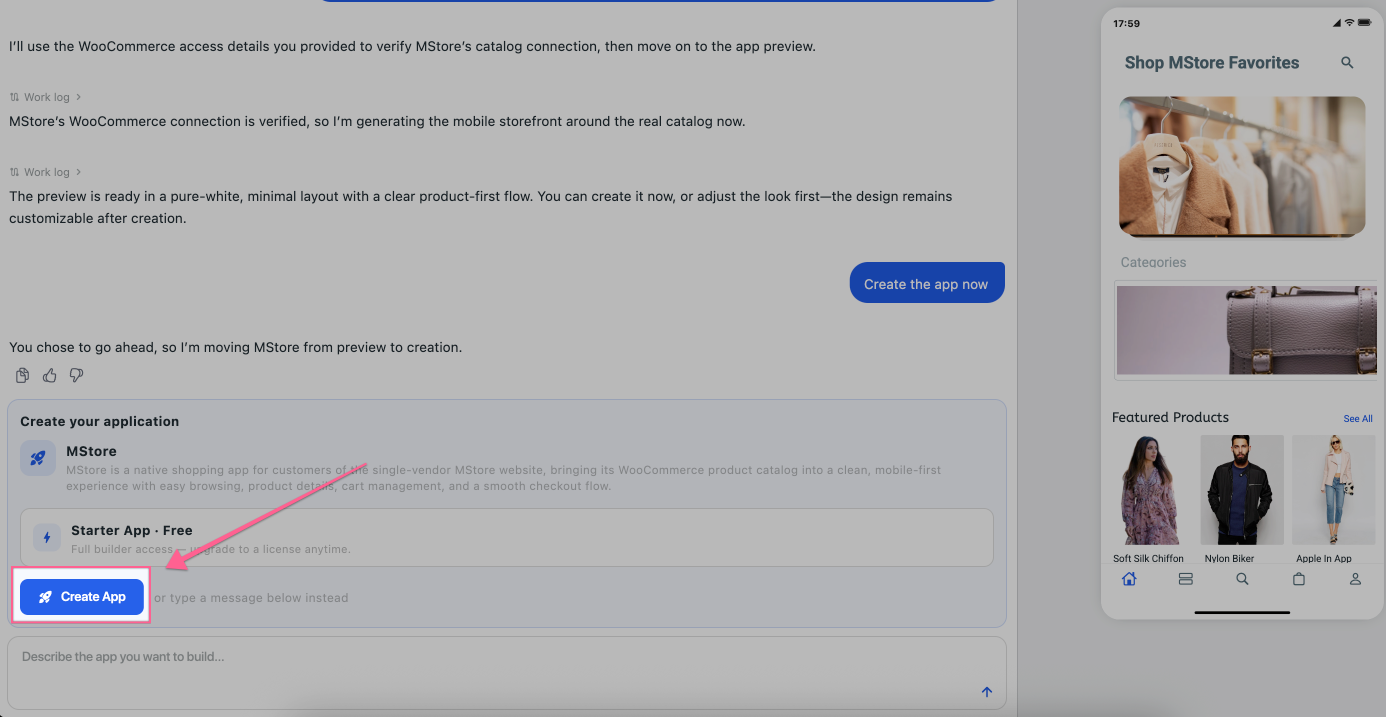
Click Create the app now:
Click Create App: (At this step, you may be asked to log in to save your app project and continue anytime.)
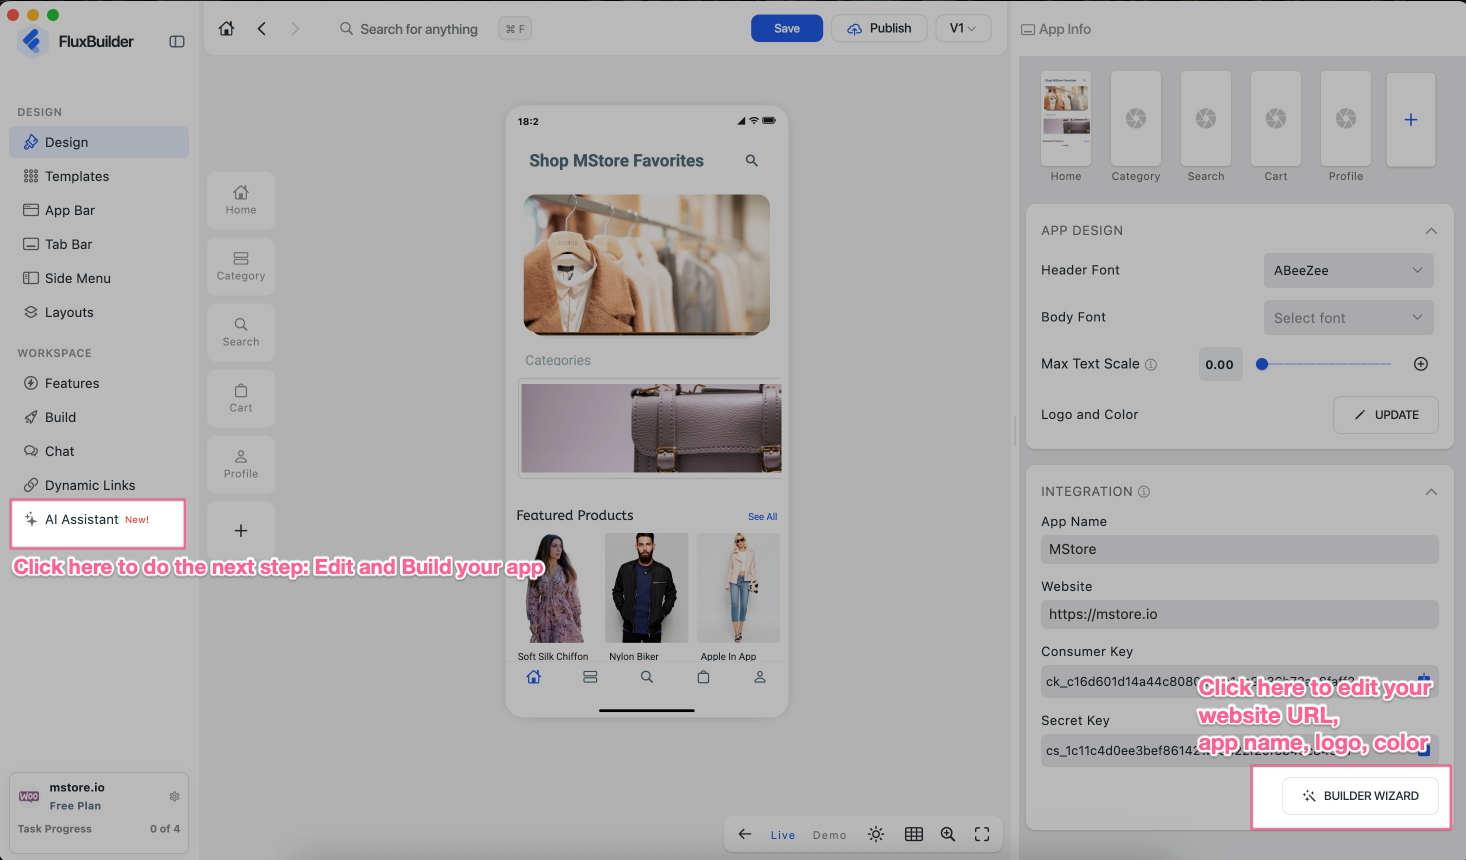
Your app project has been created successfully and this is the FluxBuilder editor:
—-
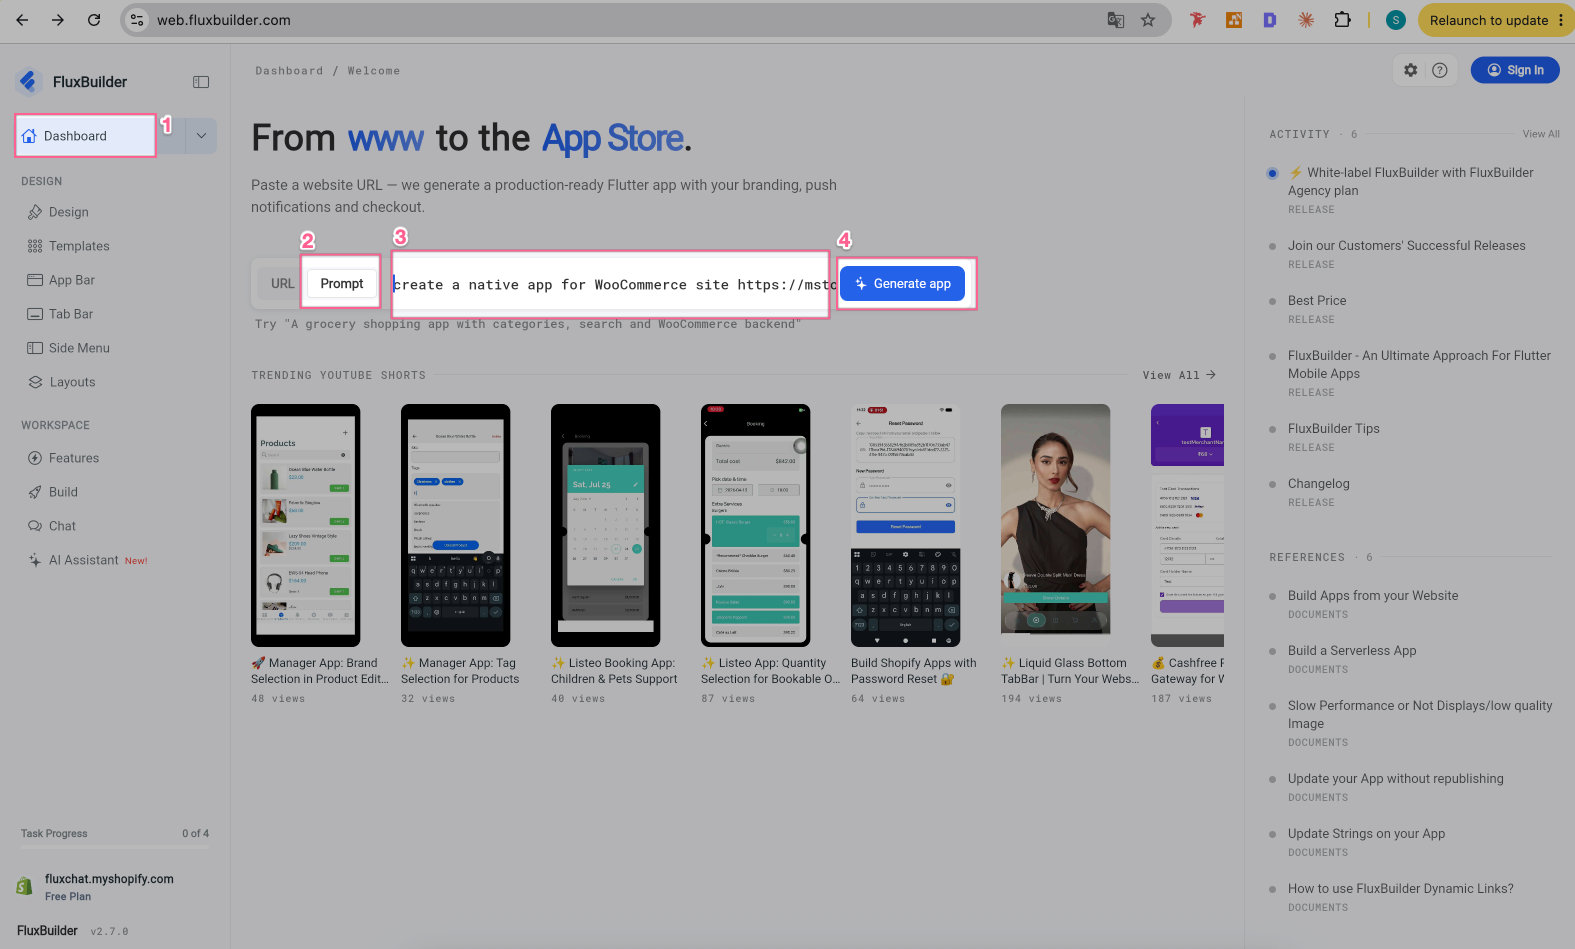
✨ If using the FluxBuilder Web version https://web.fluxbuilder.com : select Dashboard, click Prompt, then enter your request and click Generate App: (e.g: create a native app for WooCommerce website https://mstore.io )
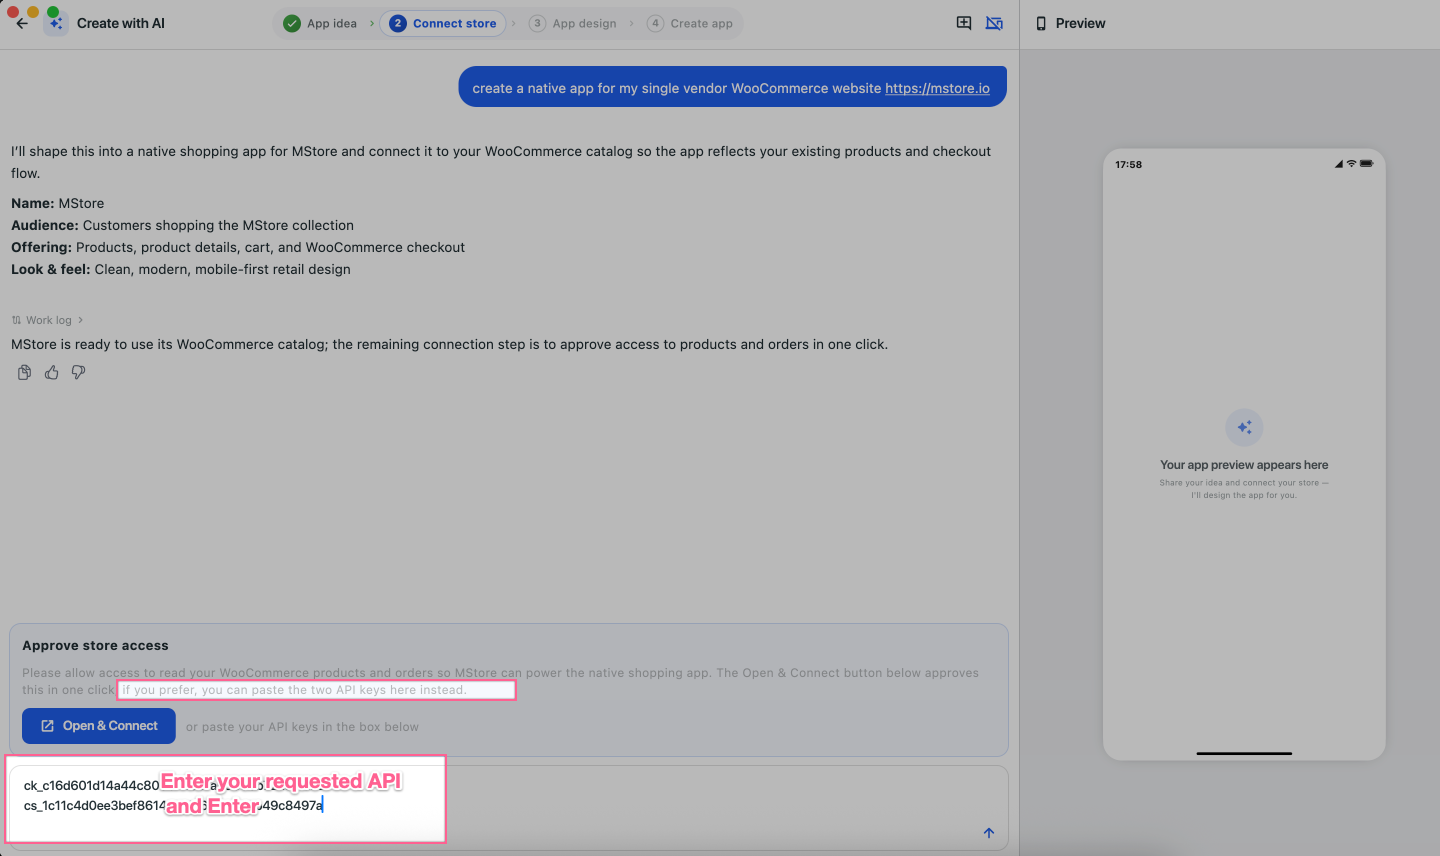
Enter your Key APIs (getting from Step 1 above) if they are requested:
Click Create the app now:
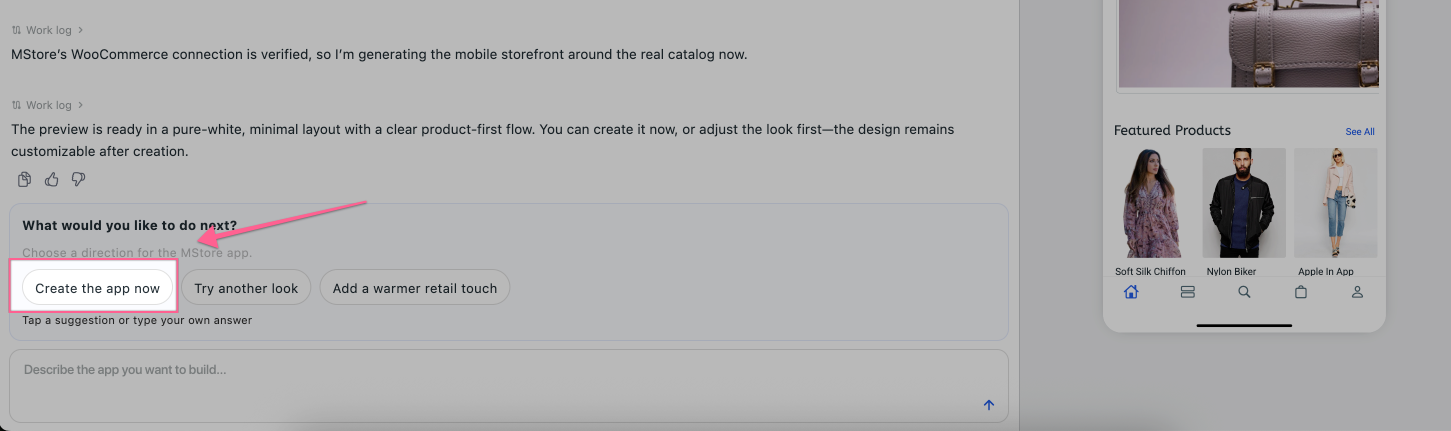
Click Create App: (At this step, you may be asked to log in to save your app project and continue anytime.)
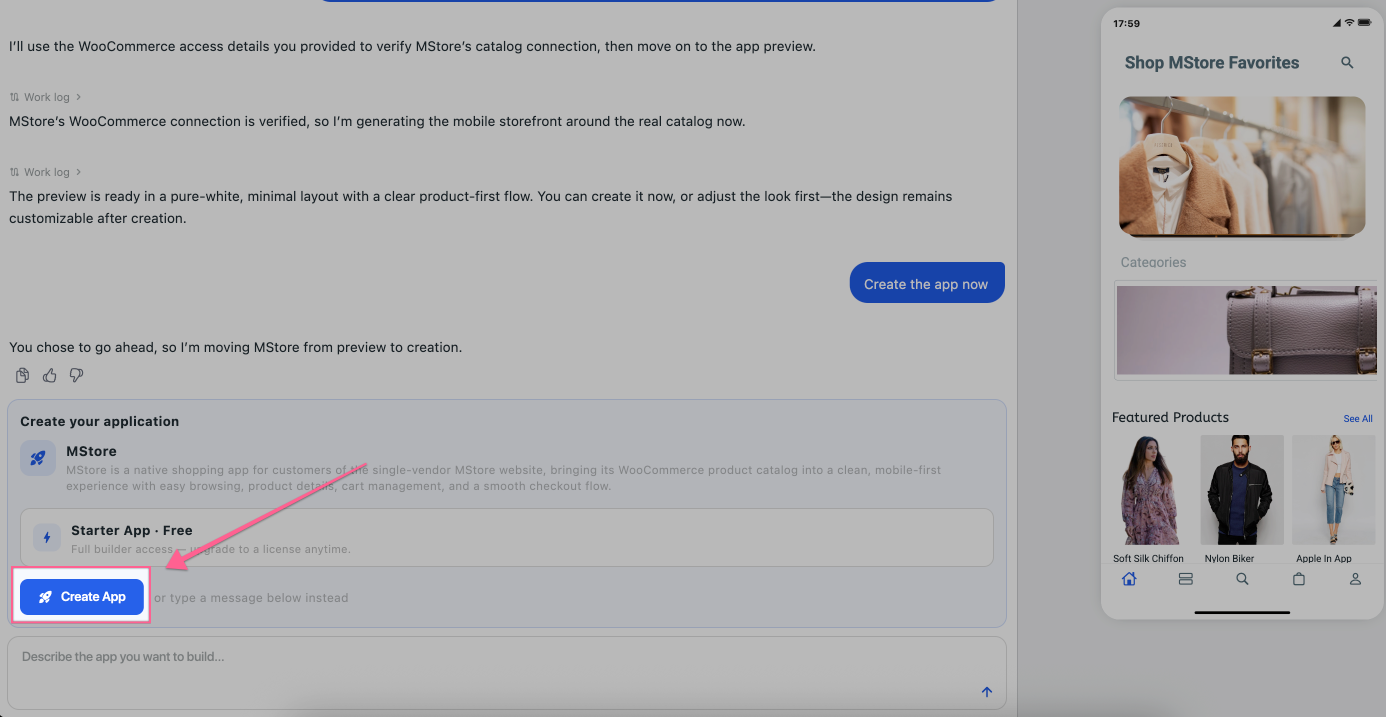
Your app project has been created successfully. Click it to open:
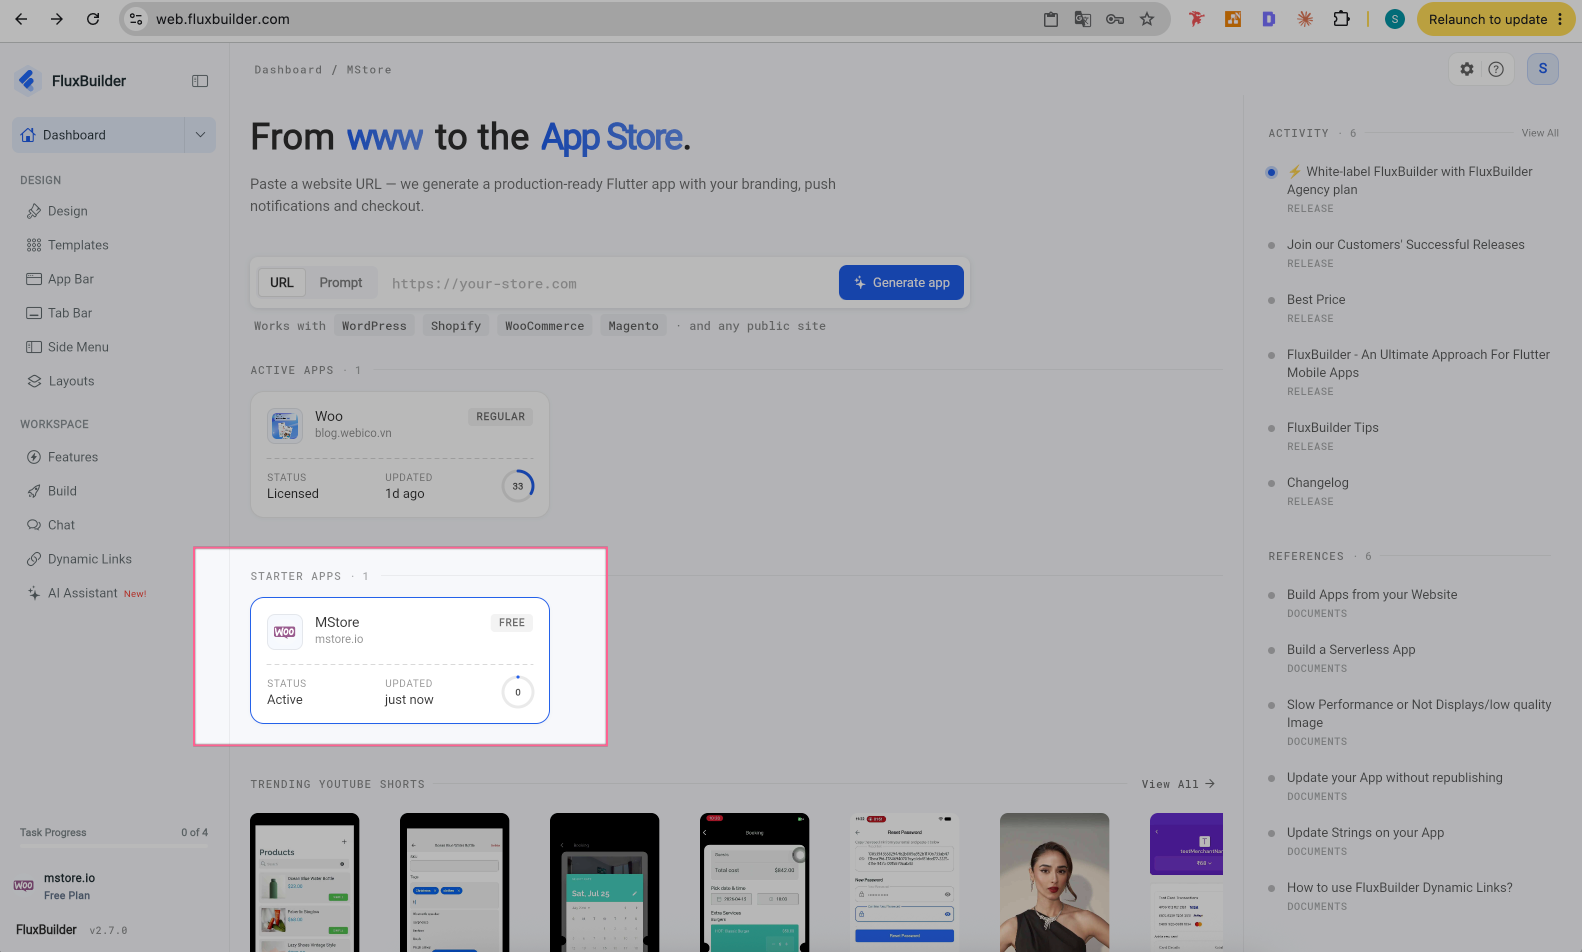
Your app project is now open in the FluxBuilder editor:
—-
Step 3: Edit and Build your app
Video guide:
🎥 Explore the FluxBuilder AI & MCP Tutorial Playlist → https://www.youtube.com/playlist?list=PLQj-KQmrvvB8
Manual guide:
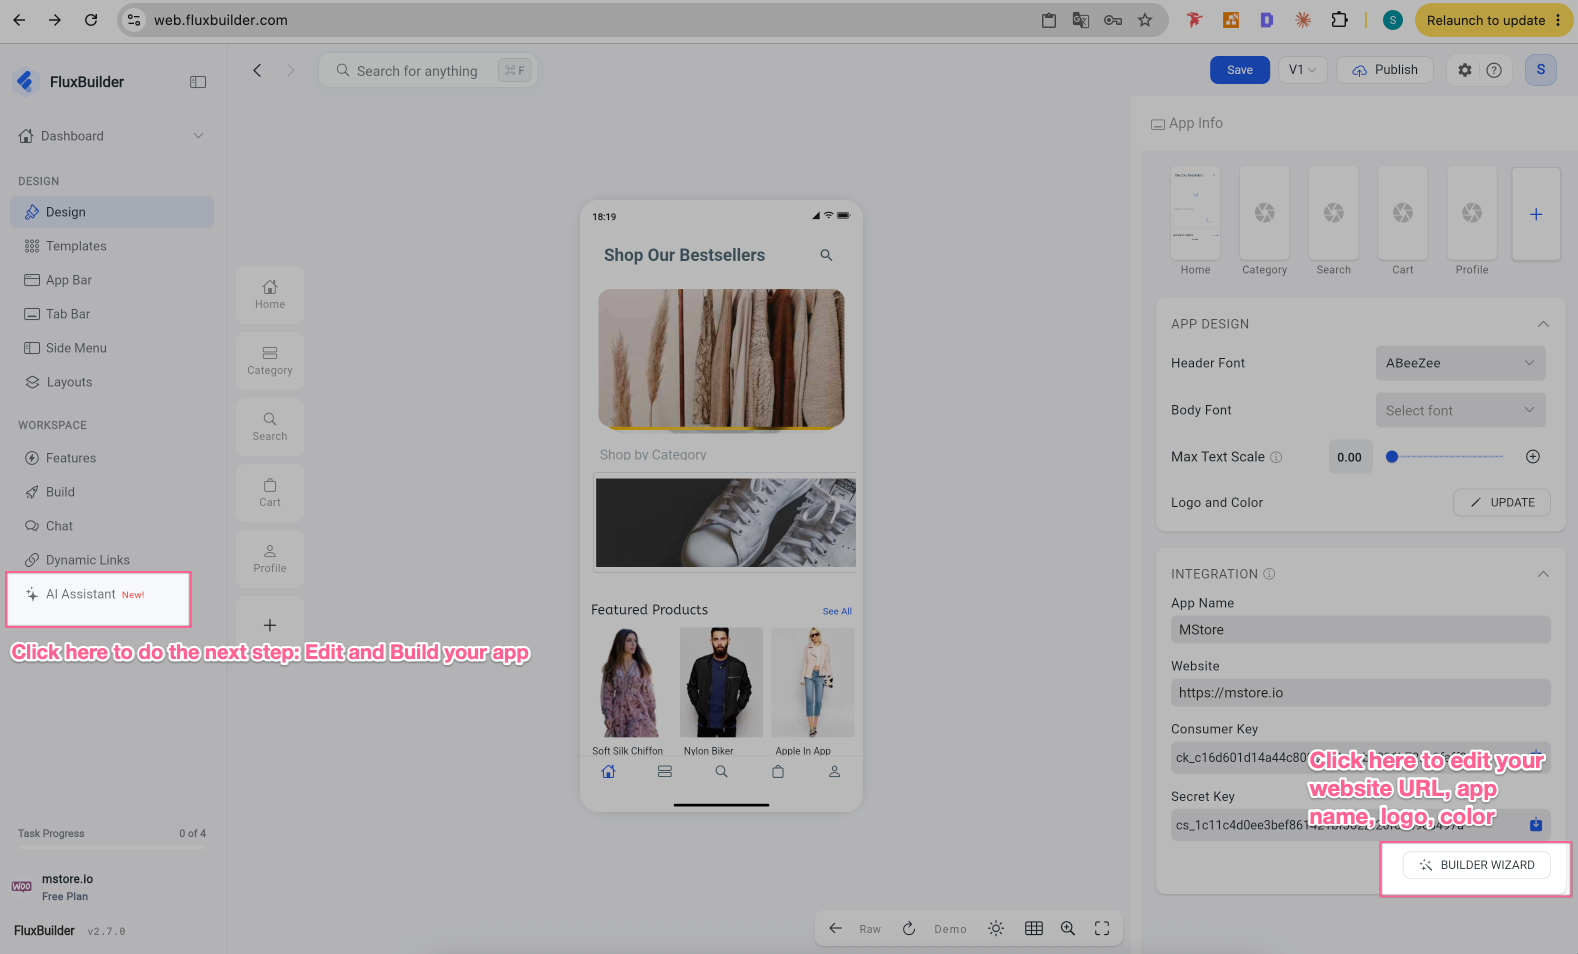
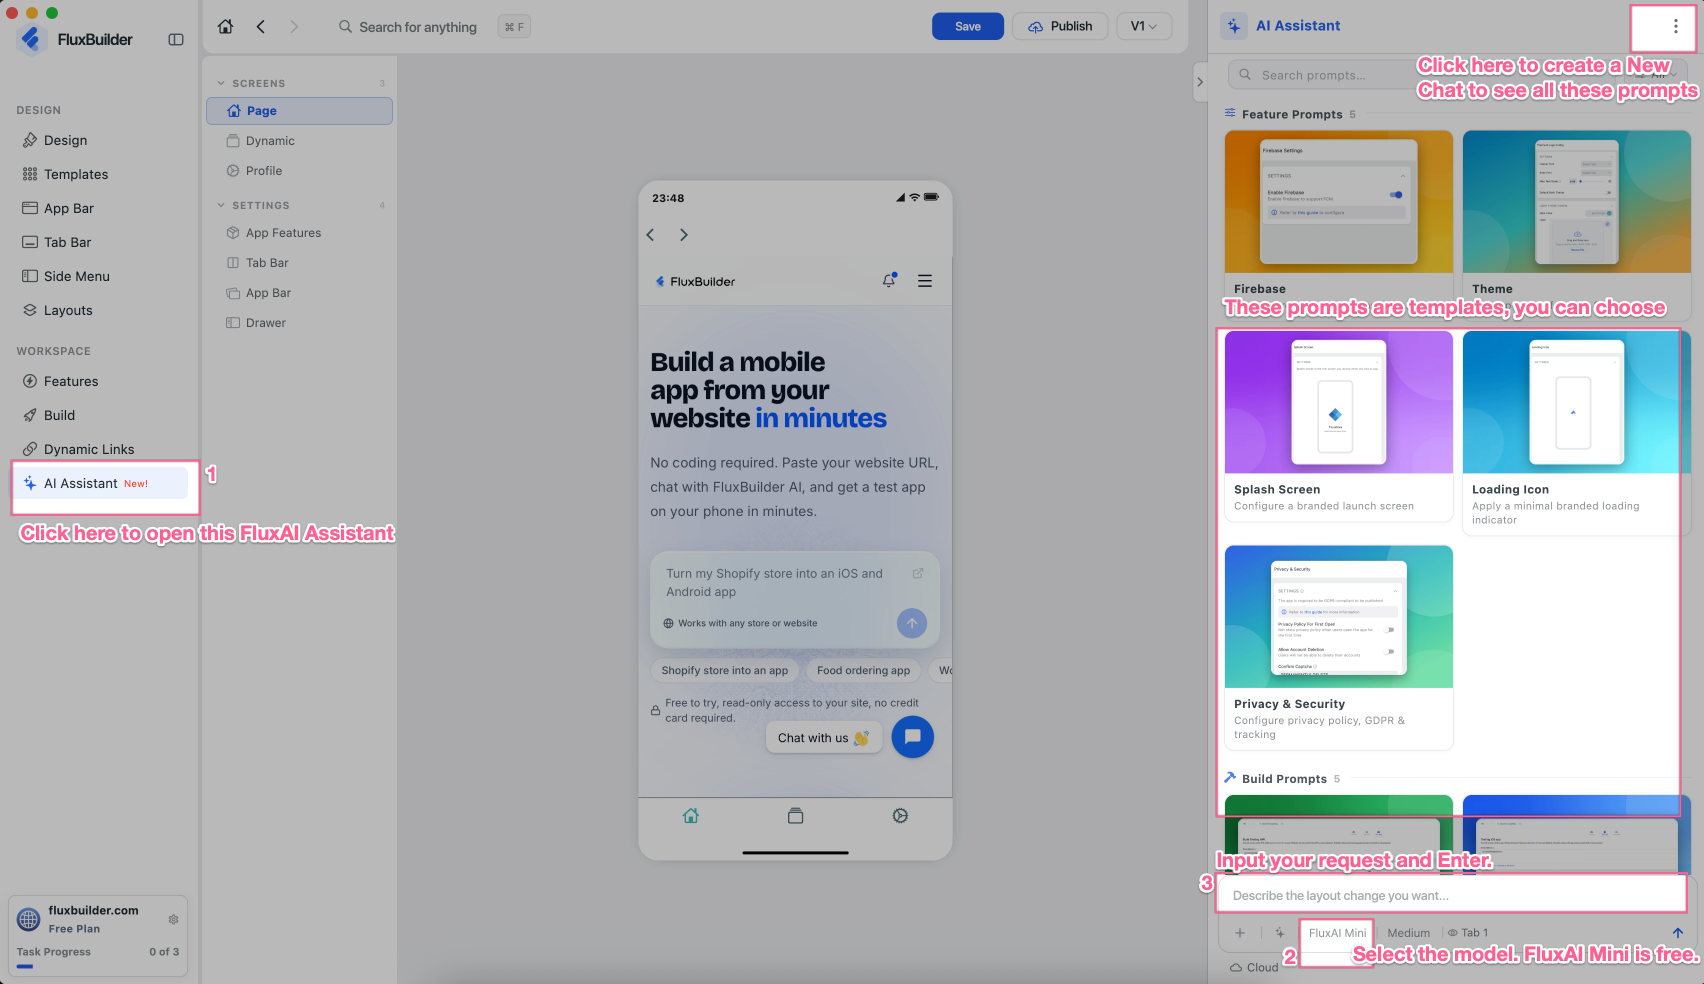
Click AI Assistant, type your request, and press Enter to customize your app UI, configure app features, or build your Android/iOS app.
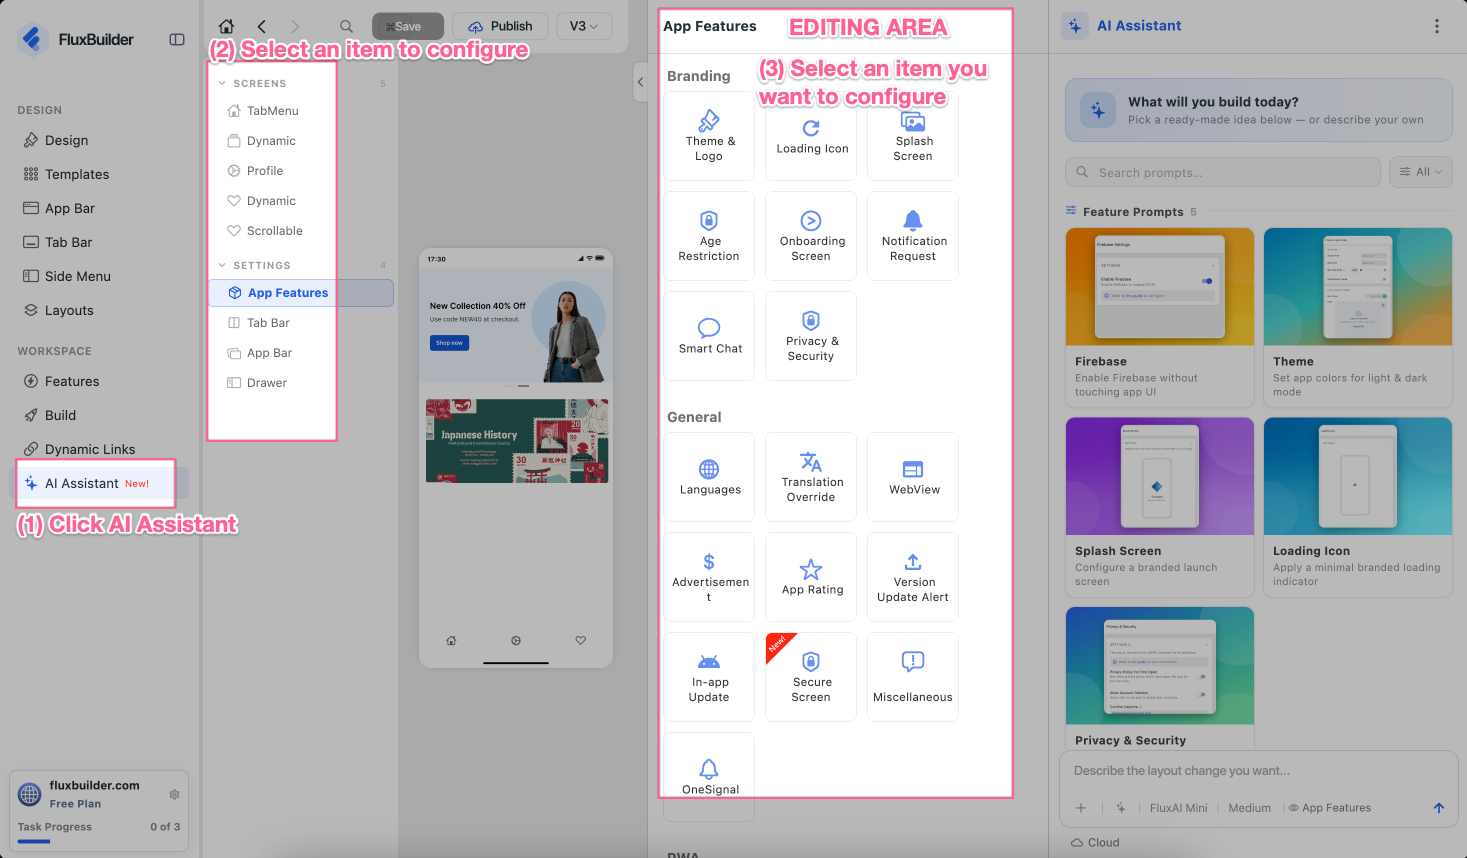
Or select an item to configure it manually:
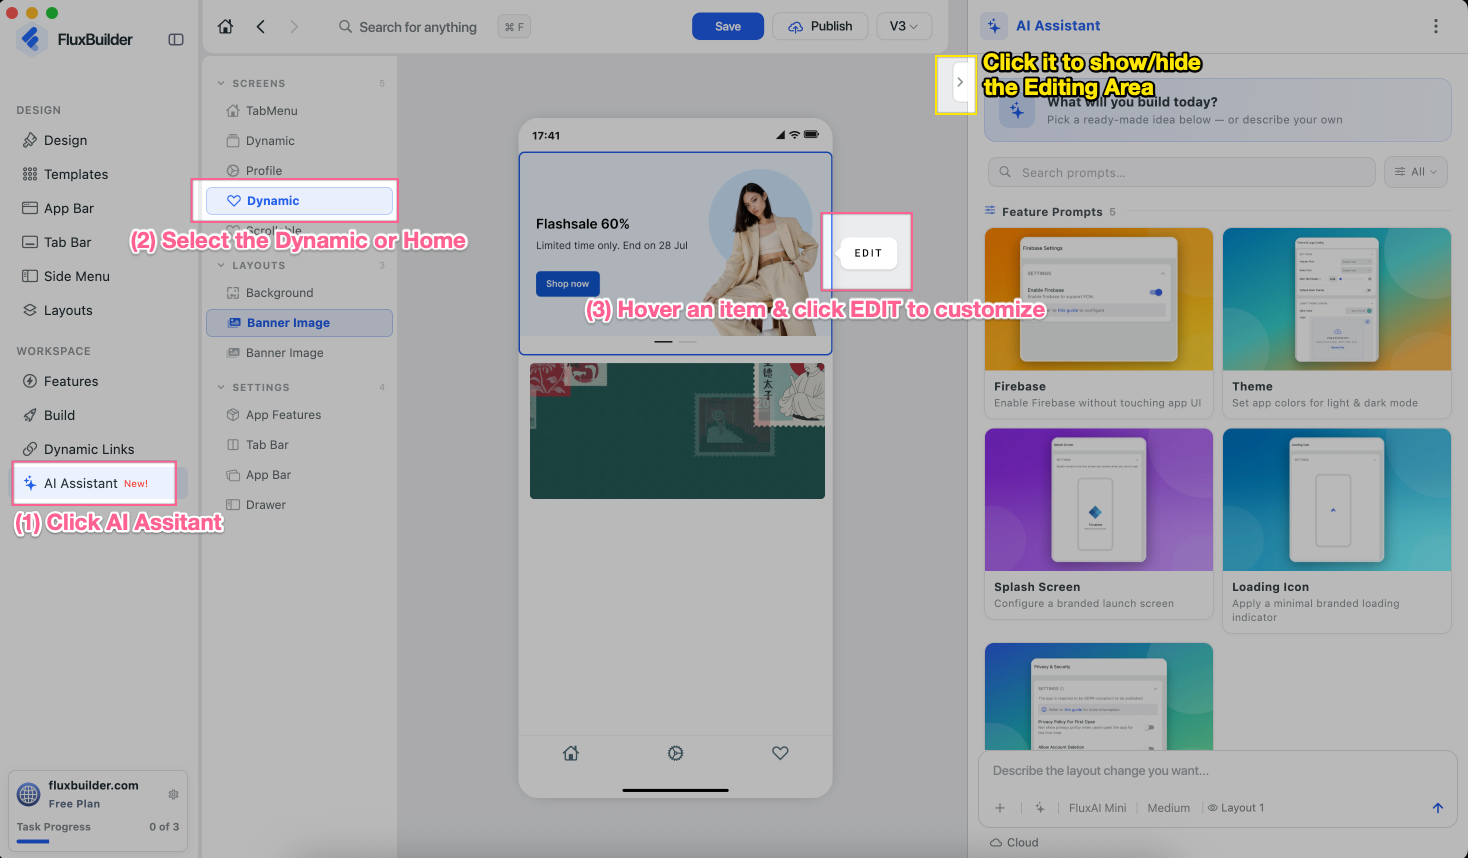
If your app has a Dynamic or Home tab/screen, hover over an item in the simulator to quickly edit it:
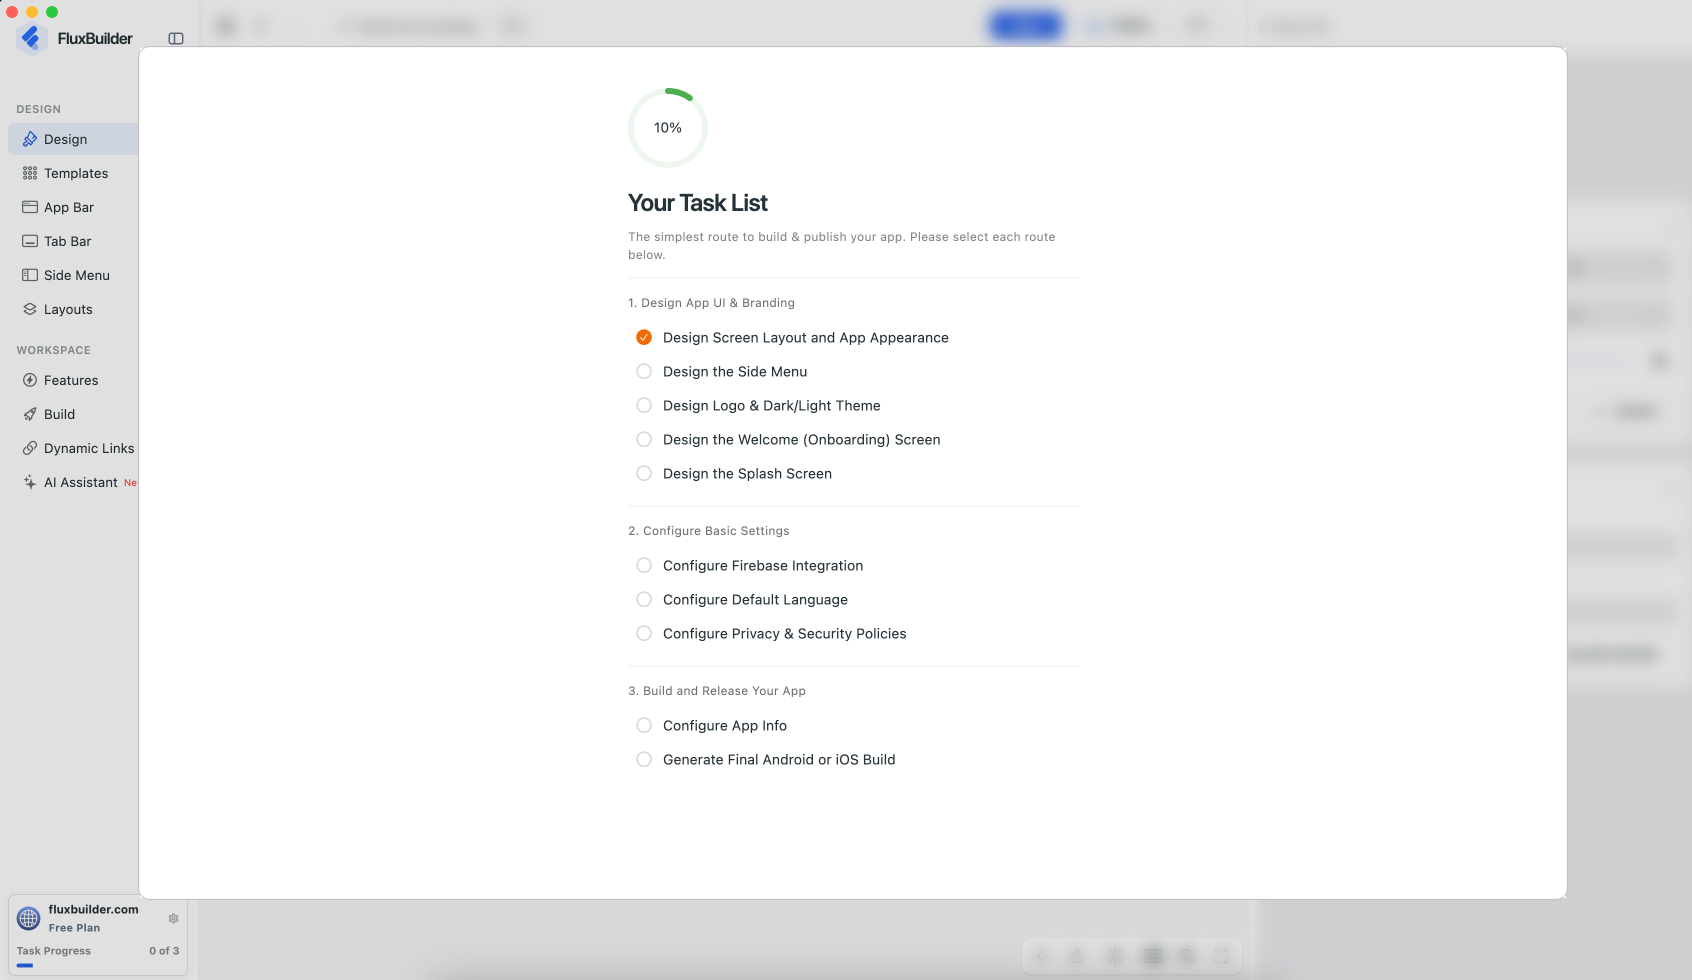
✨ If you're not sure which essential UI and features need to be configured before submitting your app for approval, click Task Progress:
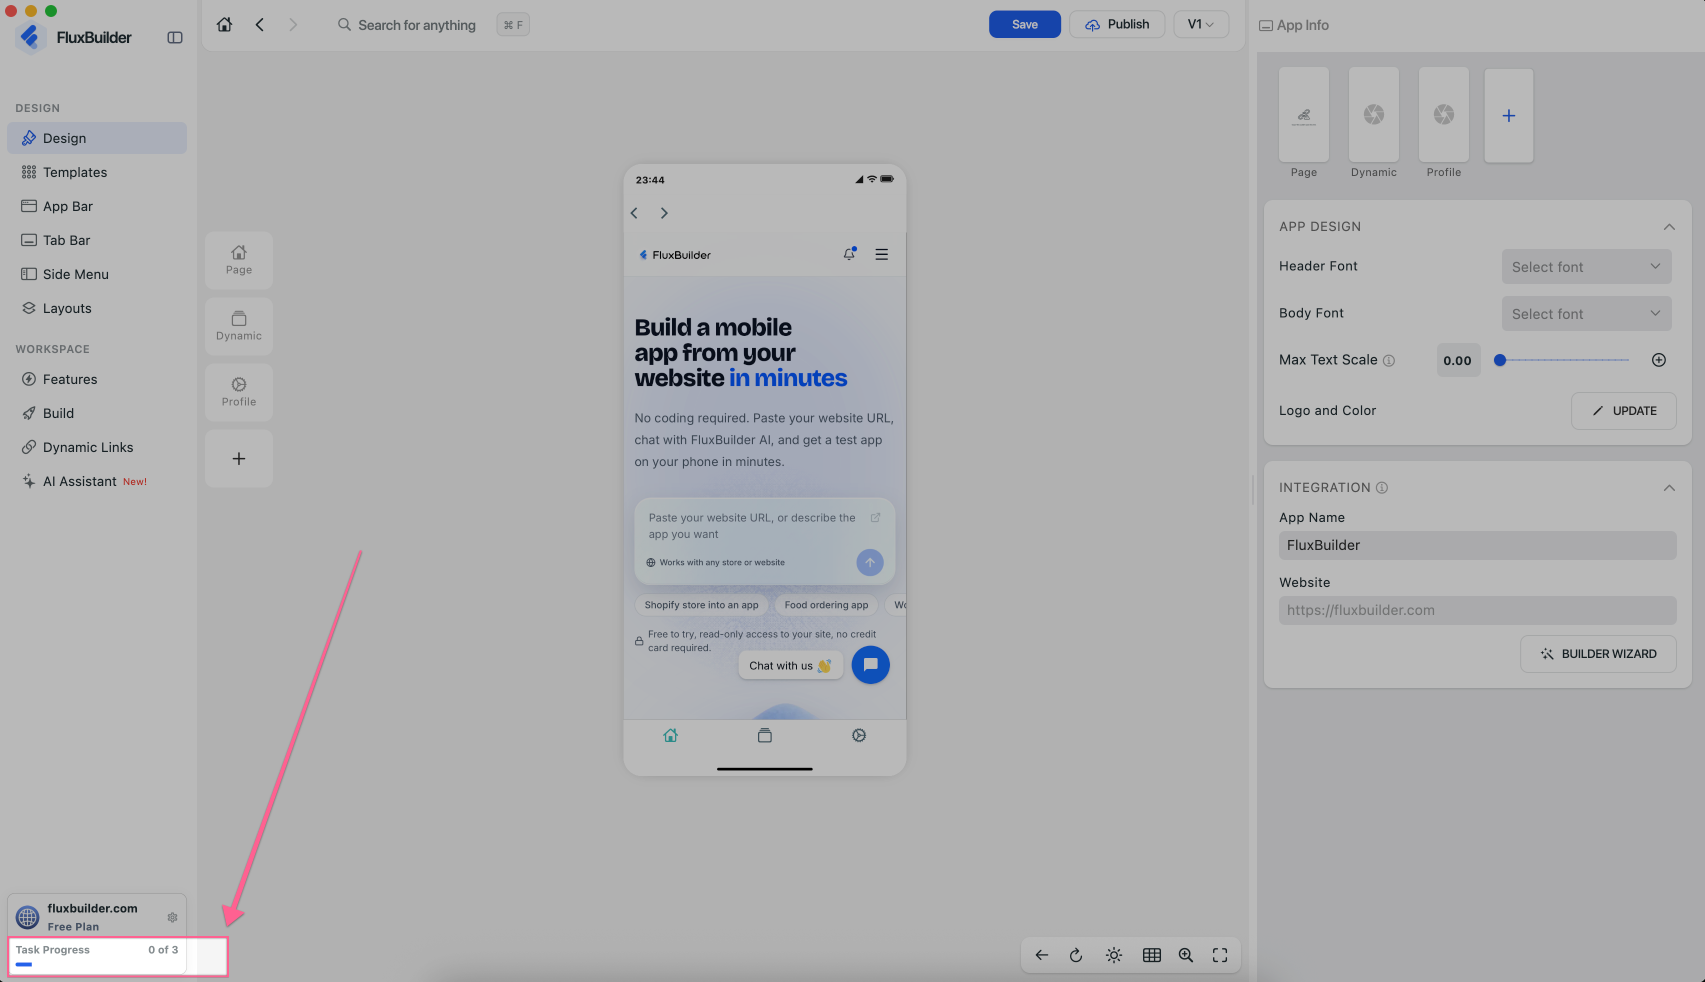
Your Task List is now open and shows the essential tasks to complete:
If you want to update your app without republishing it to the App Store and Google Play, configure this feature before building your app.
Create Manually
- This guide shows you how to create a Native app using the standard FluxBuilder workflow.
- Choose one of the two methods to create your Native app: “Create Manually” or “Create with AI” (above).
Follow these steps to take you from connecting your website to build and publish apps on the App Store and Google Play:
Step 1: Prepare your website
To ensure that all products and images from your website are displayed correctly on your iOS and Android apps and that data stays synchronized, install the required plugins and complete the necessary configurations on your website.
Pick one guide that matches your site:
- WooCommerce API Setup Guide
- Shopify Access Token Guide
- Opencart API Setup Guide
- Magento API Setup Guide
- PrestaShop API Setup Guide
- Strapi API Setup Guide
- Listing API Setup Guide
- Delivery Boy API Setup Guide
- Admin (Manager) API Setup Guide
- WordPress API Setup Guide — for WordPress site (not e-commerce — recipe, news, music, etc.)
- OpenAI- Setup Supabase Server — want to build AI Assistant apps support ChatGPT & OpenAI
- Other sites do not require installing API.
Step 2: Create an app project
Create a new app project in FluxBuilder. Follow this guide to install and run FluxBuilder in your devices successfully.
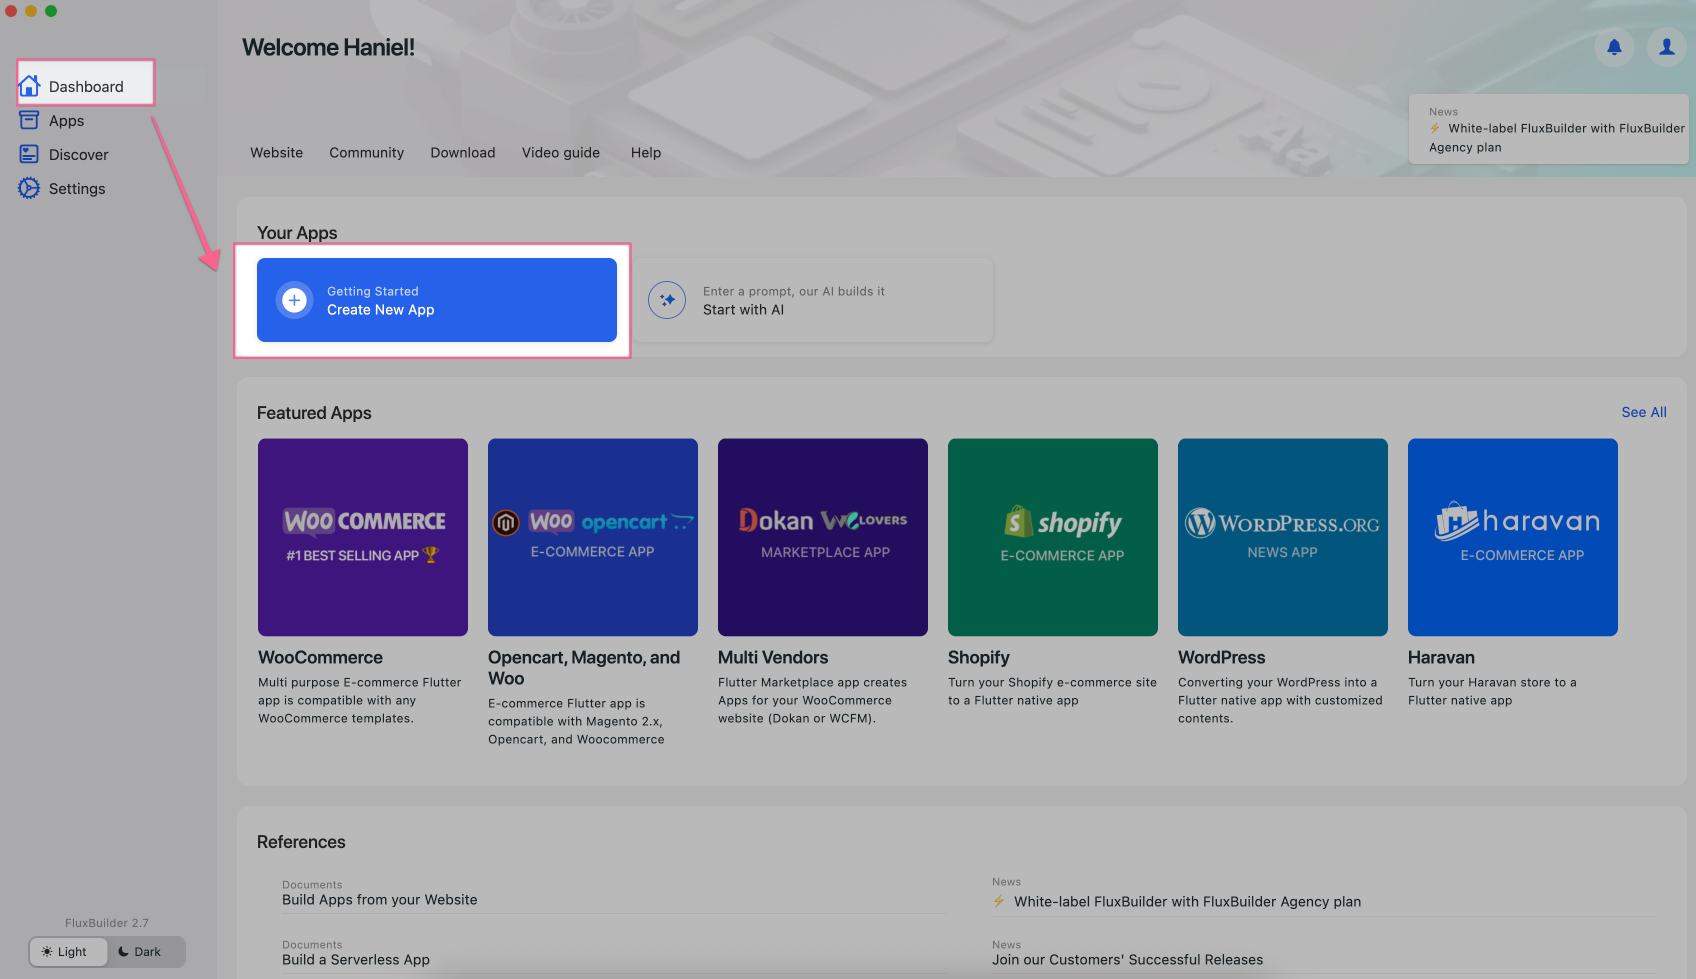
✨ If using the FluxBuilder Desktop version, open FluxBuilder, then select Dashboard > choose Create New App:
(If you subscribed to a plan but haven't created an app yet, refer to this guide.)
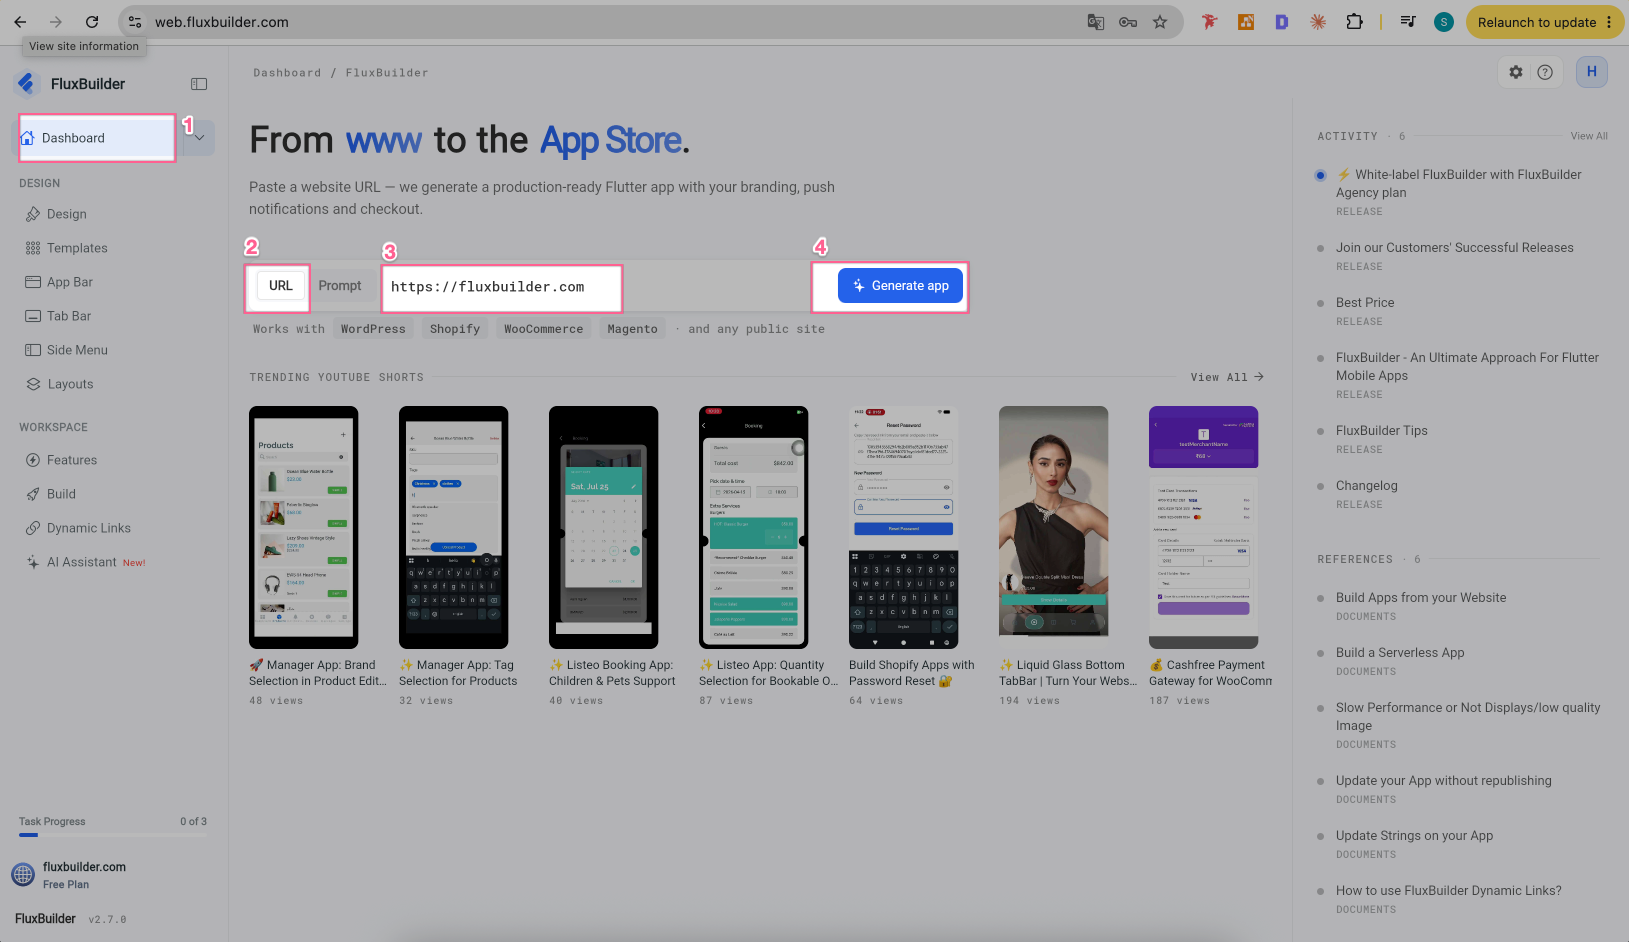
✨ If using the FluxBuilder Web version https://web.fluxbuilder.com : select Dashboard, click URL, then enter your Website URL and click Generate App:
(If you subscribed to a plan but haven't created an app yet, refer to this guide.)
—-
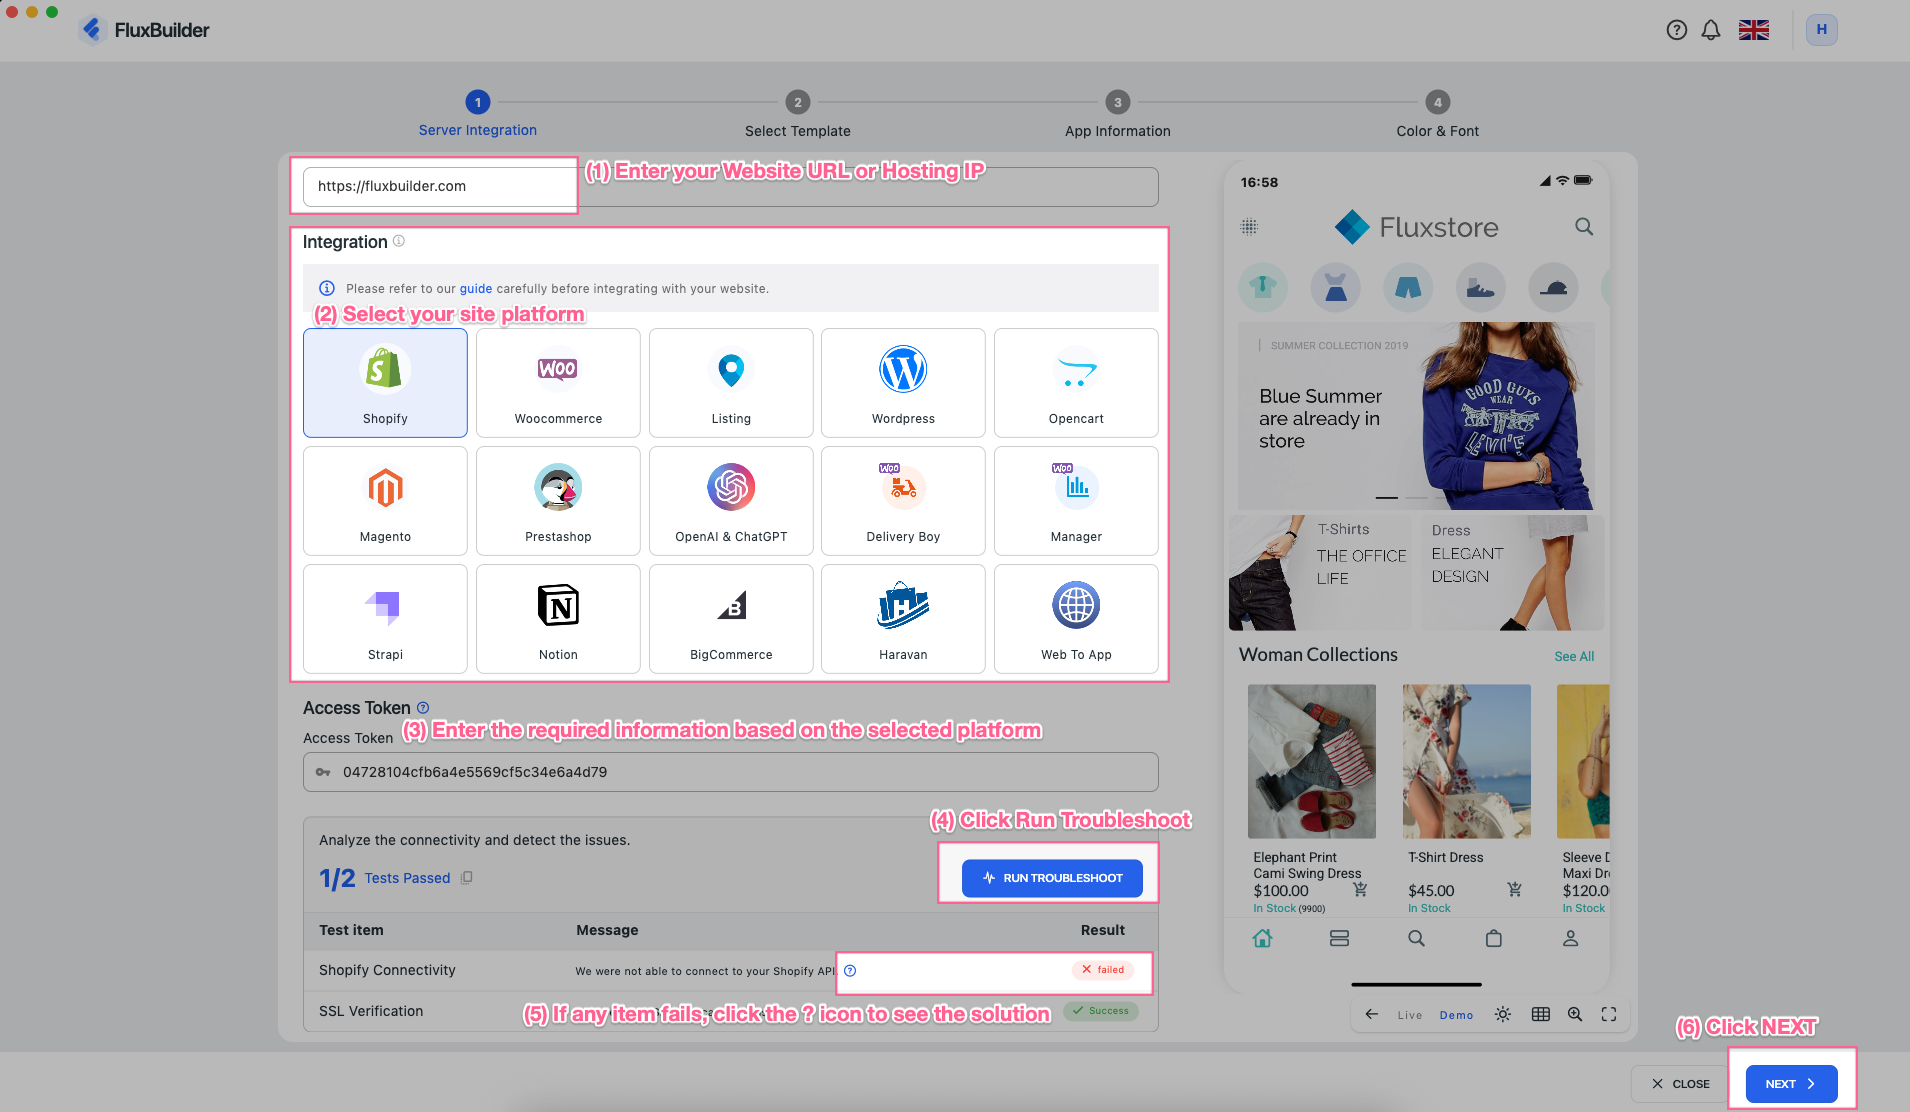
Then, (1) Enter your Website URL or IP address of the HOSTING service (e.g. https://1.100.67.68) → (2) Select your site platform → (3) Enter the required information (getting from Step 1 above) based on the selected platform → (4) Scroll down and click Run Troubleshoot → (5) If any item fails, click the ? icon to see how to fix it → (6) Select NEXT:
📌 At (2), if you're not sure which item to choose, see:
- Listing or Booking site — Listeo, MyListing, or ListingPro → Select the
Listingitem. - WordPress site (not e-commerce — blog, news, music, recipe) → Select the
WordPressitem. - Want to build AI apps support ChatGPT & OpenAI → Select the
ChatGPT & OpenAIitem. - Delivery Boy and Admin (Manager) apps — for single-vendor or multivendor stores using WCFM or Dokan → Select the
Delivery BoyorManageritem. - E-commerce site: WooCommerce (single-vendor or multivendor stores using WCFM or Dokan), Shopify, Magento, OpenCart, PrestaShop, BigCommerce, Strapi, or Haravan → Select the related platform.
Select a Template and click NEXT:
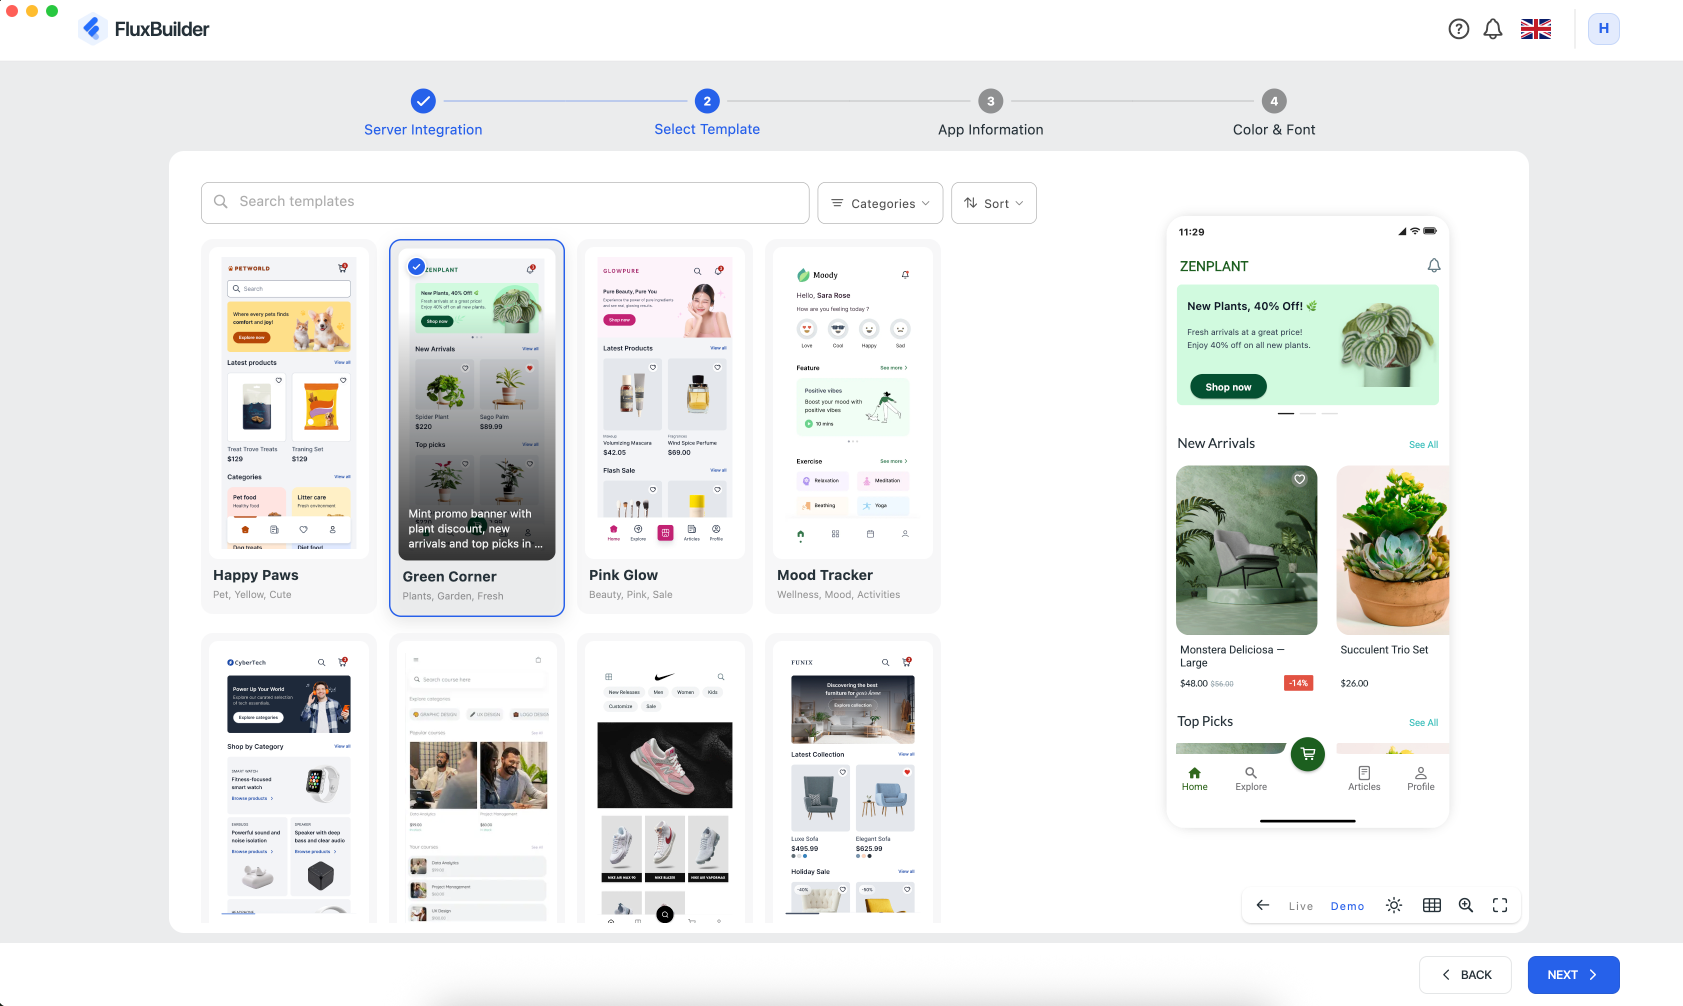
📌 Note: The Delivery Boy and Admin (Manager) apps do not support UI customization in the FluxBuilder app builder. You can skip this step.
—-
Next, enter your app information:
App Name(required): Enter the name of your App.Short Description(optional): Enter a brief description of your app.Upload Logo(optional): Upload your app logo for both Light and Dark themes. You can change it later.
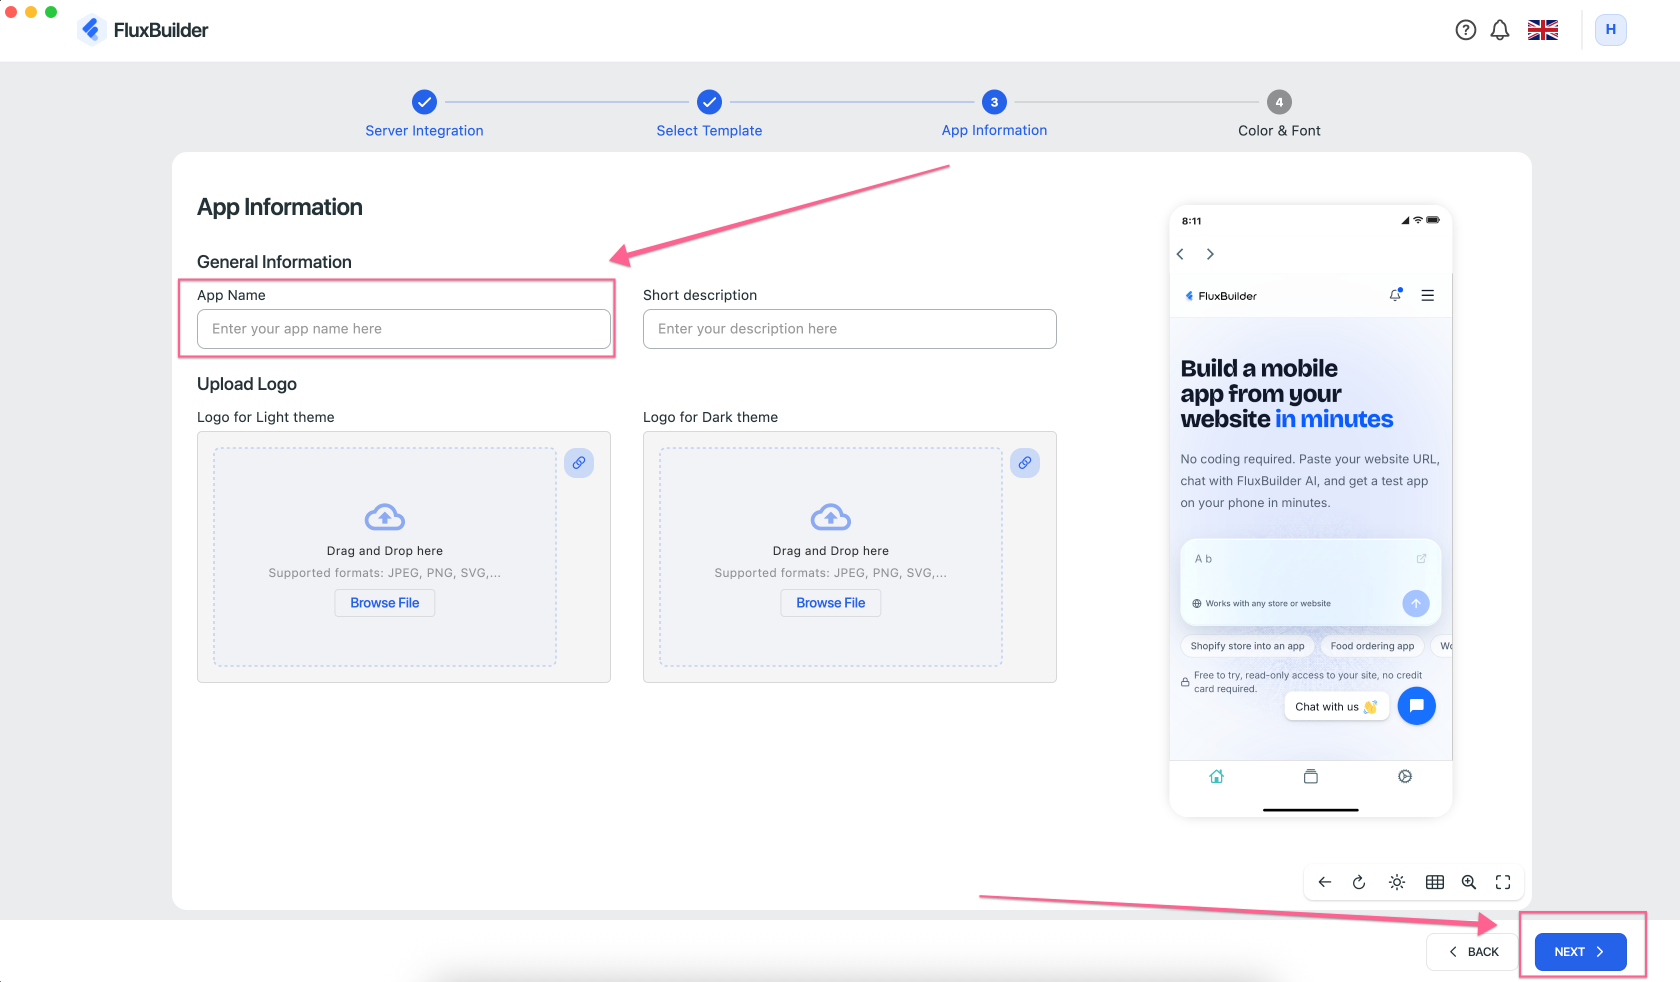
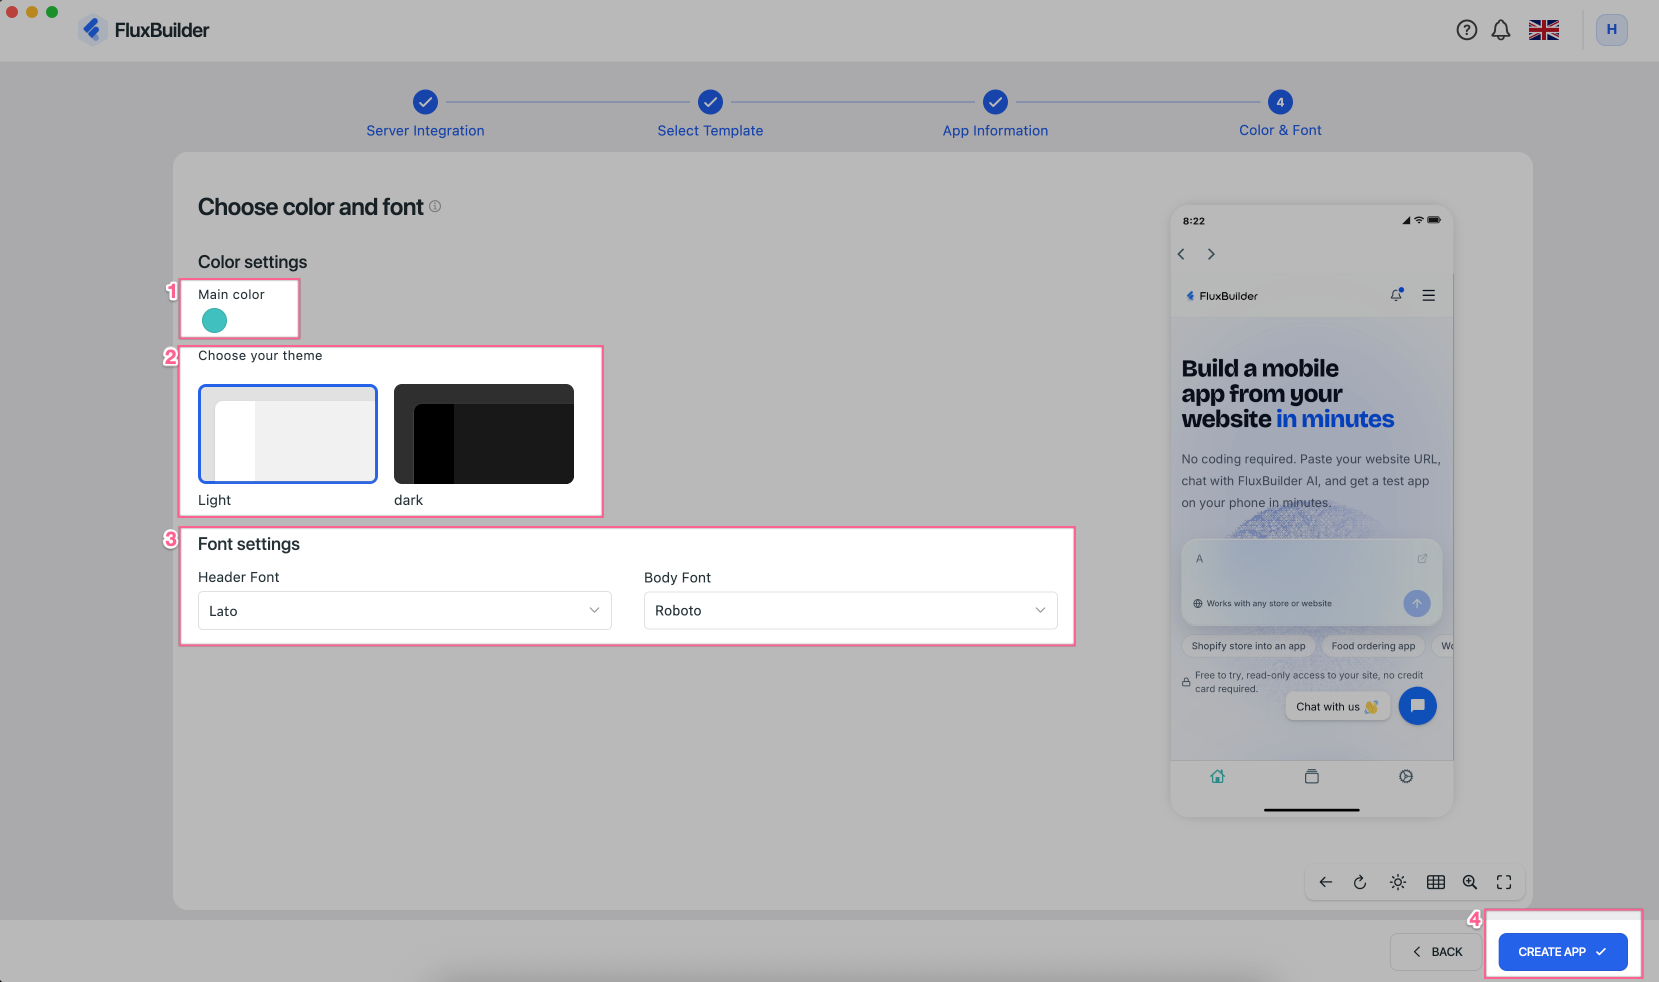
Choose a color, font, and default Light/Dark theme (optional — you can edit these settings later). Then click CREATE APP :
Your app project has been created successfully and this is the FluxBuilder editor:
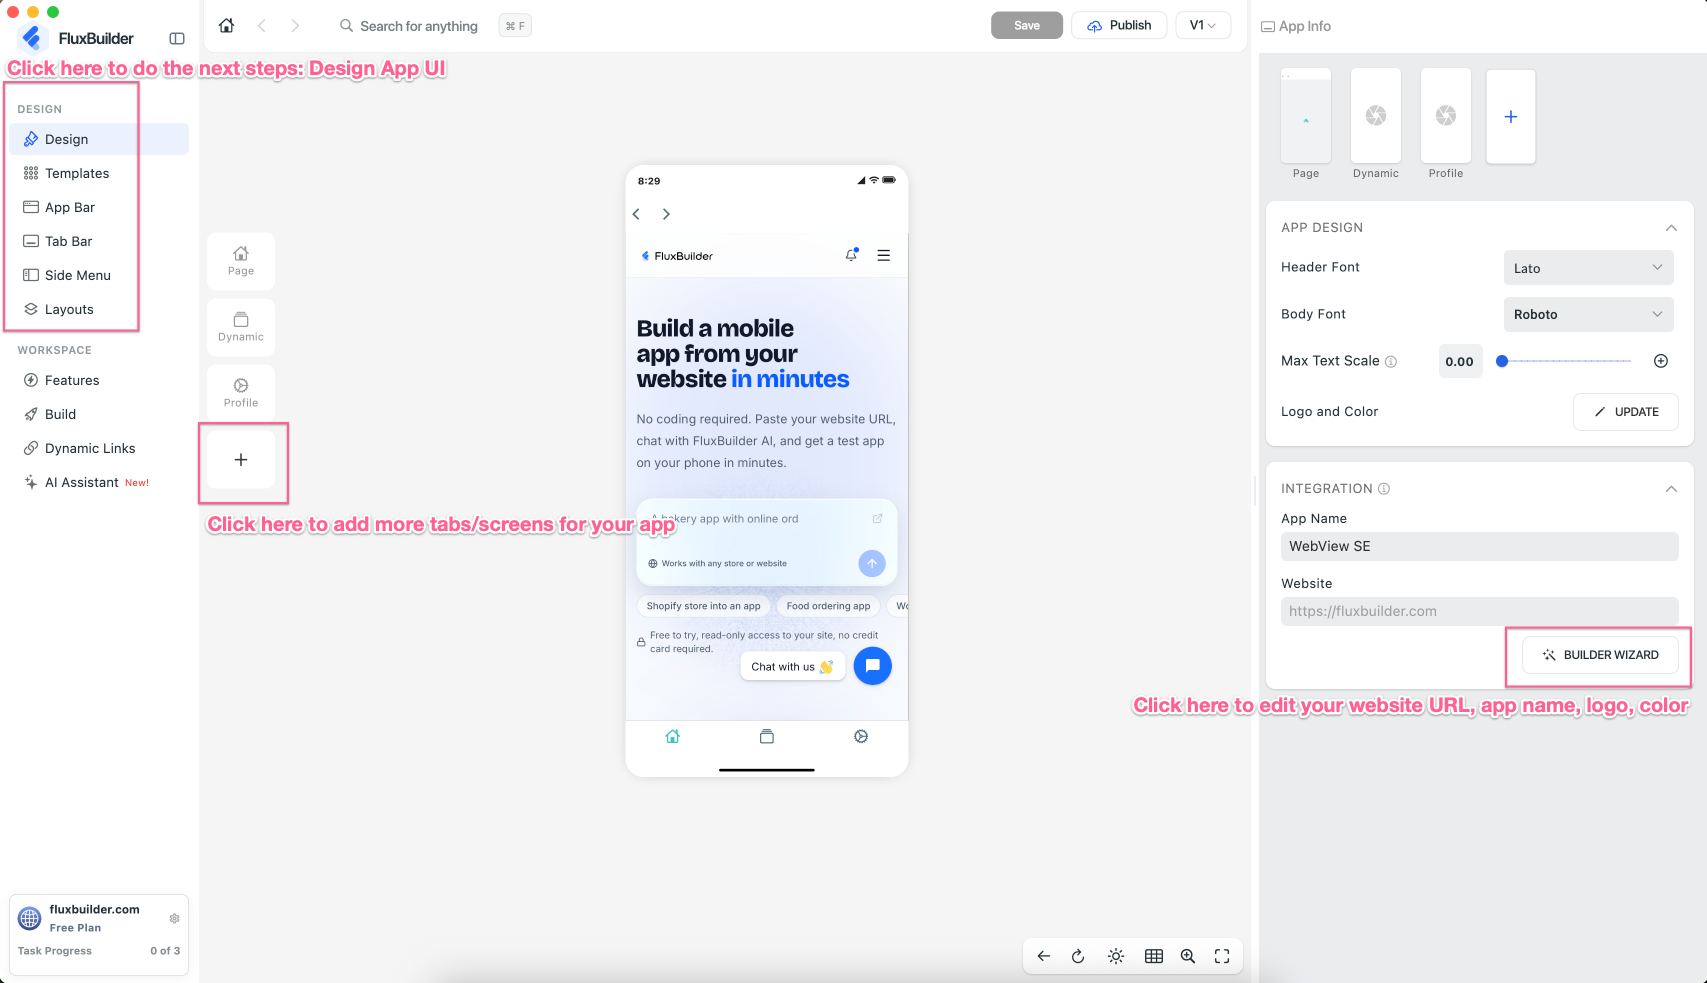
Step 3: Customize your app
Customize your app’s UI and features by drag-and-drop on FluxBuilder to create an experience that fits your needs.
👉 Learn how to customize your app
Step 4: Build Apps and Release
Once your app UI and features are ready, it’s time to build, test, and release your app.
- Generate Demo App for Free and test on phone.
- Build and Publish Apps on both Google Play and App Store.
🎉 You’re all set! Your app is ready to launch.
Common issues and Solutions
If any website or backend connectivity check fails—whether via the Run Troubleshoot button in the 'Create Manually' method or 'Create with AI' — follow these steps to fix it:
| Failed item🚨 | Solution ✅ |
|---|---|
| Make sure you do not input sub-folder domain like this https://yaari.store/pk-en. Please change to subdomain or main domain | |
Make sure you input https instead of http | |
| SSL Verification | Please select Run Troubleshoot again or Ignore it. |
| Permalink Setting | Check your backend to see if it works https://your website/wp-json/wc/v2/products?consumer_key=your ck key&consumer_secret=your cs key |
| CS & CK Authorization | Please input your Consumer Key and Consumer Secret, following this guide. |
| CS & CK Validation | Make sure you have inputted the correct Consumer Key and Consumer Secret, , following this guide. |
| WooCommerce Connectivity | Your REST APIs are not enabled on your website, please follow this guide. |
| PrestaShop Connectivity | It could be missing the PrestaShop plugin/API on your site. Please follow this guide. |
| Magento Connectivity | You could install this extension to active the API integrate with the app following this guide. |
| WCFM Connectivity | Missing WCFM Rest API. Please install WCFM Rest API plugin to solve it. |
| Dokan Connectivity | Missing Dokan Rest API. Please install Dokan Rest API plugin to solve it. |
| Opencart Connectivity | You could install this extension to active the API integrate with the app following this guide. |
| Listing Connectivity | Your REST APIs are not enabled on your website, please follow this guide. |
| Shopify Connectivity | Please insert "https://" before your website URL https://tppr.me/gJY9G and follow this guide. |
| Post Connectivity | Please check if you install any strange plugins that needing the permission to access |
| Plugin Activation | Please install the FREE MStore API to securely sync your app with website data. |
- Cannot see any Images, Products, or Categories, use this solution.
- App loads slowly, also use this solution.
If you’ve followed this guide but are still facing issues, it might be due to a plugin conflict on your site. Please open a ticket here so we support you for FREE https://support.fluxbuilder.com
App Examples
For example, you can check out some Native apps as a reference (have been successfully built with FluxBuilder No Code App Builder):
- WOOCOMMERCE APP — Marketplace, Multivendor:
- SHOPIFY APP — E-commerce:
- WORDPRESS APP — News, Public TV:
- MAGENTO APP — Game:
And there are many more platforms and app types with apps successfully built using FluxBuilder No-Code App Builder.