Stripe, Apple & Google Pay
1. Stripe
This native payment is available for WooCommerce apps.
Update Stripe's information into the drag&drop FluxBuilder
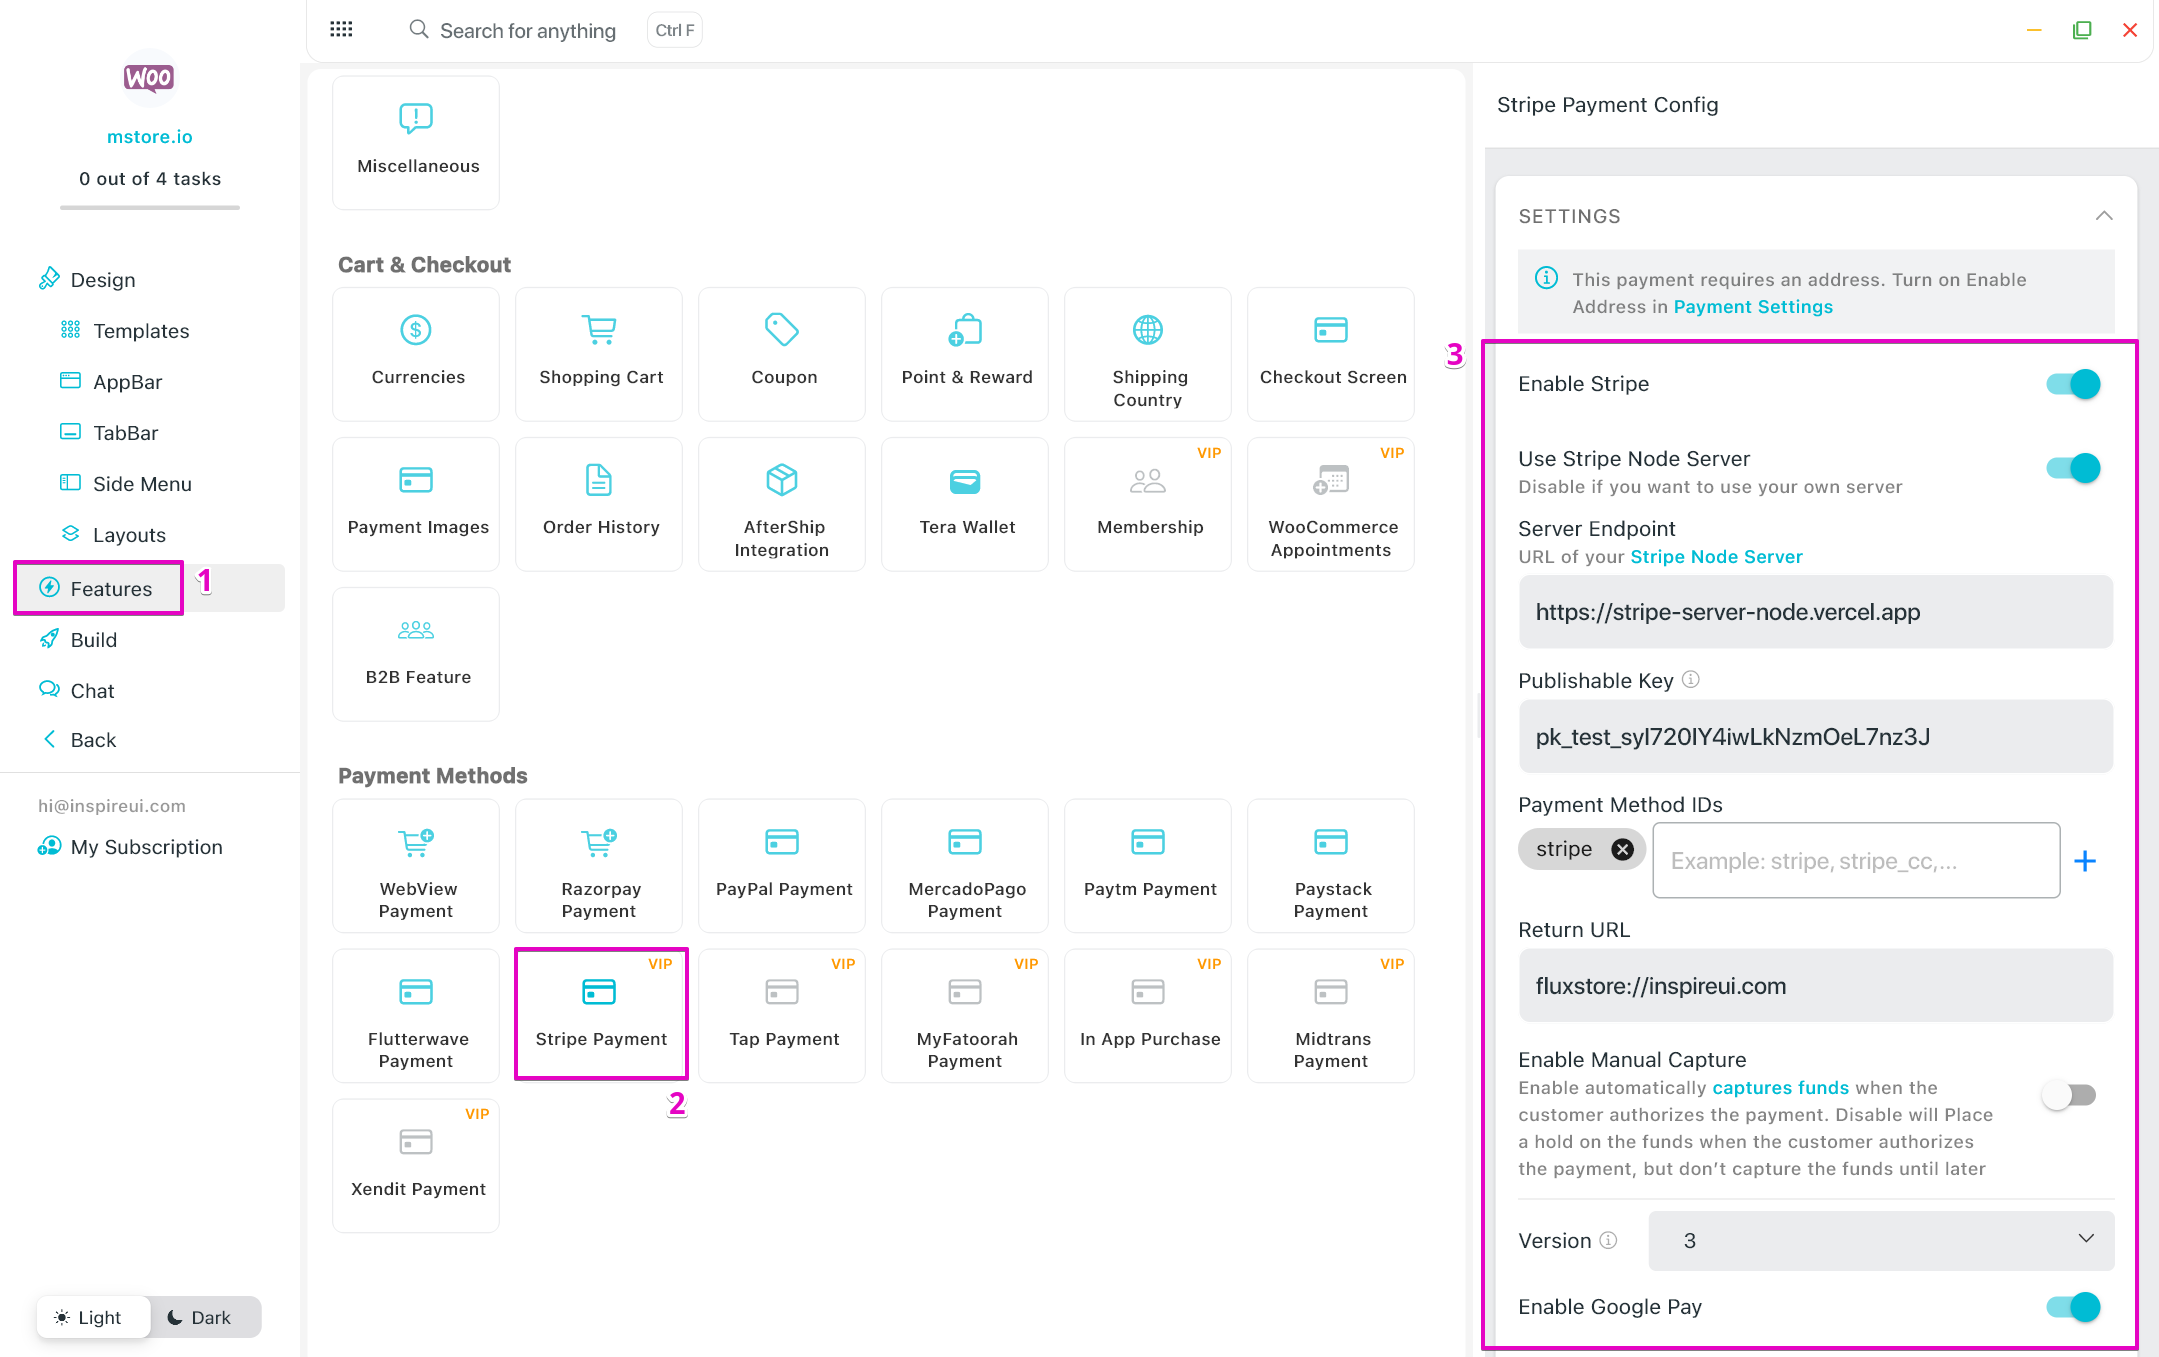
- Server Endpoint: This is the URL to your Stripe Node Server. Please follow the below tutorial to set up Stripe Node Server.
- Publishable Key: Publishable key taken from your Stripe dashboard.
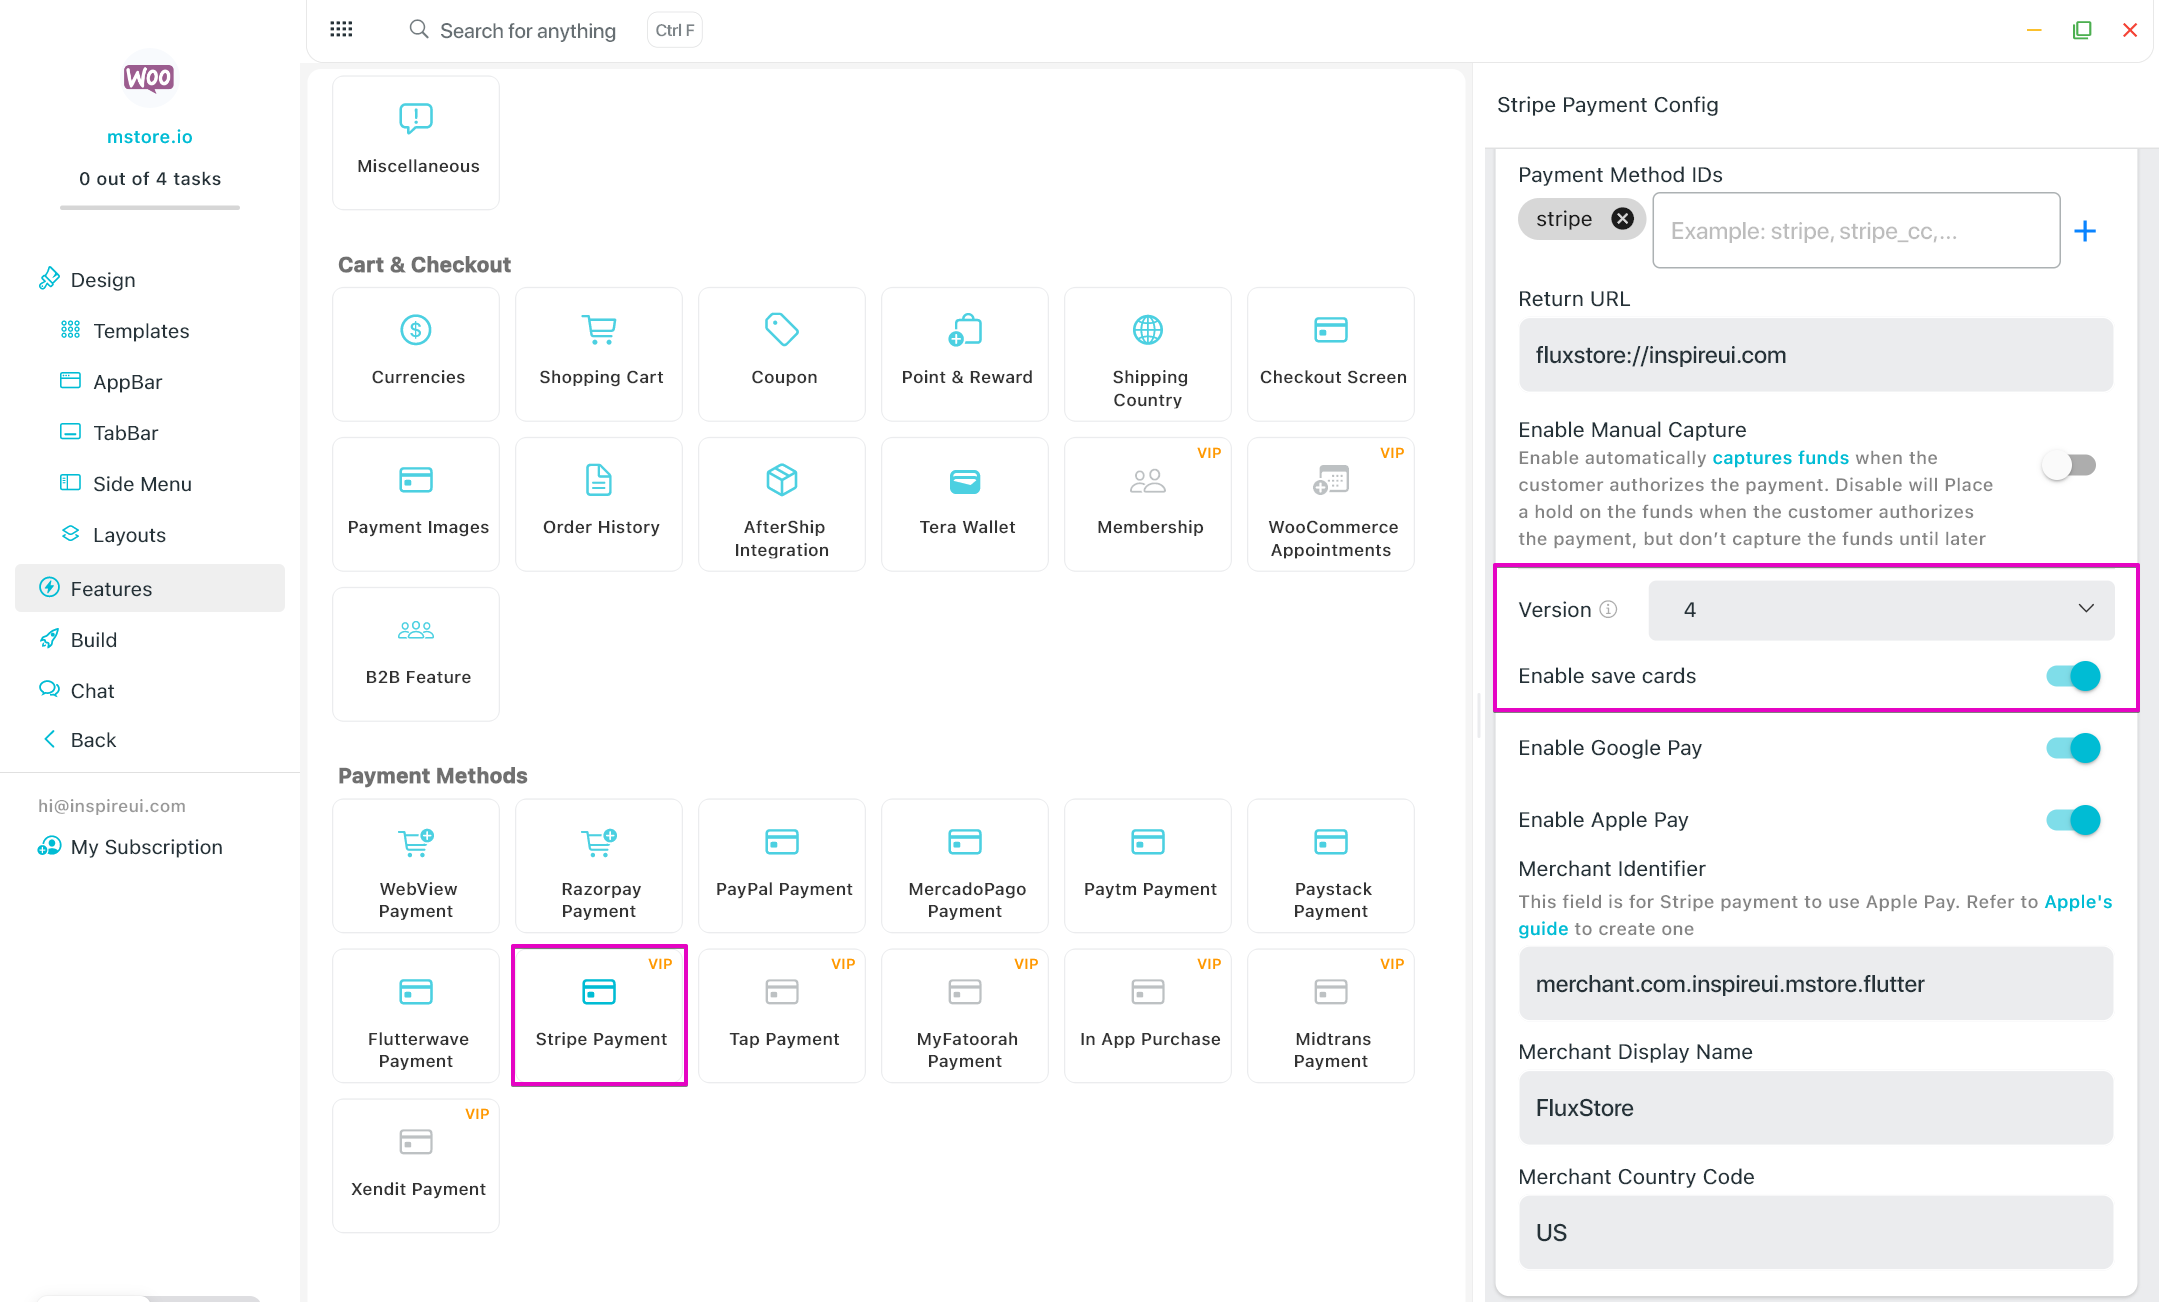
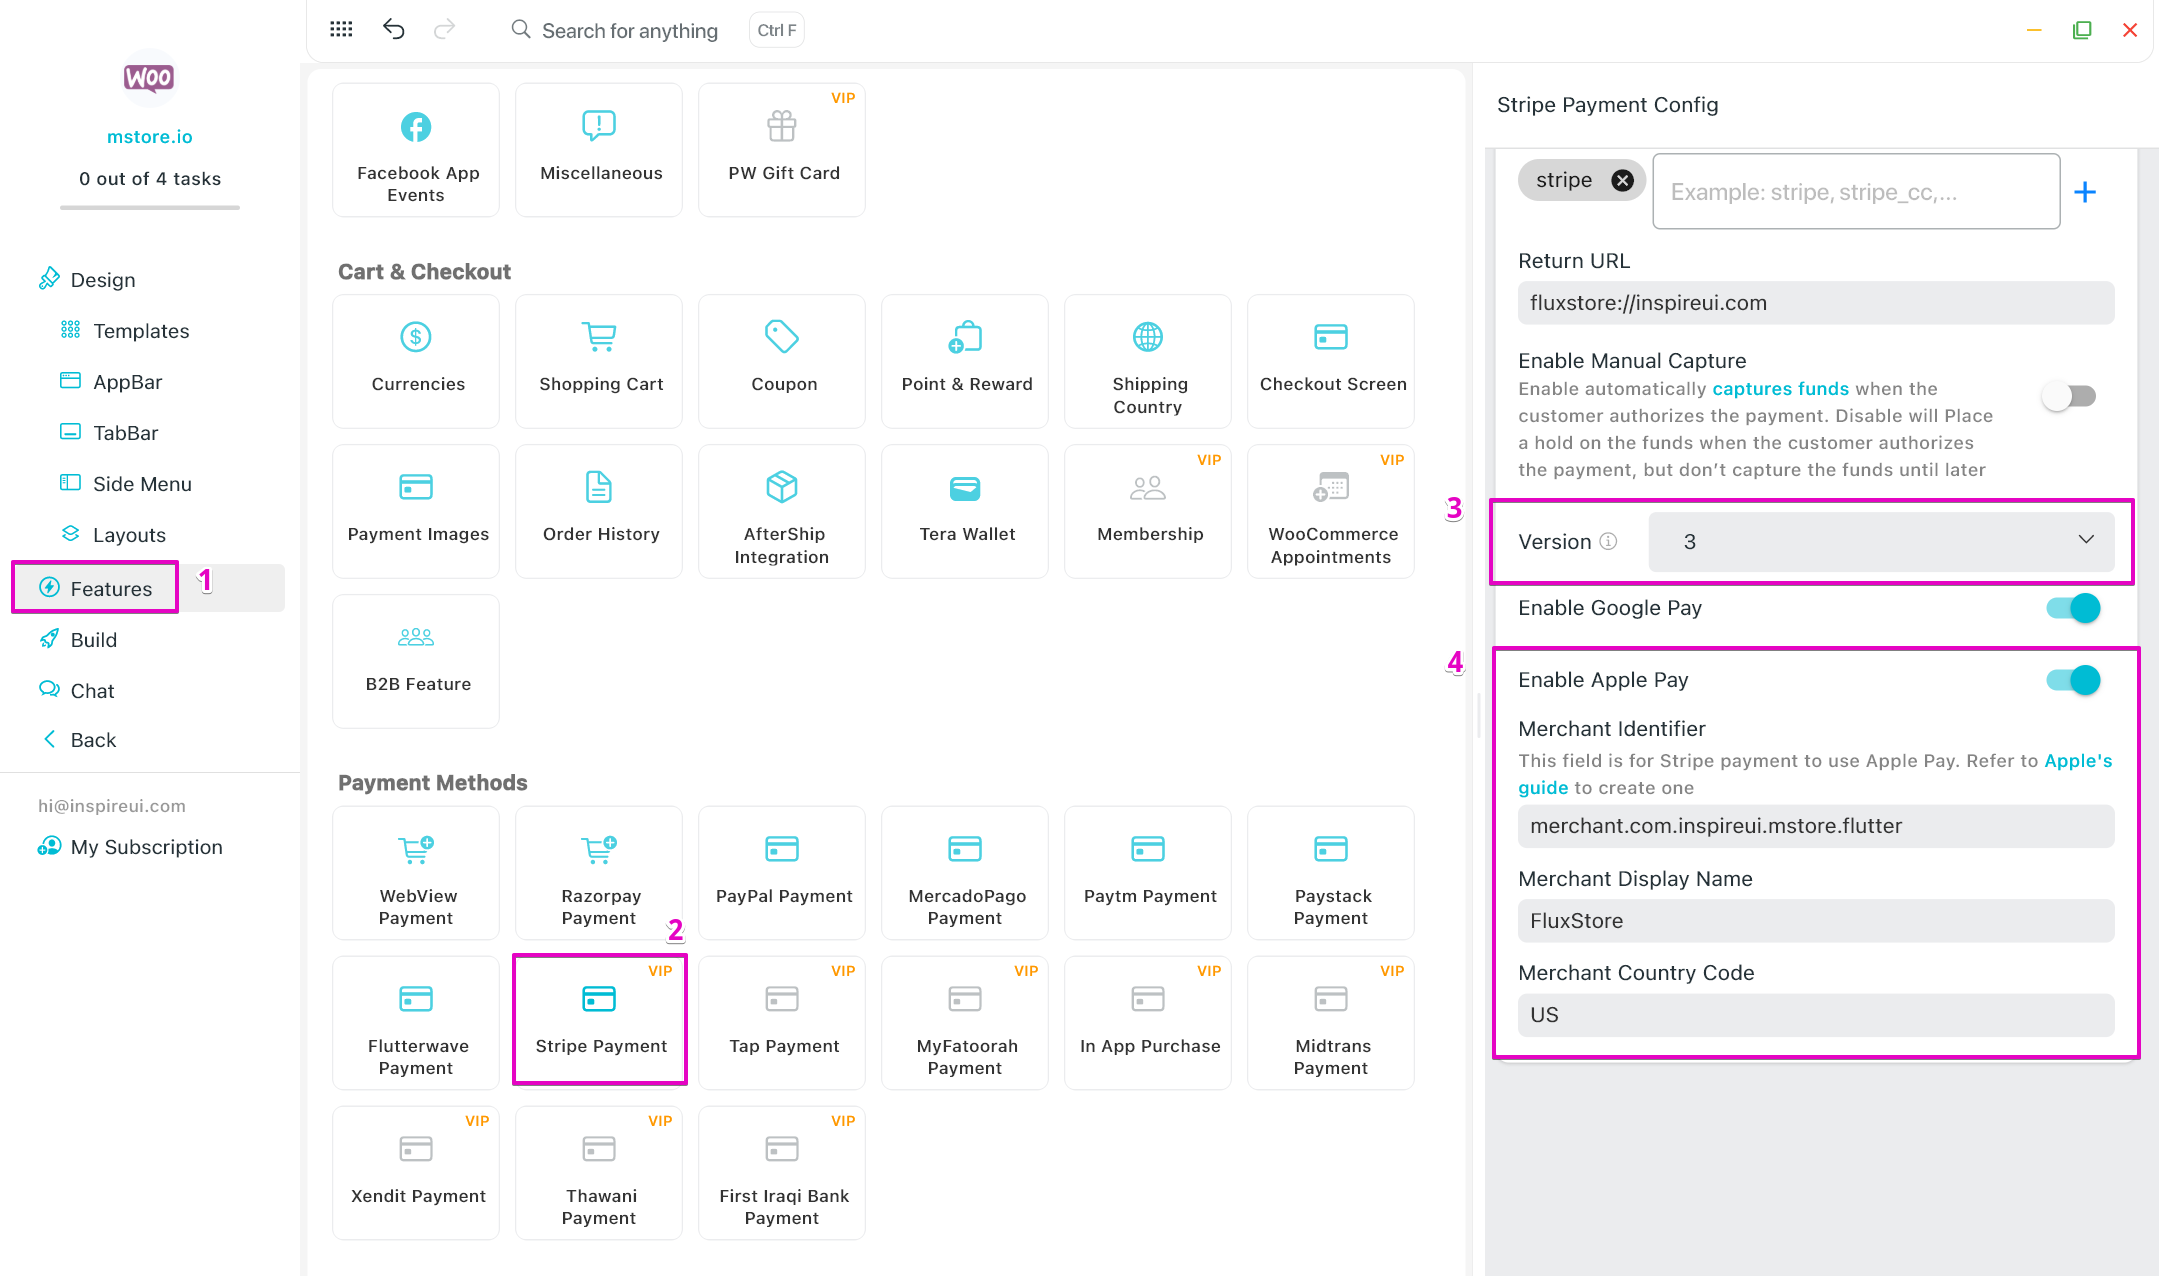
- Payment Method Ids: all ID of your Stripe methods.
- Enable: to enable Stripe payment. Default is
disable - Enable Google Pay: to enable Google Pay payment. To use Google Pay, remember that do not select Version 1 , input Merchant Display Name and Merchant Country Code.
- Enable ApplePay: enable Apple Pay payment. To use Apple Pay, remember that do not select Version 1 , input Merchant Display Name and Merchant Country Code. Check the guide to create merchantIdentifier.
- Version: there are version 1, version 3 and version 4
- Enable Manual Capture: Enable this automatically captures funds when the customer authorizes the payment. Disable will Place a hold on the funds when the customer authorizes the payment, but don’t capture the funds until later (not all payment methods support this). Check Stripe's documentation. Default is
disable
Setup Stripe Node Server
If you are using StripeServerNode-v2, update it to the latest StripeServerNode-v3 to use with the latest version.
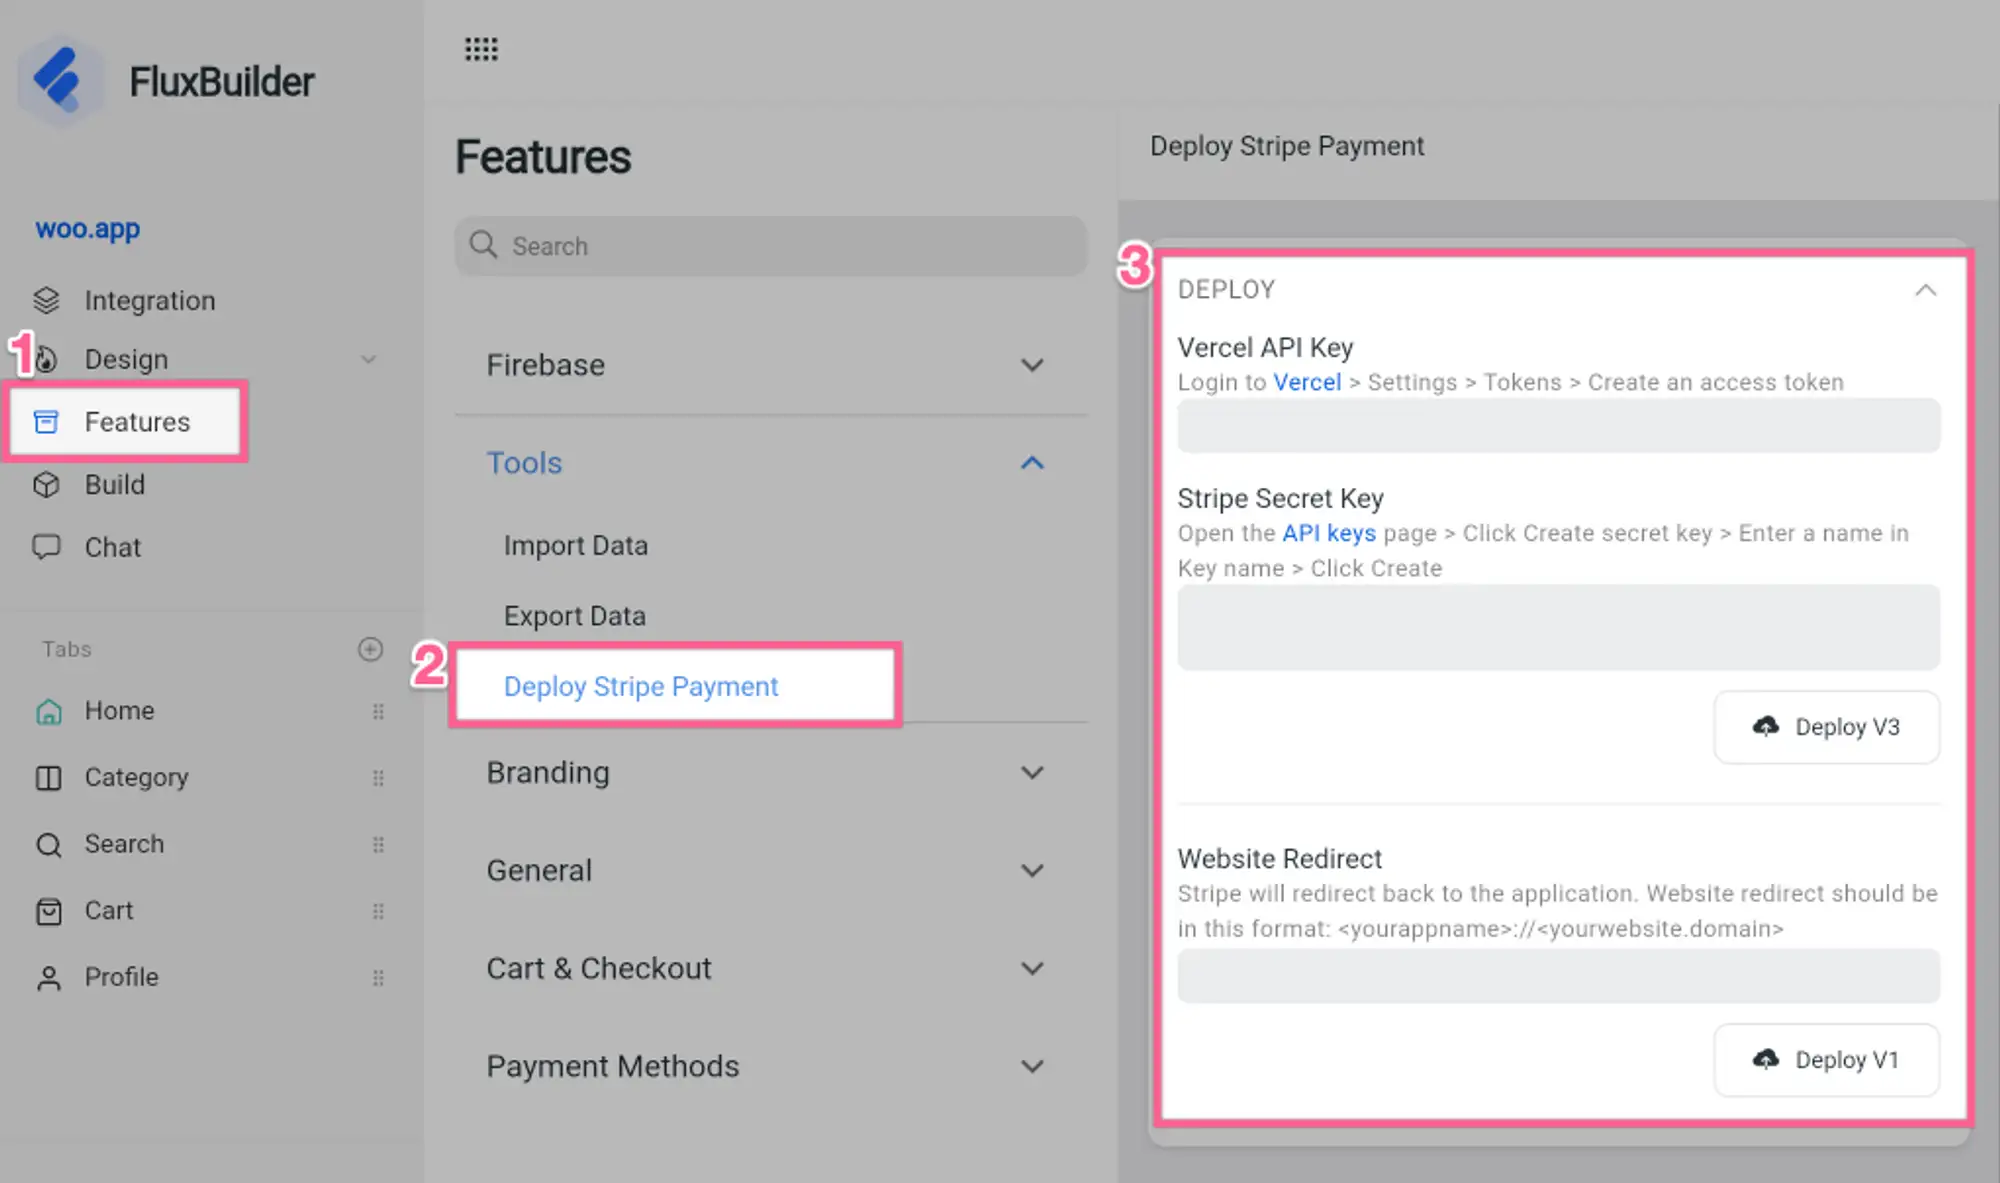
Use FluxBuilder:
- Open your app and go to Features
- In Tools → select Deploy Stripe Payment
- Deploy Stripe server and save to your local to update into the Stripe Payment feature
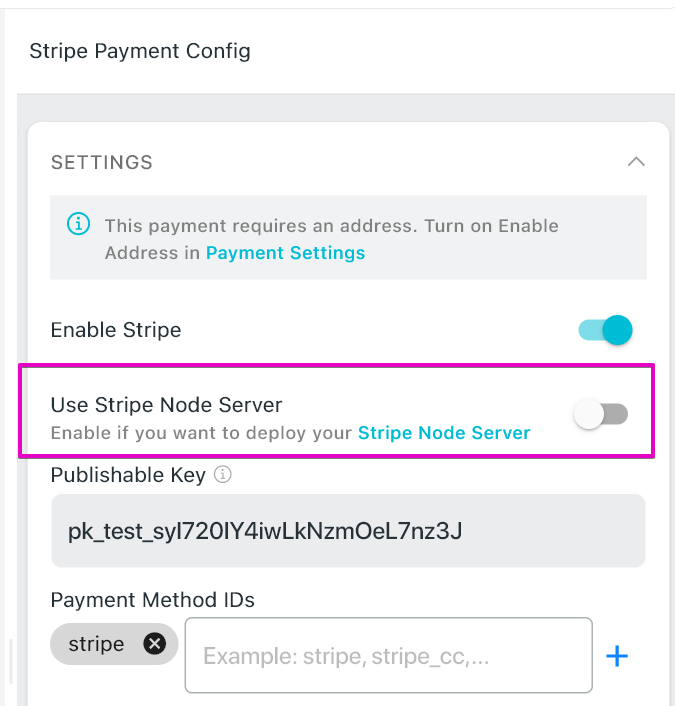
Skip Server Deployment
If you don't want to deploy Stripe server, please skip above step:
In FluxBuilder, please disable the Use Stripe Node Server :
Test:
- Test API keys (publishable key & secret key) can be taken here.
- You can use a card number
4242 4242 4242 4242with any CVV & any future expiry date to test Stripe payment (only works with test keys). - To test 3D Secure, you can use this card
4000 0027 6000 3184or get more at Stripe's documentation.
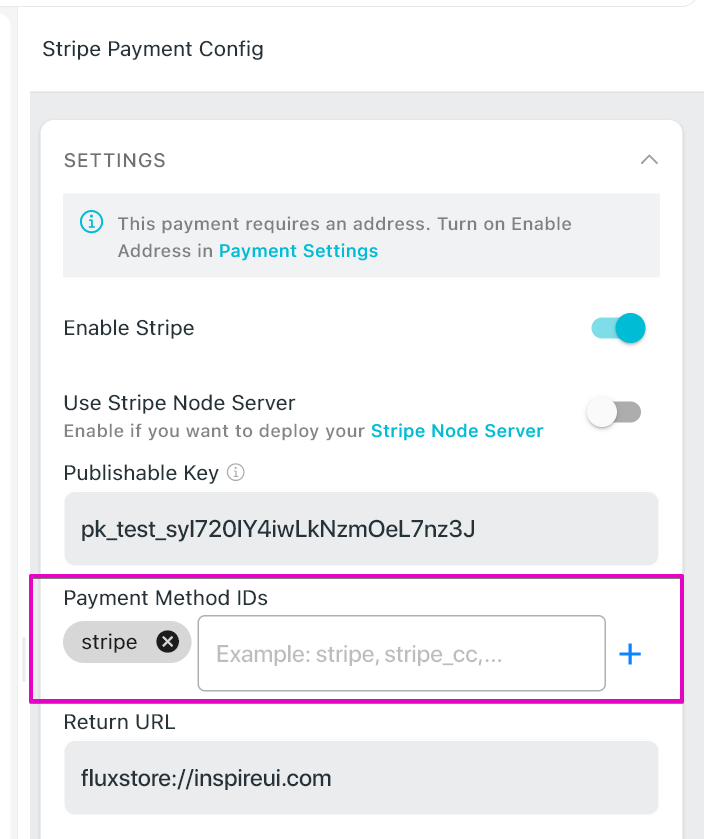
Multiple Stripe Methods
Tthe apps support native Multiple Payment Methods IDs for the Native Stripe. This means many Payment Methods IDs can be enabled as native payments in the app to be available to use. E.g. Stripe Express, Stripe Connect, etc.
Use FluxBuilder
- Open your app on FluxBuilder
- Go to Features → Stripe → input Payment Method IDs and click on the + button
The Capture Later
Learn more at Stripe's documentation.
Save Checkout Info
The feature is available for Woocommerce, Pro (Woocommerce) and Multi Vendors, supports Version 4 of Stripe payment saving Cards so your customers don't need to enter checkout information every time they pay.
Note: if you are using an old version and want to use version 4 then have to redeploy the Stripe Payment (refer to the guide Setup Stripe Node Server above).
Use FluxBuilder:
Open your app on FluxBuilder and navigate to the Features section.
Select "Stripe Payment"
In the Stripe Payment settings, choose "Version 4" to use the latest version of the Stripe payment integration.
Toggle the "Enable Save Card" option to the "On" position.
2. Apple Pay
Available for WooCommerce:
- Take a look at the integration requirements.
- Create a merchant identifier for your business.
- Create a payment processing certificate to encrypt payment information.
- Create Apple Pay Certificate (as the guide below)
- Update configs by FluxBuilder
- Release to TestFlight before testing with live keys. To test with test keys, use an iOS simulator.
✨ Create Apple Pay Certificate
Video Guide:
Manual Guide:
Step 1: Generate a Certificate Signing Request (CSR) on Stripe
- Go to https://dashboard.stripe.com/settings/payments/apple_pay and log in to your Stripe account.
- Add a new application:
- Click on Add new application.
- Stripe will auto download a file “stripe.certSigningRequest” (Certificate Signing Request (CSR) file).
Step 2: Create a Payment Processing Certificate on the Apple Developer Portal
- Log in to your Apple Developer account: Visit Apple Developer and sign in.
- Access Certificates, Identifiers & Profiles: Navigate to Account > Certificates, Identifiers & Profiles. or Go to the link https://developer.apple.com/account/resources/certificates/add
- Create a Merchant ID (if not already created):
- Select Identifiers > Merchant IDs.
- Click the ”+” button to add a new Merchant ID.
- Enter a description and identifier (e.g., merchant.com.yourcompanyname).
- Click Continue, then Register.
- Generate a Payment Processing Certificate:
- Under Certificates, click the ”+” button to add a new certificate.
- Select Apple Pay Payment Processing Certificate and click Continue.
- Choose the Merchant ID you created earlier and click Continue.
- Upload the CSR file you downloaded from Stripe by clicking Choose File, selecting the CSR file, and then clicking Continue.
- Click Download to obtain the generated certificate (.cer file).
Step 3: Upload the Certificate to Stripe
- Return to Stripe’s Apple Pay settings: In the Stripe Dashboard, go back to Settings > Payment methods > Apple Pay.
- Upload the certificate:
- Click Upload and select the .cer file you downloaded from the Apple Developer portal.
- After uploading, the certificate should appear under iOS certificates.
Step 4: Verify Your Domain for Apple Pay on the Web (if applicable)
- Add your domain in Stripe:
- Navigate to Settings > Payment methods > Apple Pay > Payment method domains.
- Click Add new domain.
- Enter your domain (e.g., yourwebsite.com) and click Save and continue.
- Download the verification file: Stripe will provide a file named apple-developer-merchantid-domain-association.
- Upload the verification file to your website: Place the file in the .well-known directory of your website, so it’s accessible at https://yourwebsite.com/.well-known/apple-developer-merchantid-domain-association.
- Verify the domain in Stripe: After uploading the file, return to Stripe and click Verify next to your domain.
3. Google Pay
Available for WooCommerce:
- Take a look at the integration requirements.
- Sign in to the business console and create a business.
- Fill in all business information and Request production access to the Google Pay API for your app. You can wait a few days for the validation.
- Update these configs in FluxBuilder: go to Features → in Payment Methods, select Stripe Payment → turn on Enabled Stripe → Enable Google Pay → input Merchant Display Name and Merchant Country Code.
- Upload your app to Google Play Console (Internal testing/Closed testing track) and download it from Play Store to test.
That’s all :)