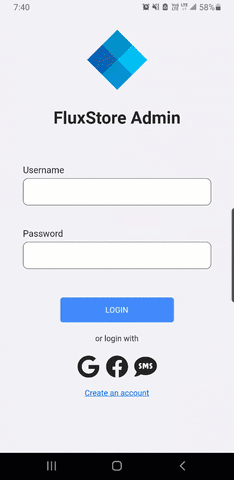
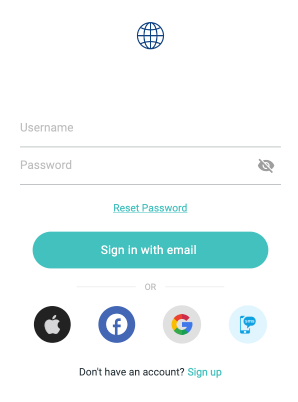
Social Login
Biometrics Login
This feature is available on almost apps, but Manager and Delivery Boy apps have not supported it yet.
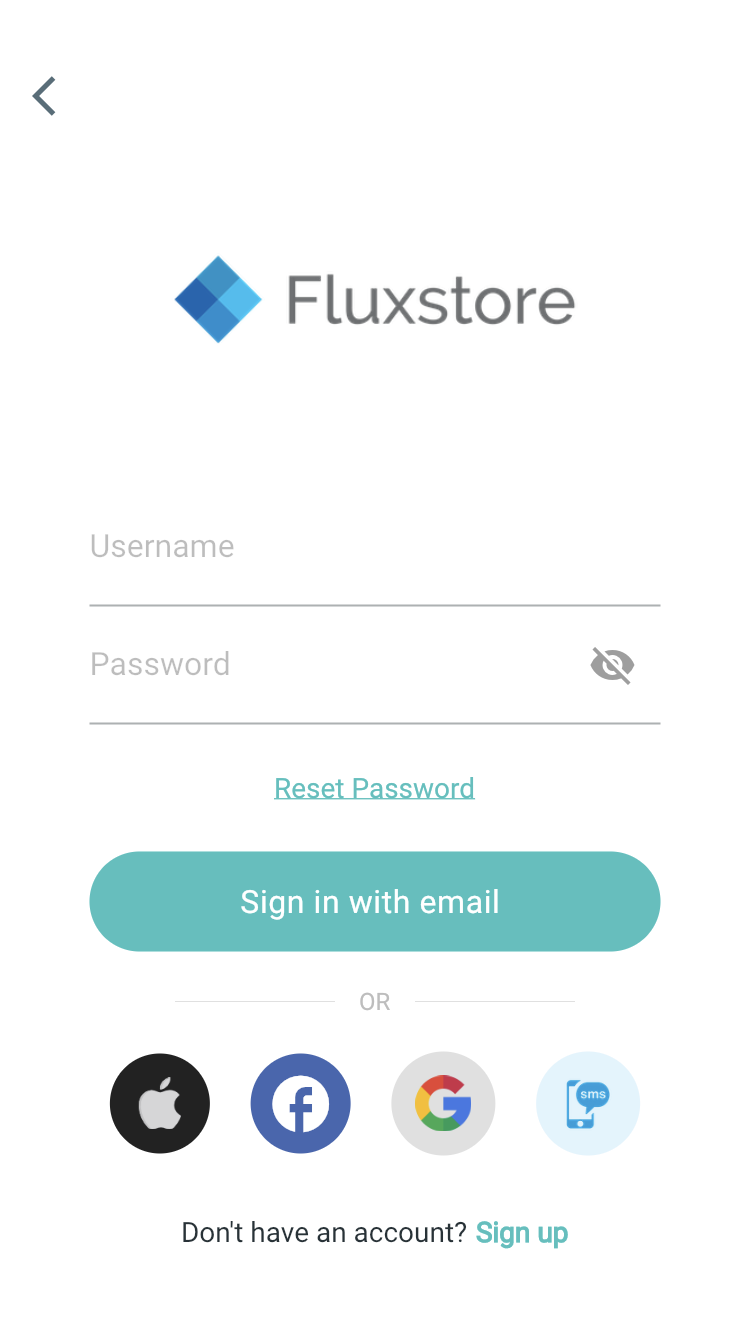
A new convenient method for authorizing access to your app by Face ID and Touch ID. Users will not need to remember the account username and password in the next login.
⭐️ Mainly support the 3 screens:
- Login
- Checkout
- Using Wallet
Biometrics will be applied to your available screens that are included in the 3 above screens.
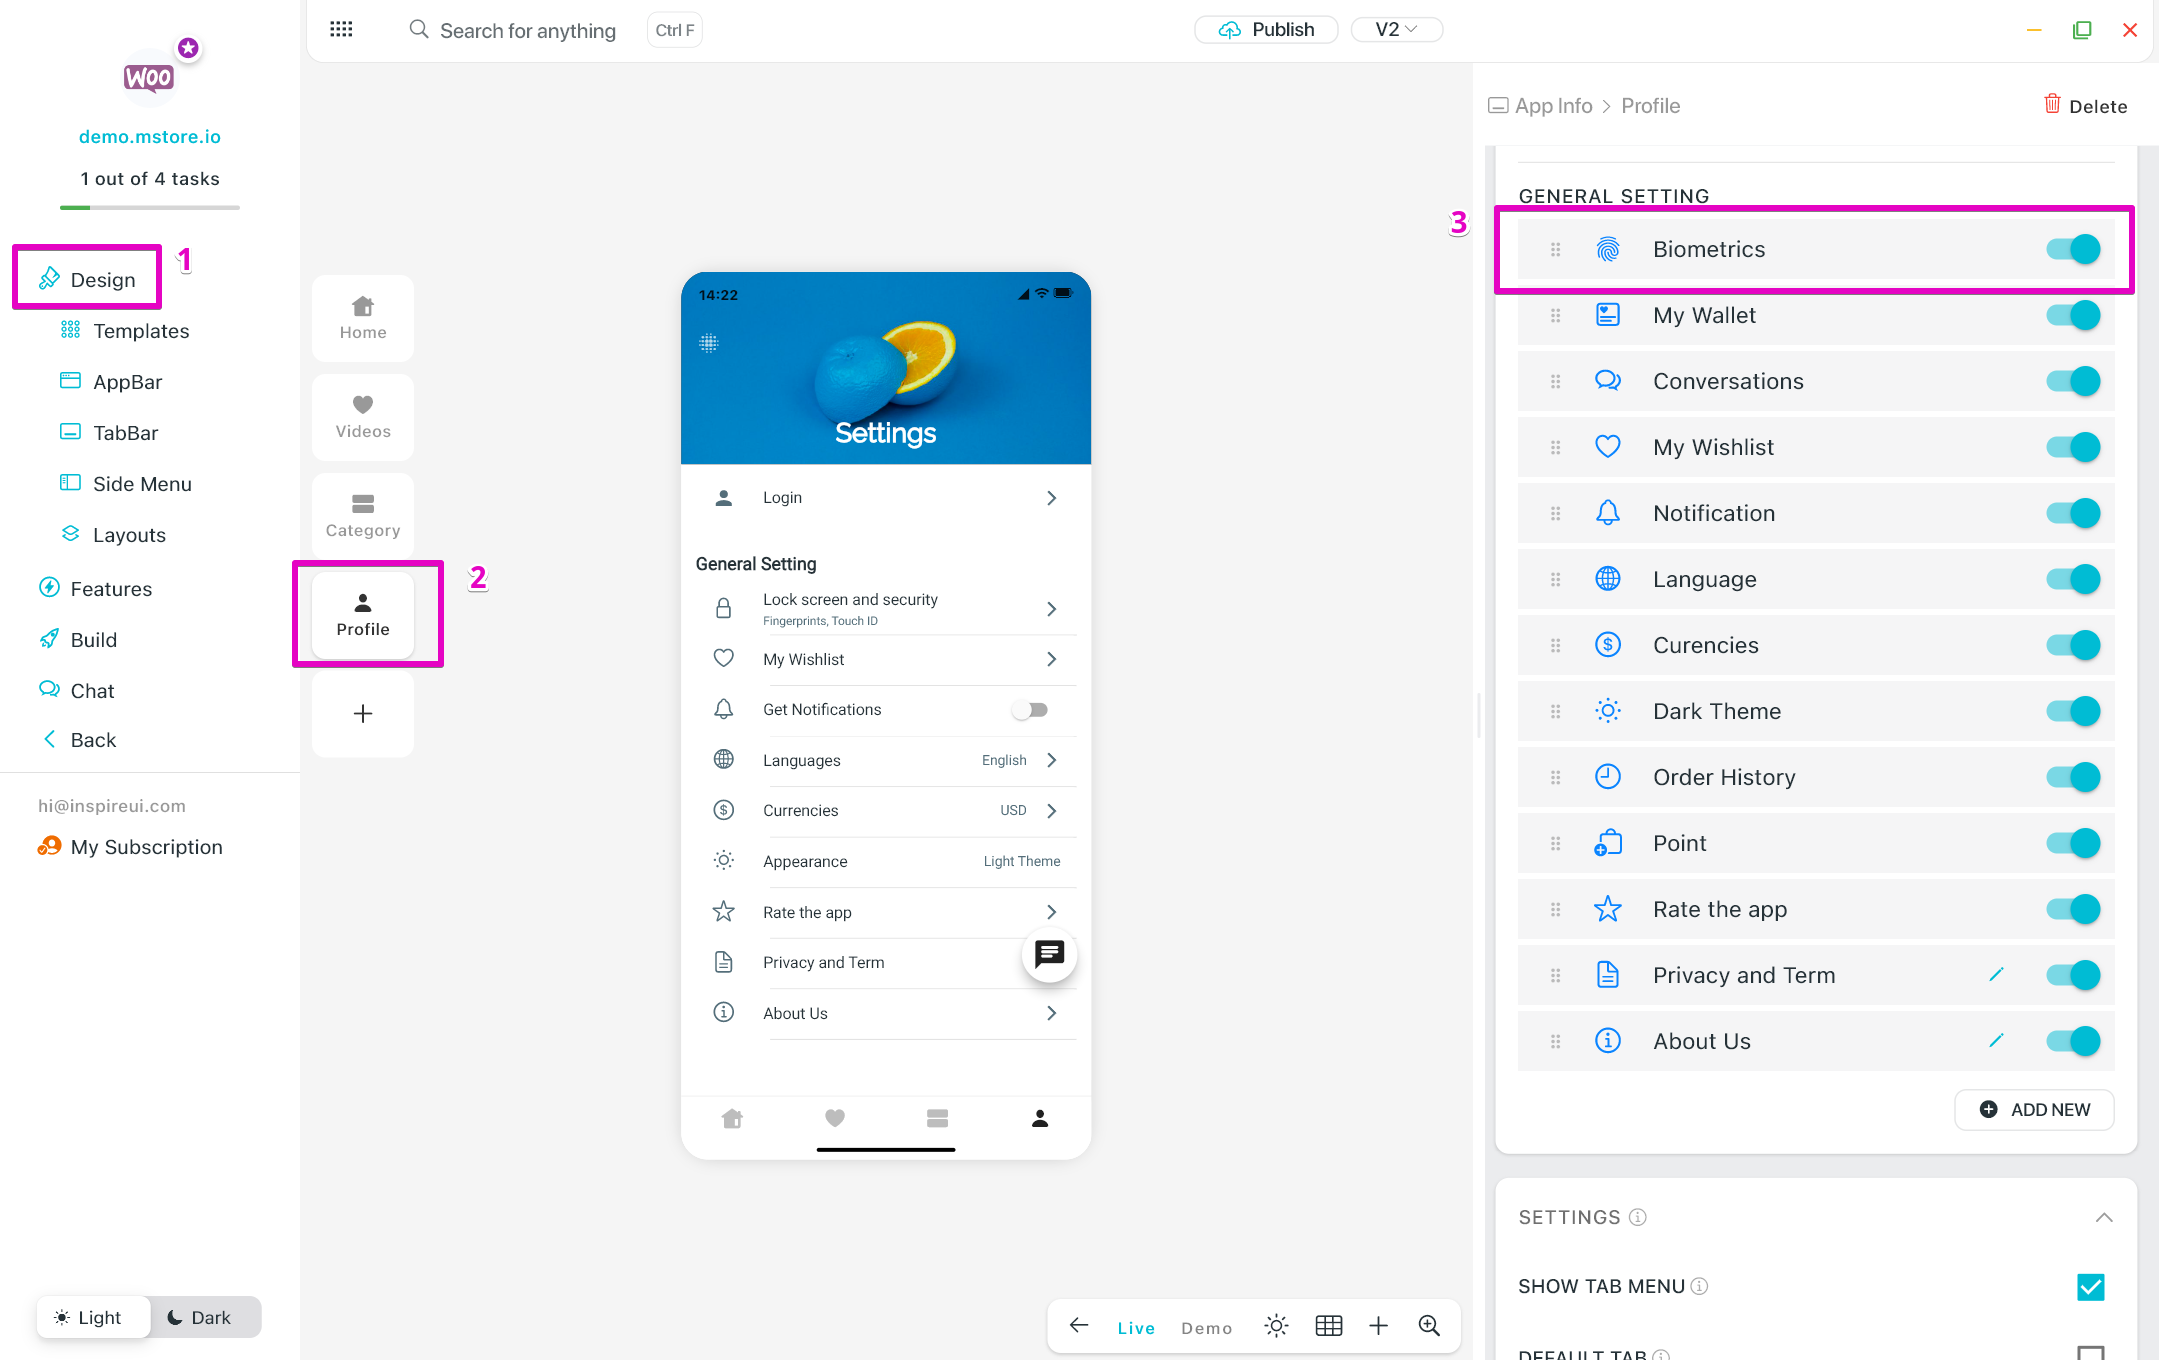
Configure: go to your app on FluxBuilder. Then on the Profile tab (Settings screen), enable the Biometrics option:
Apple Login
✅ This guide is for WooCommerce, Opencart, Magento, PrestaShop, WordPress.
❌ Not use for Shopify, BigCommerce, Notion, Strapi.
Follow steps below to enable Apple Login:
1. Execute the Firebase Settings
Create your project on Firebase. Then add iOS App into your project following this guide Firebase Settings. (Skip this step if you already did.)
2. Setup Apple in Firebase project
Step 1: Open the Firebase page https://console.firebase.google.com
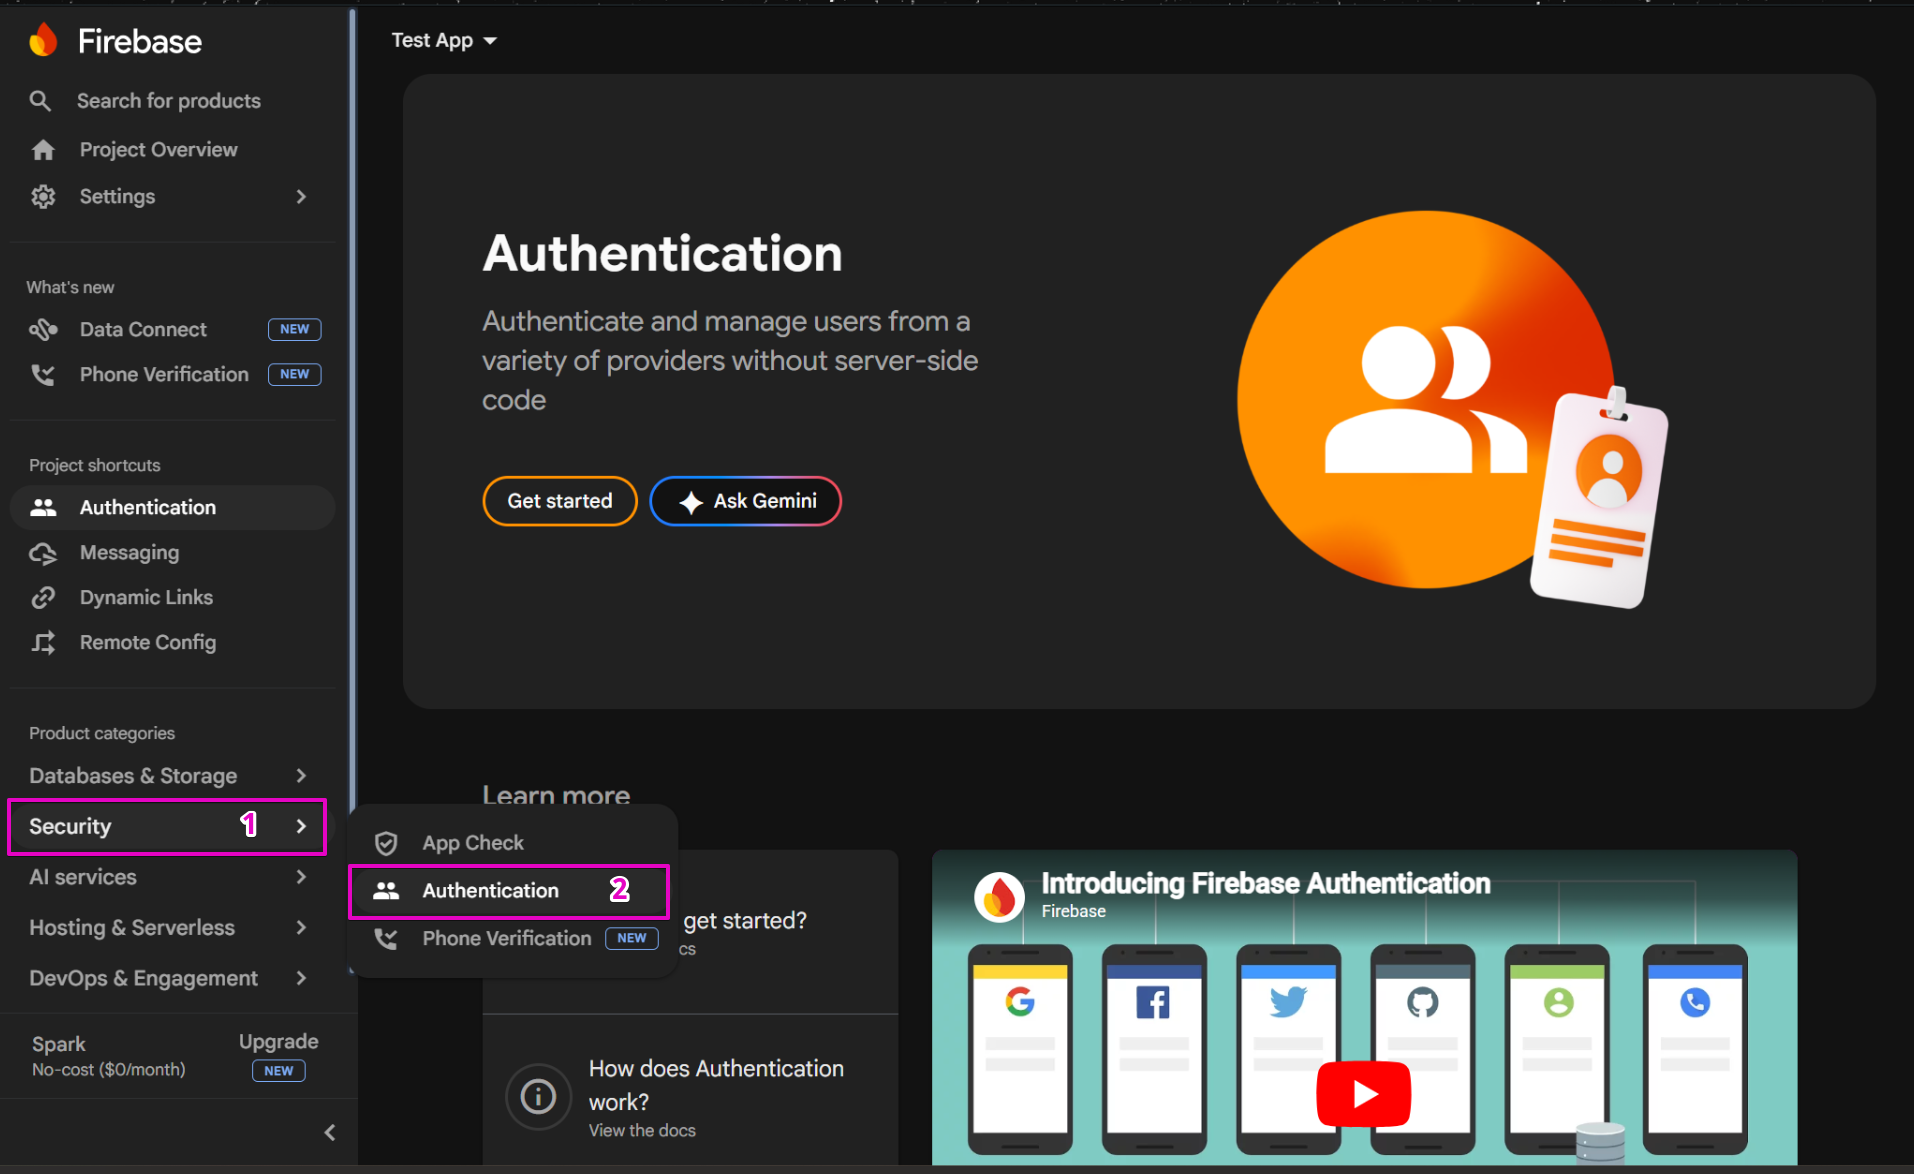
Step 2: Open your Firebase project. Then in the left menu bar, select the [Security], and click the [Authentication] item:
Step 3: Select the [Get Started] button:

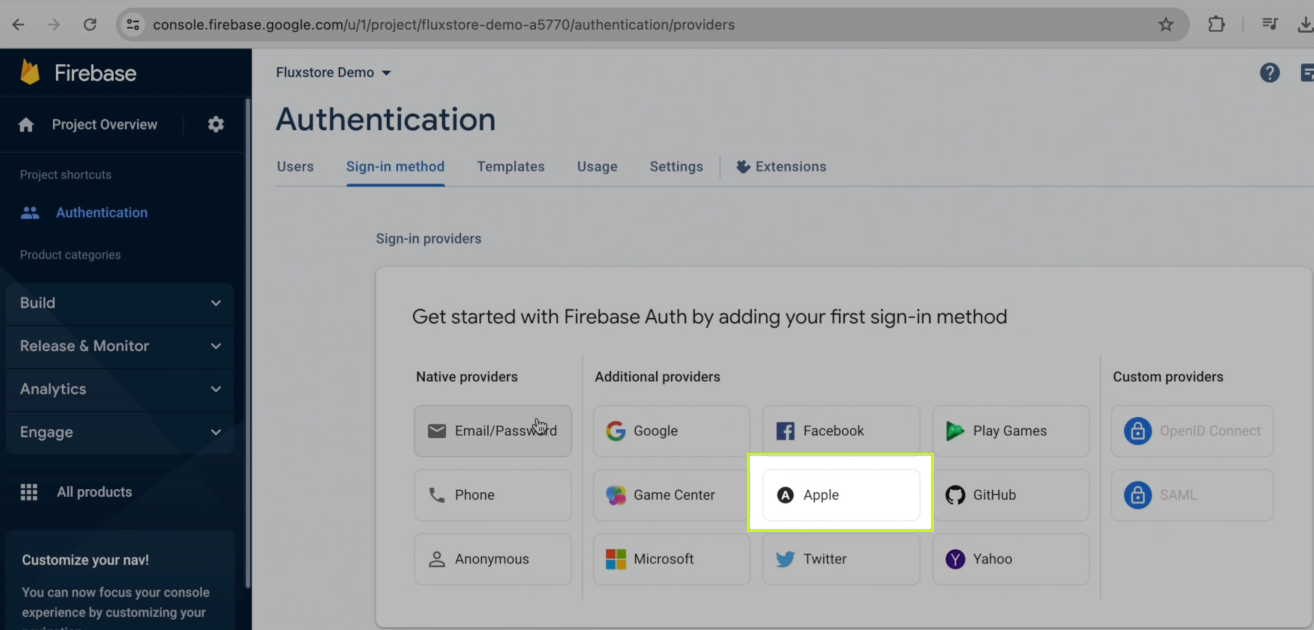
Step 4: Click the [Apple] item:
Step 5: Turn on the Enable option, then click the Save button.
3. Update Team ID & Bundle ID
Step 1: Open the Firebase page https://console.firebase.google.com
Step 2: Open your Firebase project. Select Settings option, and select General:
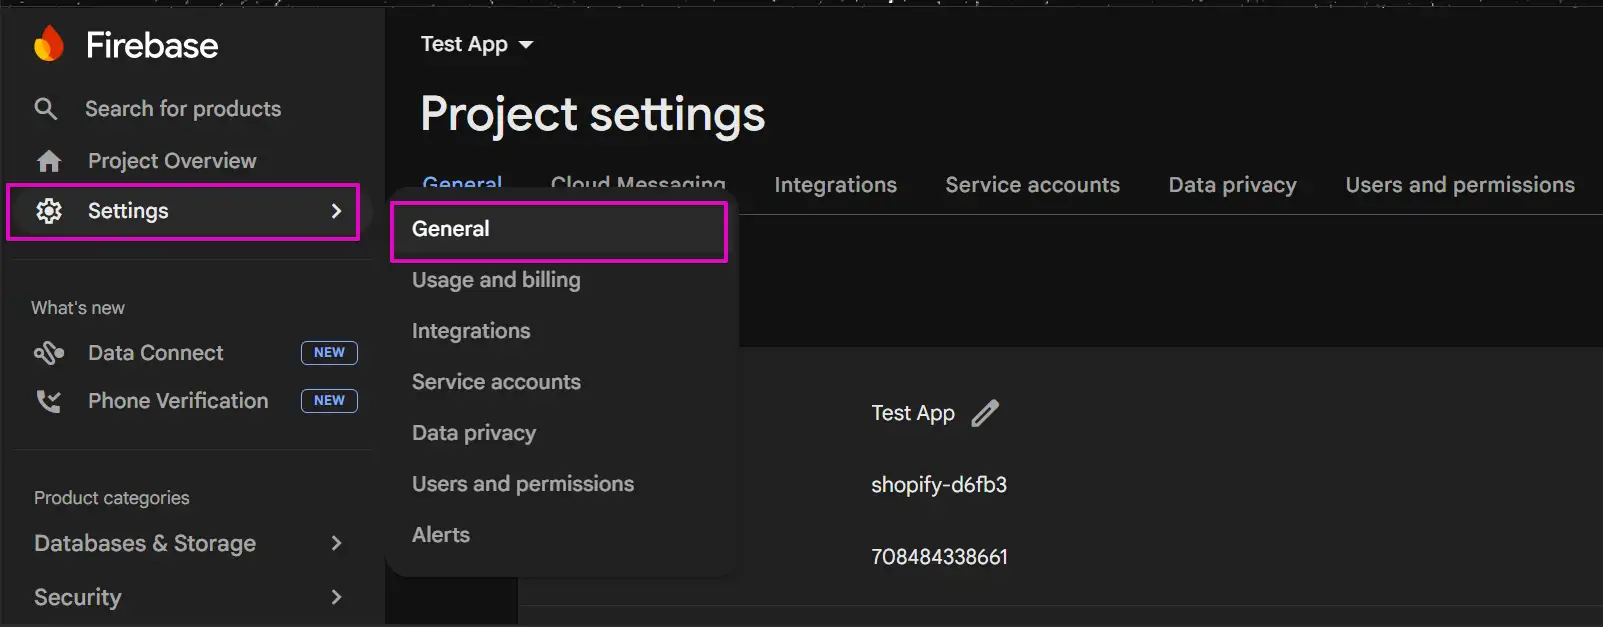
Step 3: Select your iOS app, then add Team ID and iOS Bundle ID to your iOS App.
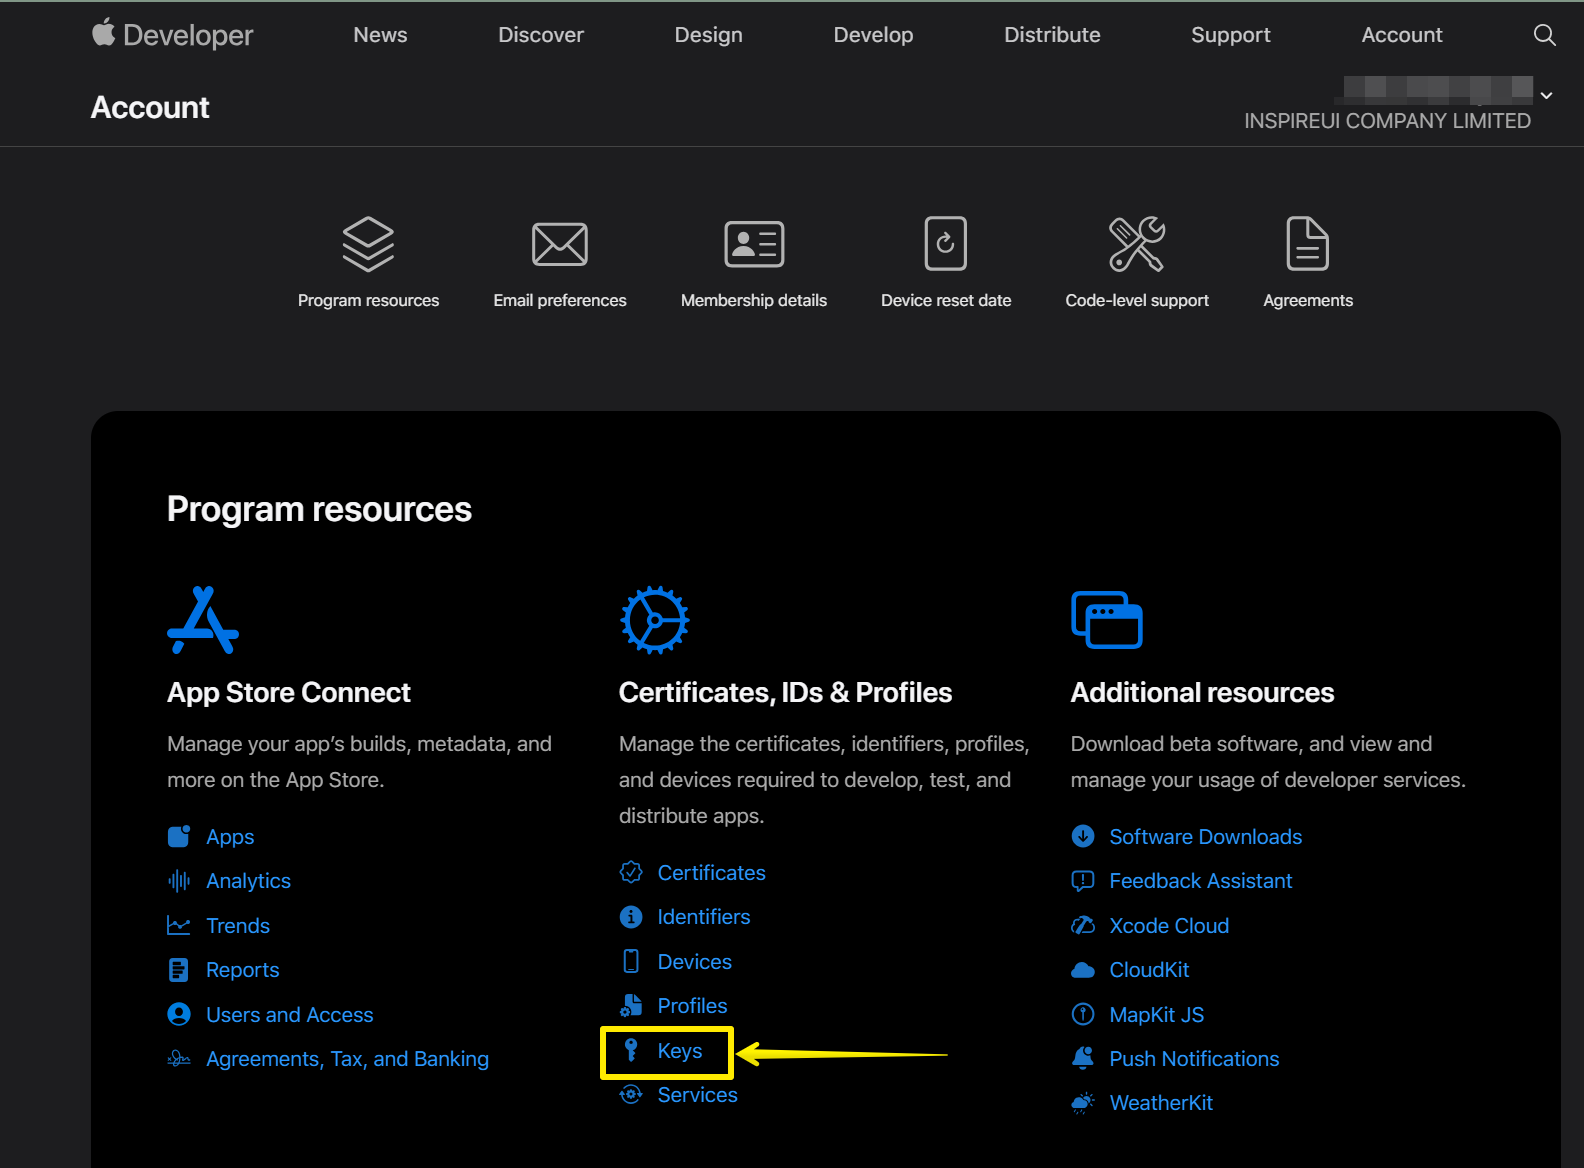
- Go to Apple Developer and get the Team ID
- Go to AppStoreConnect and get your Apple ID
- Save them to a note for later usage
"How to create Bundle ID for iOS app on Windows or Mac?”
4. Create Apple Sign In Key & Upload .p8 File
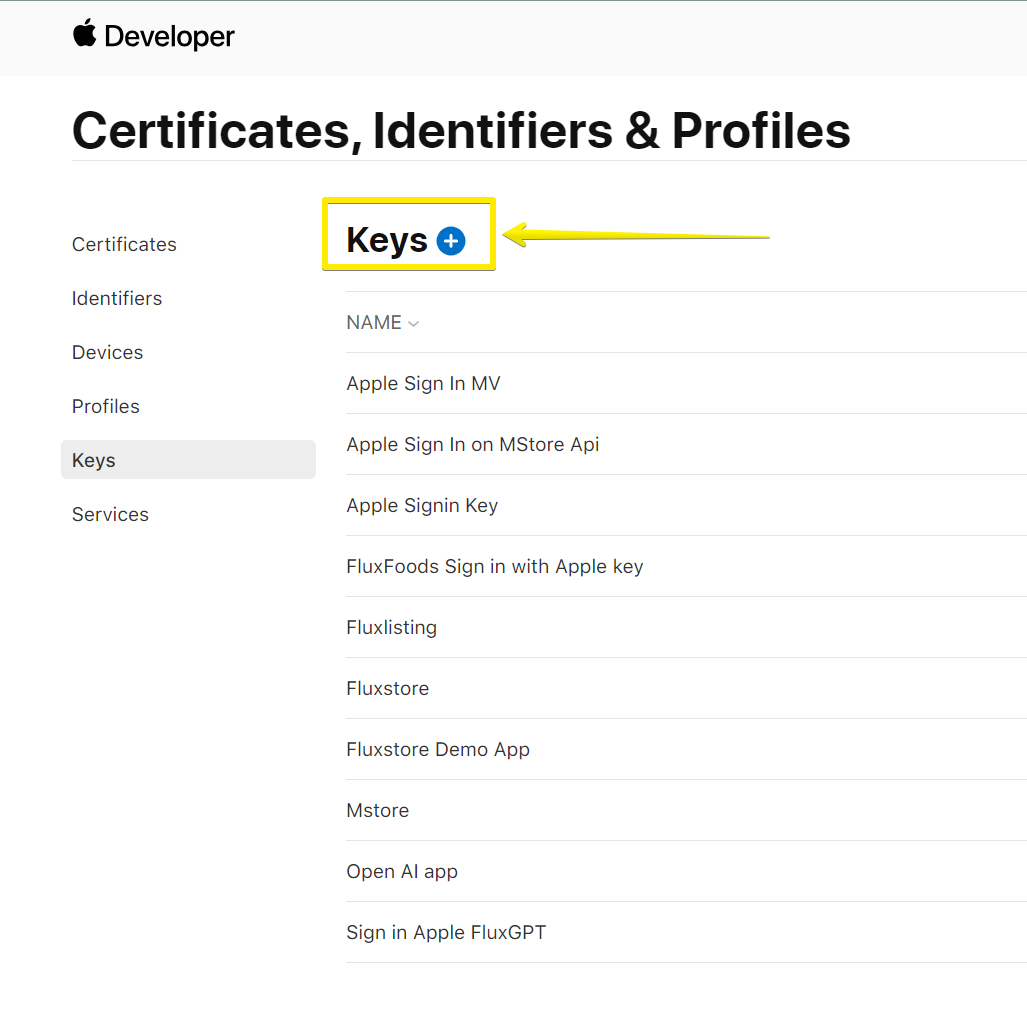
Step 1: Go to Apple Developer and create new Keys
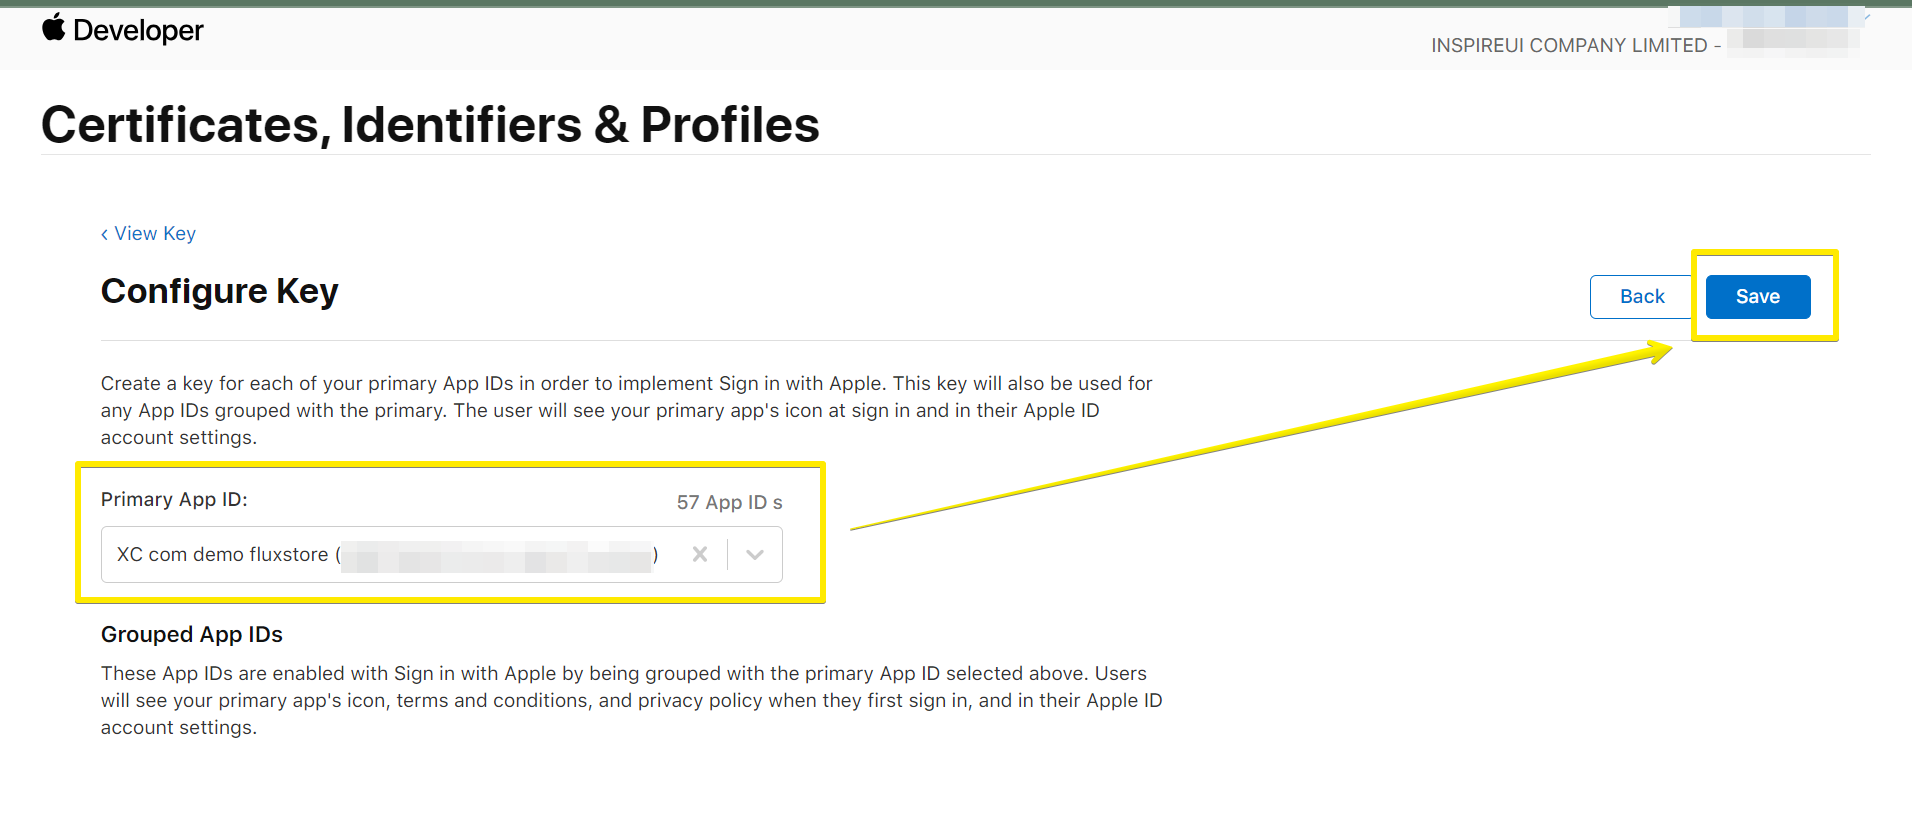
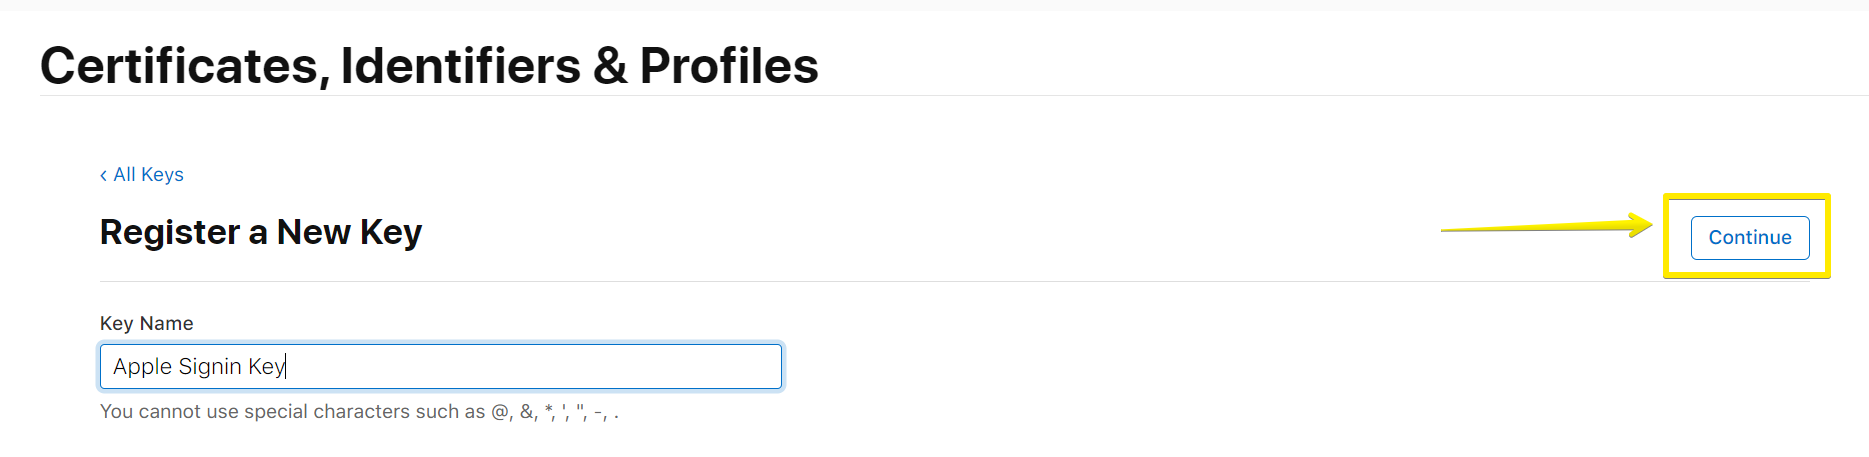
Step 2: Input the Key Name. Select Sign In with Apple option and click Configure to edit.
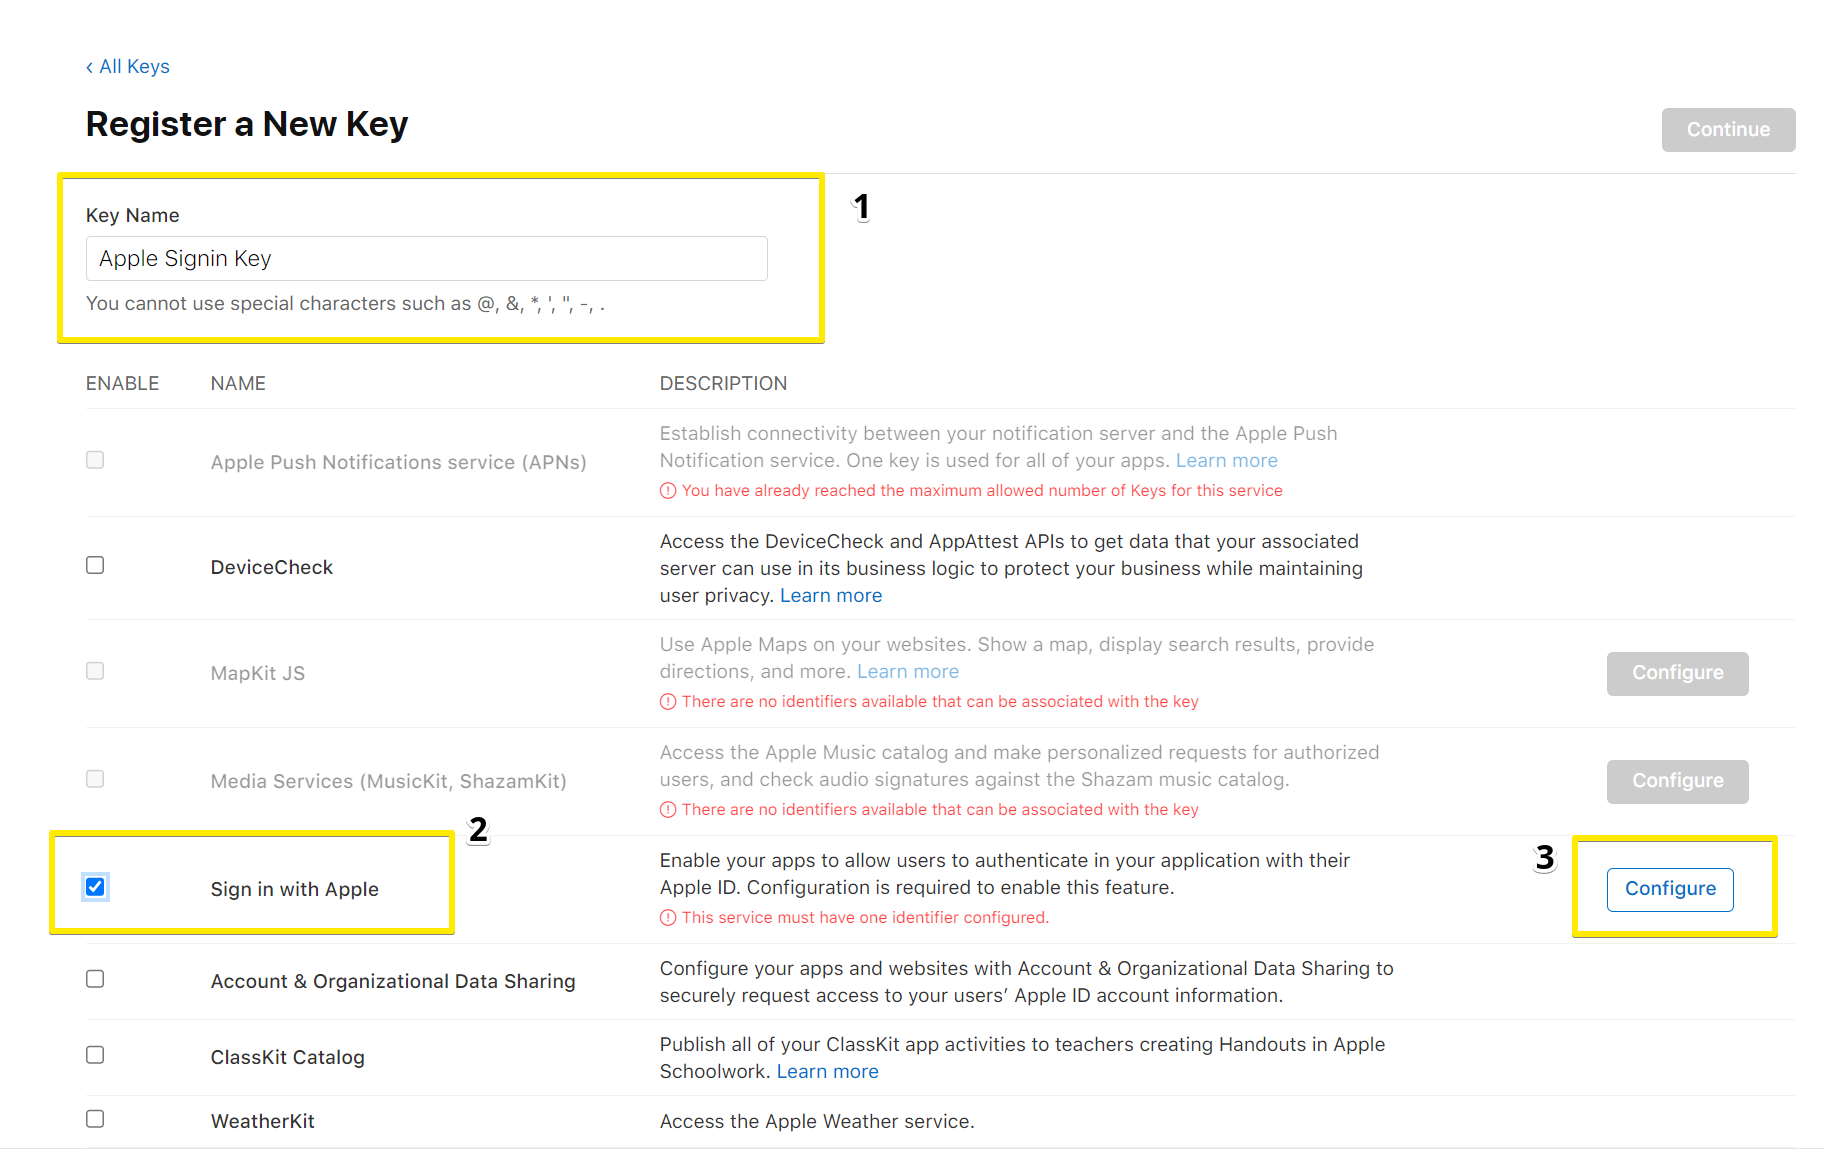
Step 3: Select Primary App IDs and Save
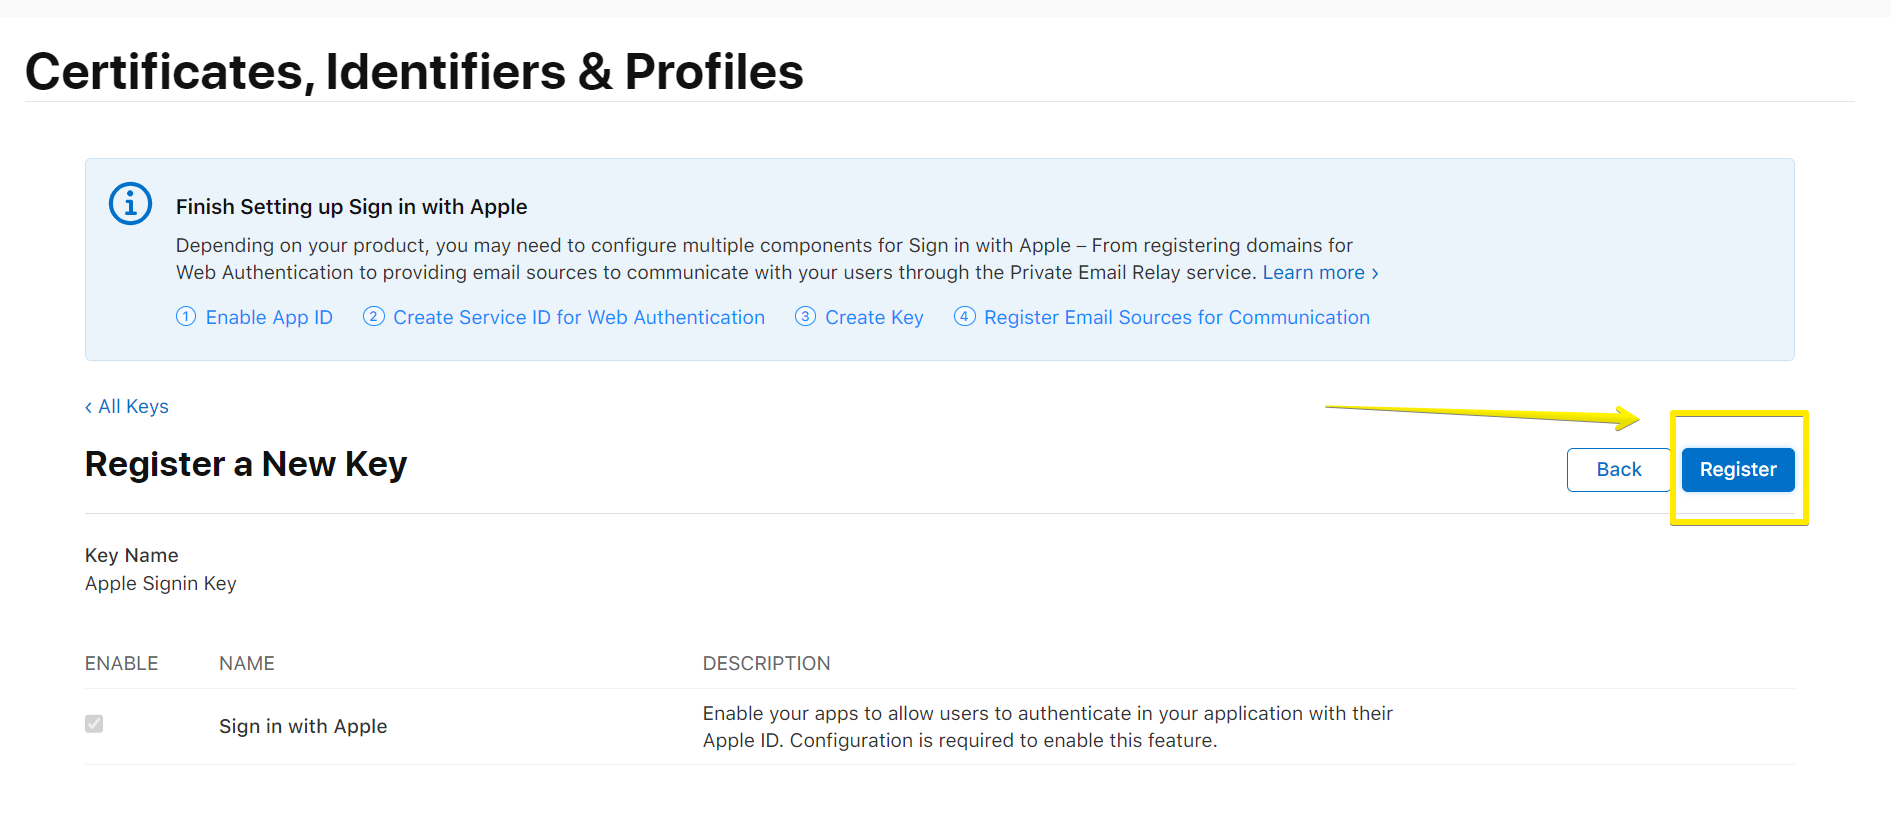
Step 4: Now click Continue and Register
Step 5: After registering the new key successfully, download the key file
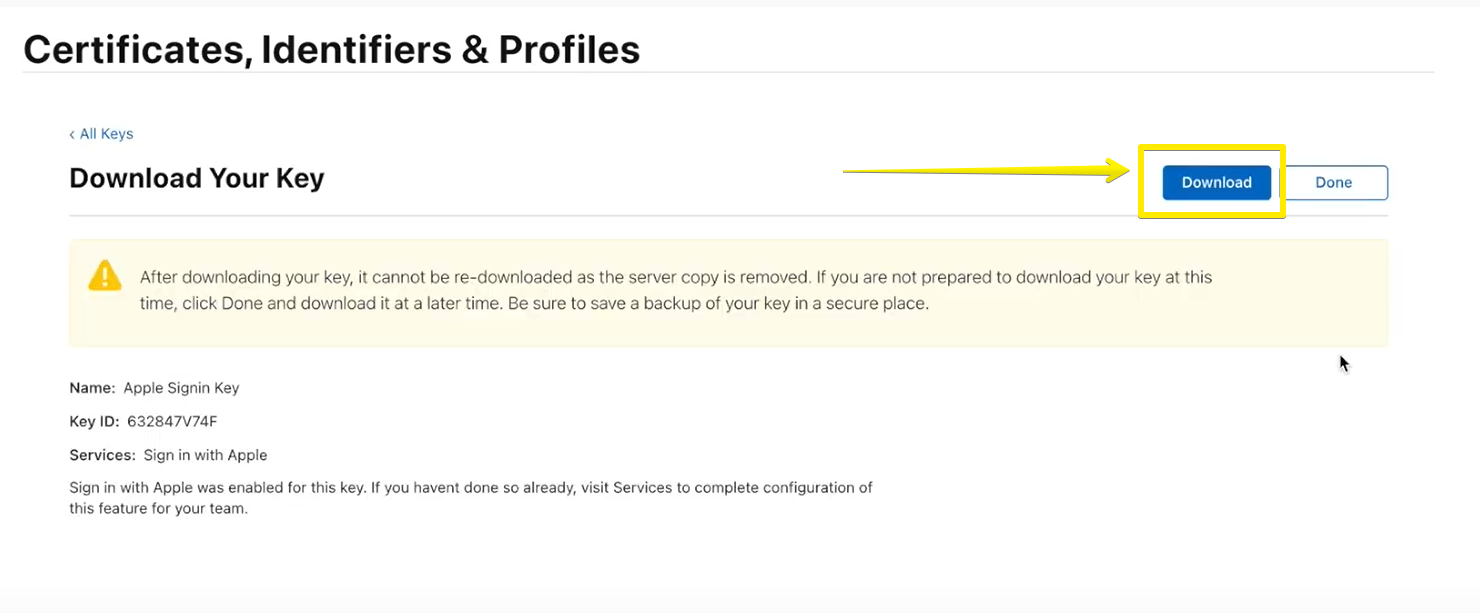
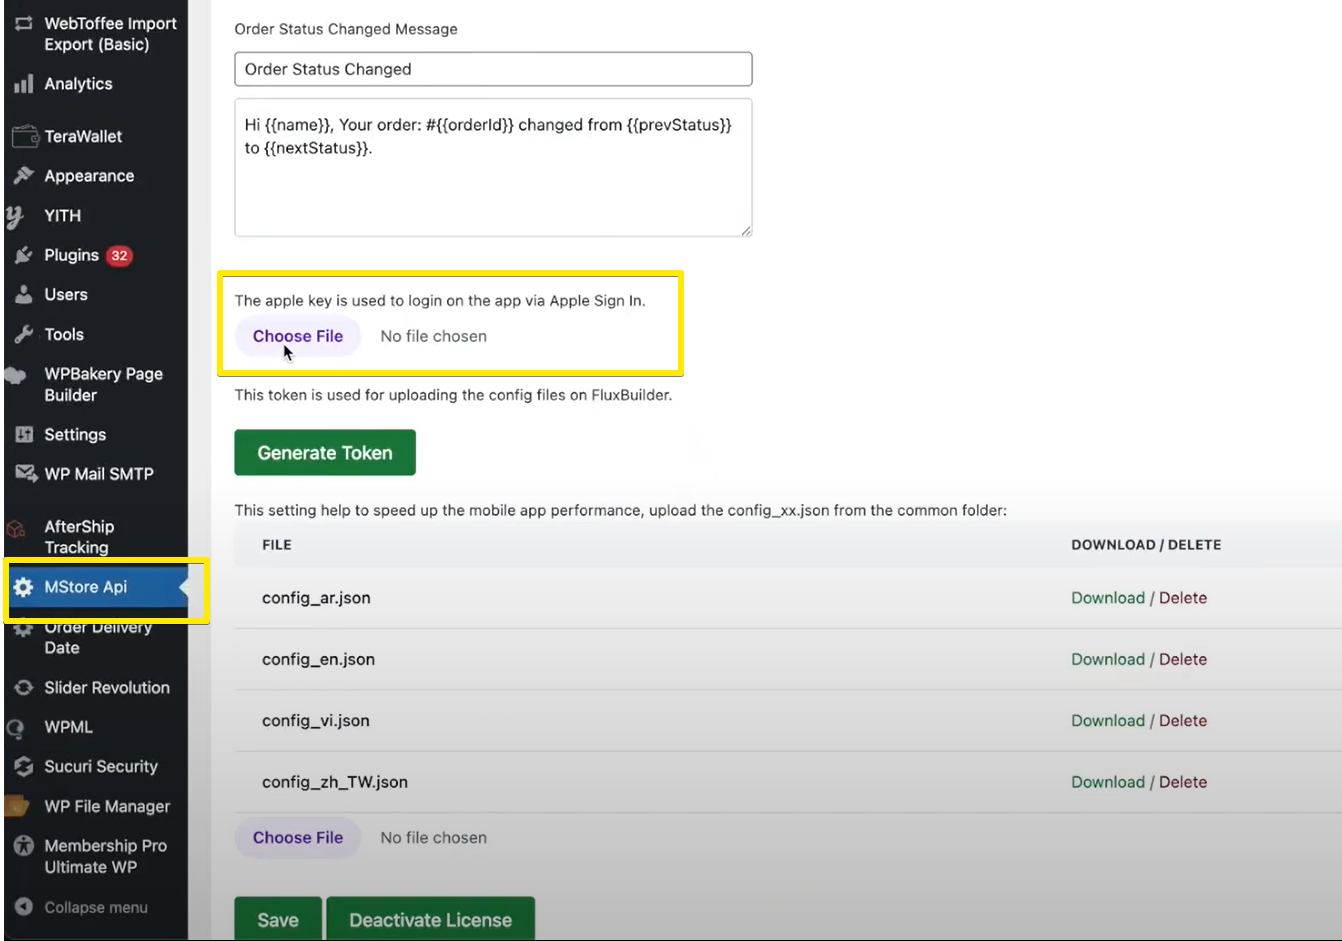
Step 6: Upload the key file into Mstore API of your admin site.
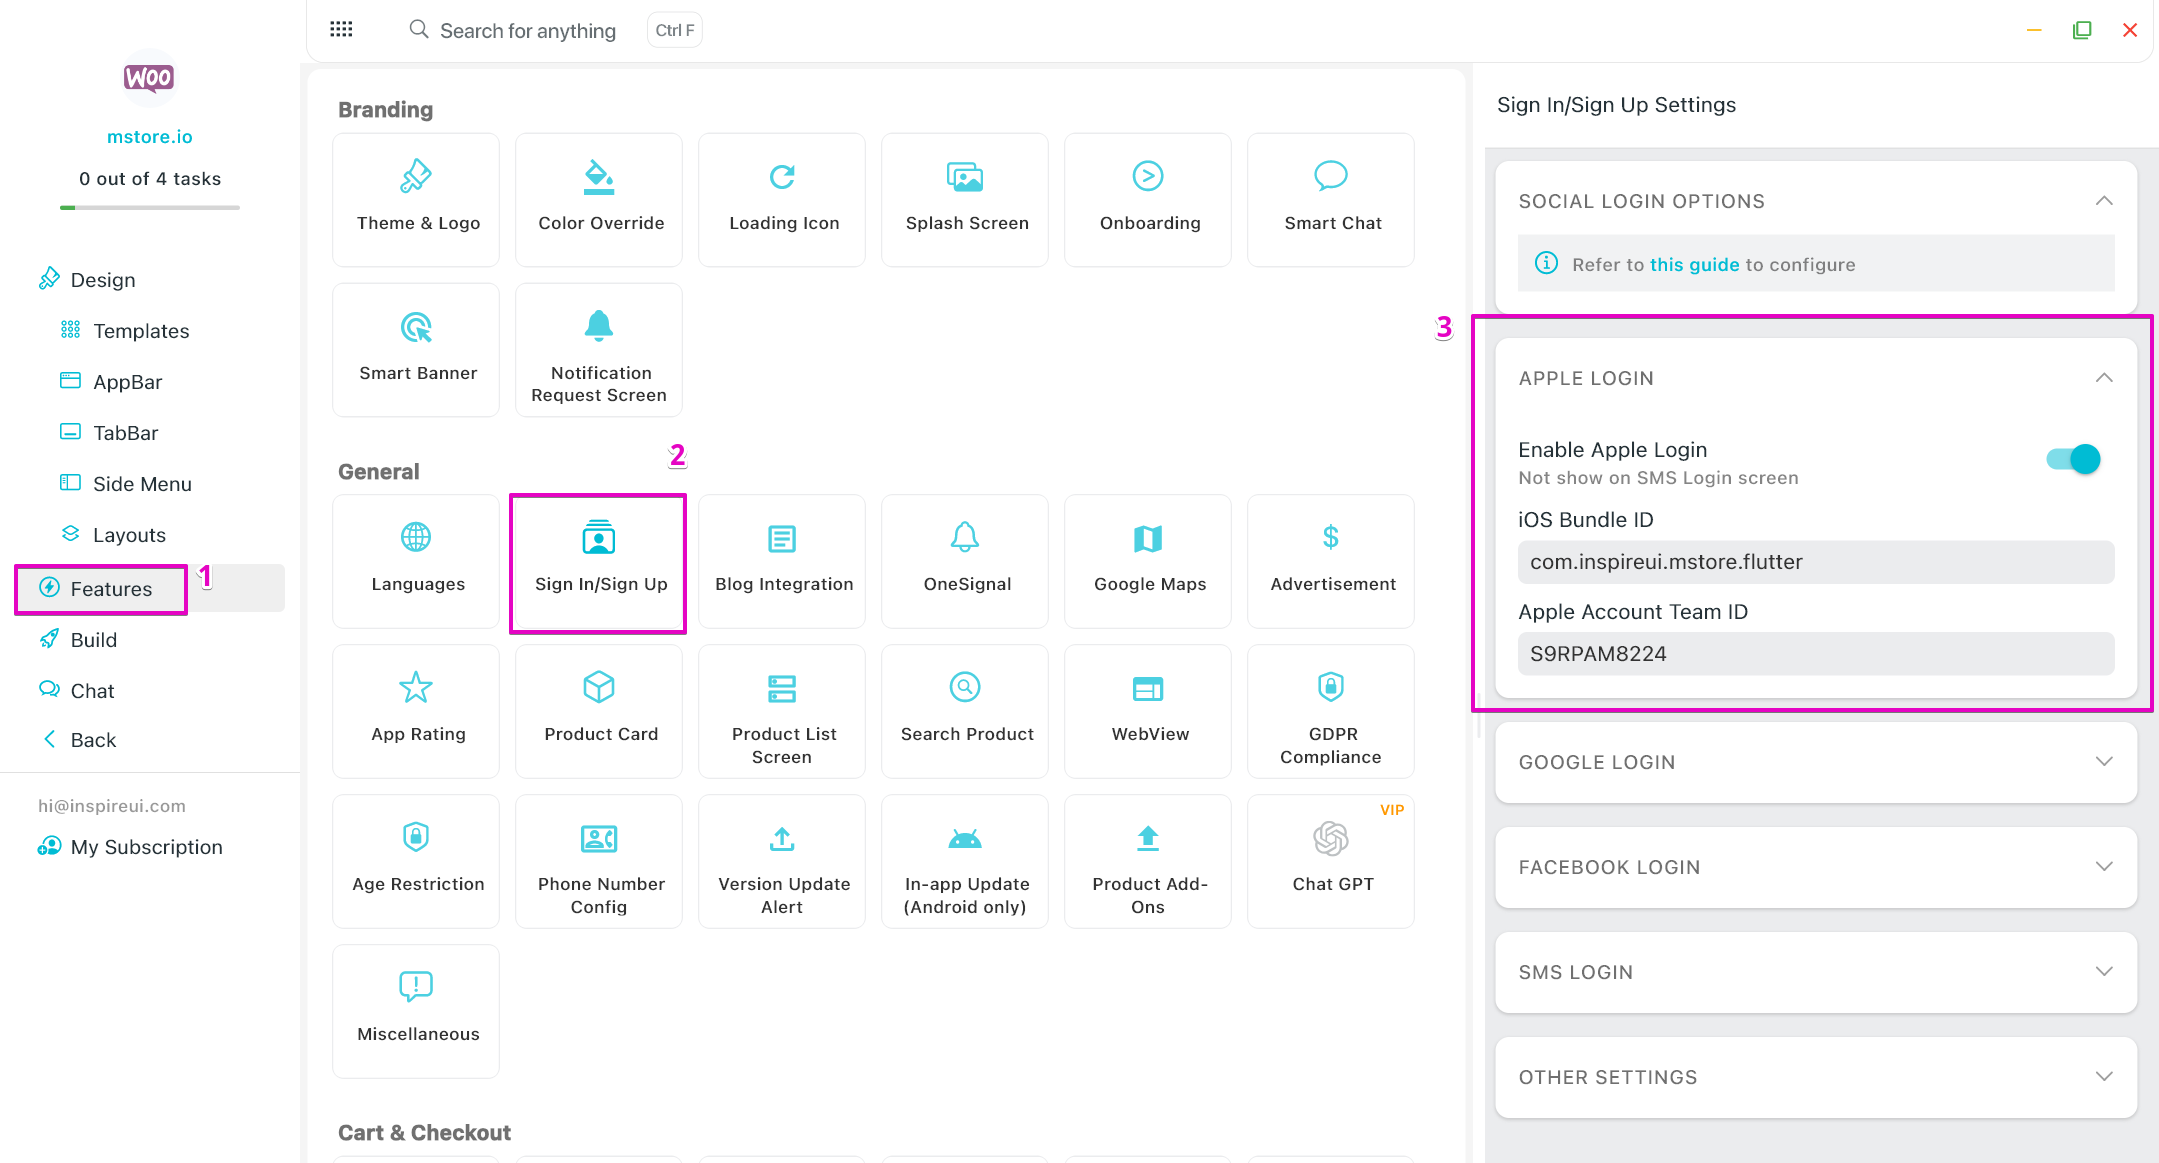
5. Enable Apple Login on FluxBuilder
Turn on the Google Login option on FluxBuilder by steps:
Step 1: On FluxBuilder, open your app.
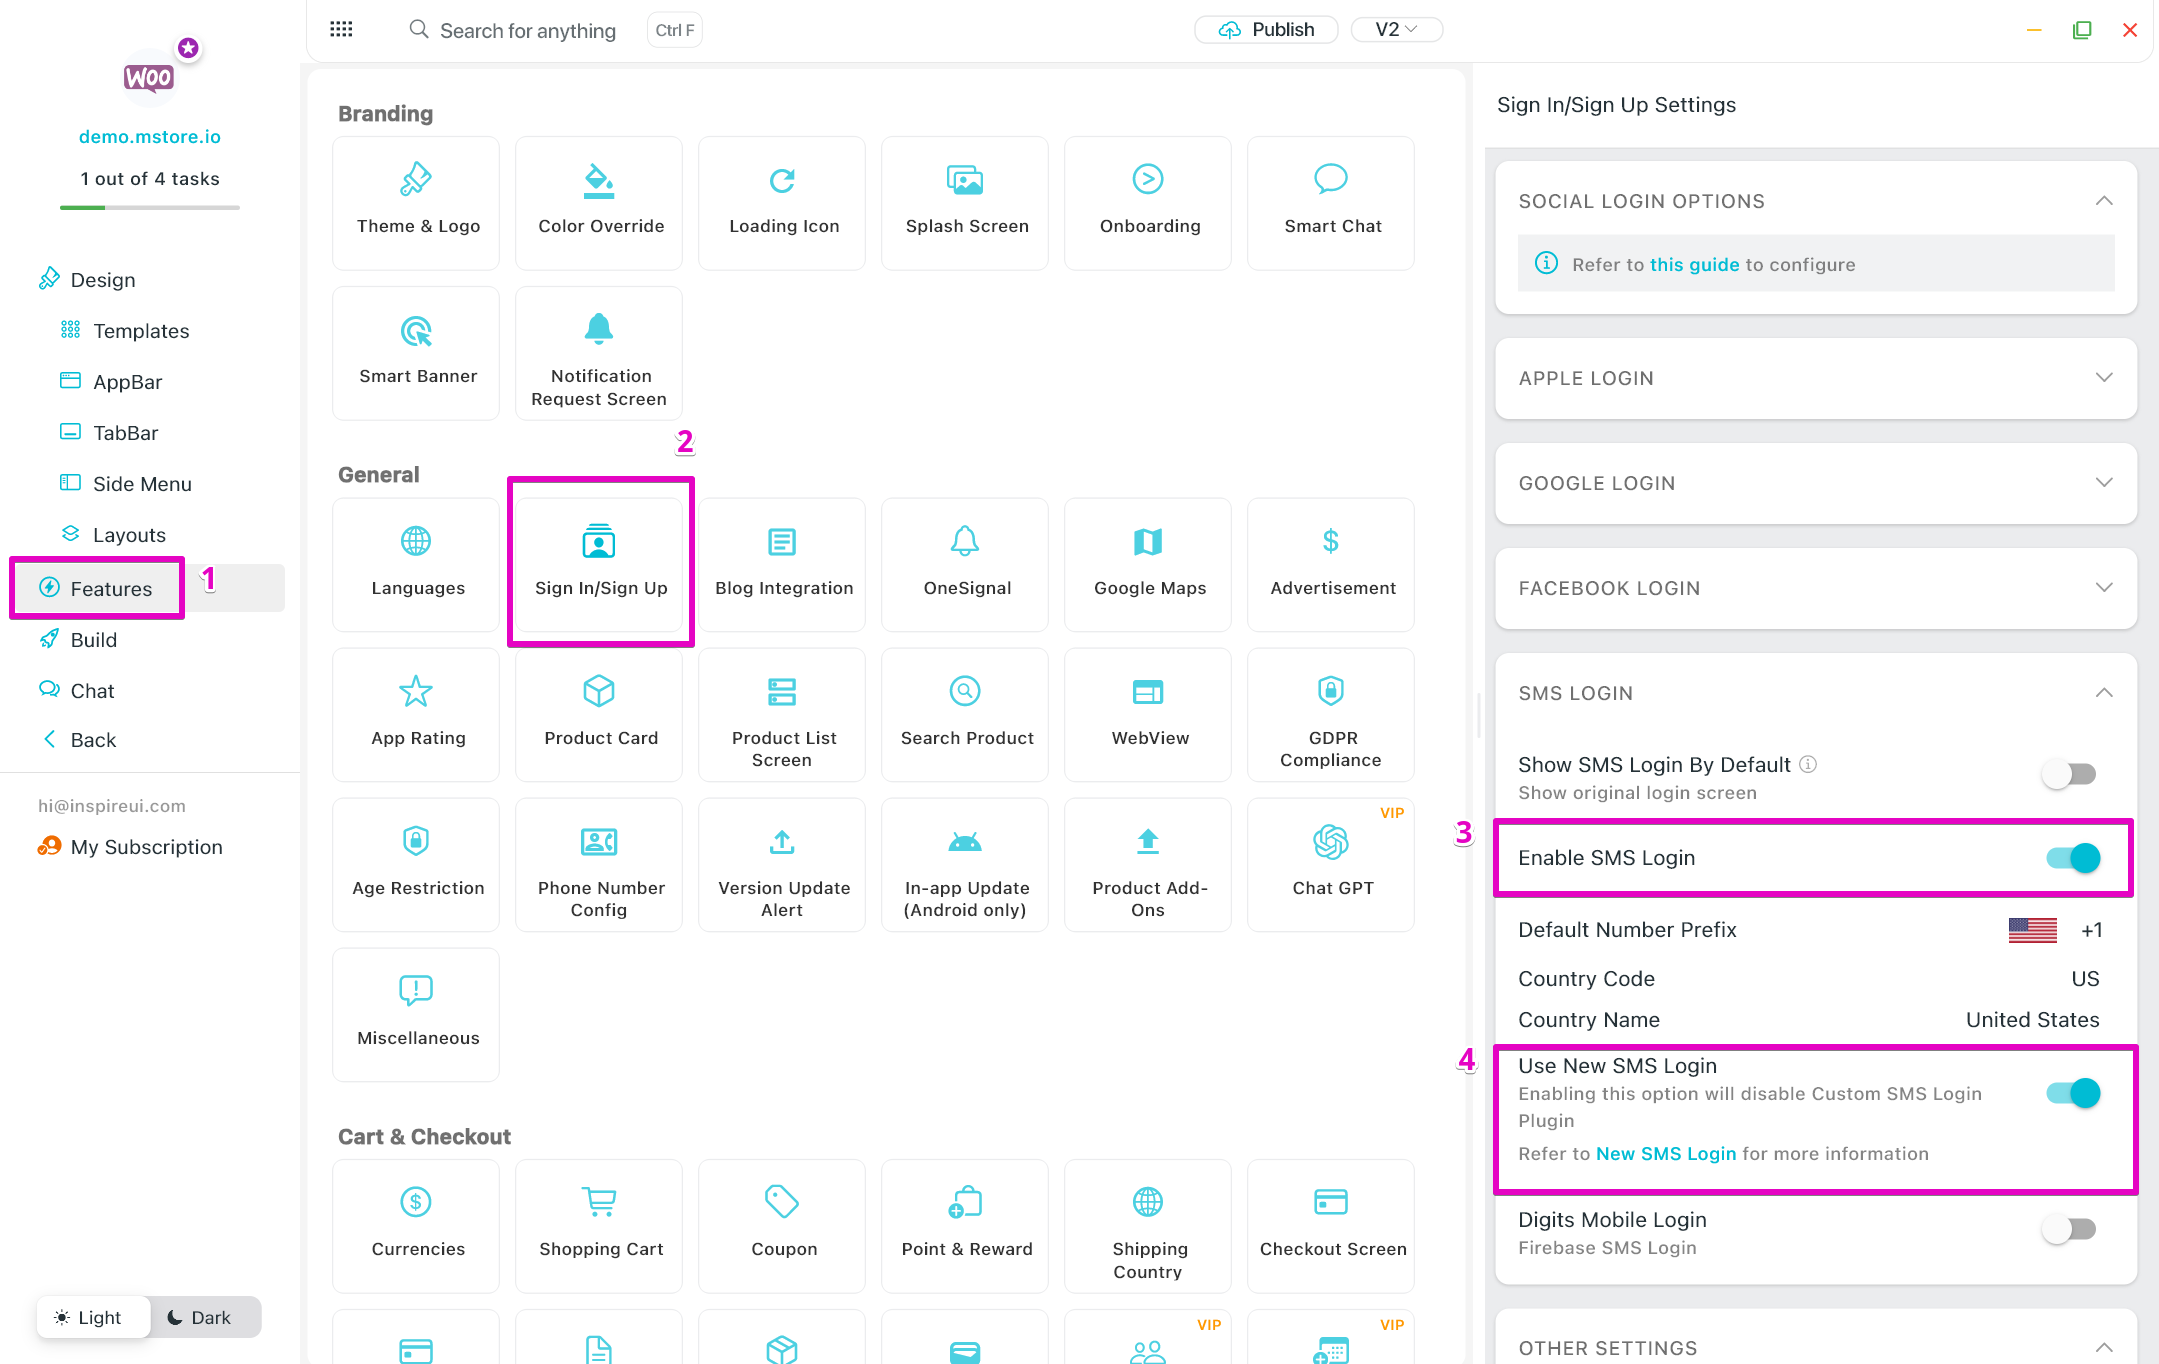
Step 2: Select Features on left menu. Click Sign In/Sign Up button (in the General section).
Step 3: Enable Apple Login option. Enter IOS Bundle ID and Apple Account Team ID. Then click Apply.
Google Login
✅ This guide is for WooCommerce, Opencart, Magento, PrestaShop, WordPress.
❌ Not use for Shopify, BigCommerce, Notion, Strapi.
For Firebase projects created since September 15 2023, the setting to protect against email enumeration is enabled by default. This setting makes it harder for malicious user to find out what users are in your project by changing the responses of some APIs, and disabling other APIs completely. While this protects your users from abuse, but unfortunately the API no longer distinguishes between 'user-not-found' and 'wrong-password' anymore and throws a more generic error instead. This causes errors when signing in to your app with Google.
Therefore, you need to disable email enumeration protection to be able to sign in with Google normally in your app. Please refer to the following link to disable email enumeration protection. Ref: https://cloud.google.com/identity-platform/docs/admin/email-enumeration-protection#disable
Video guide:
Manual guide: Follow steps below to enable Google Login:
1. Execute the Firebase Settings
Create your project on Firebase. Then add Android App and iOS App into your project following this guide Firebase Settings. (Skip this step if you have already done this step before.)
2. Setup OAuth consent screen
To set up a login with Google, let’s set up the OAuth consent screen for your Firebase project.
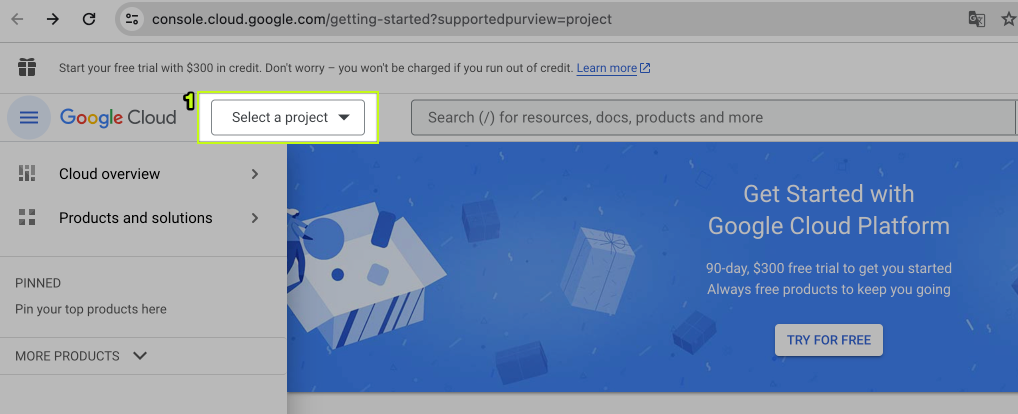
Step 1: Open the Google Cloud page https://console.developers.google.com
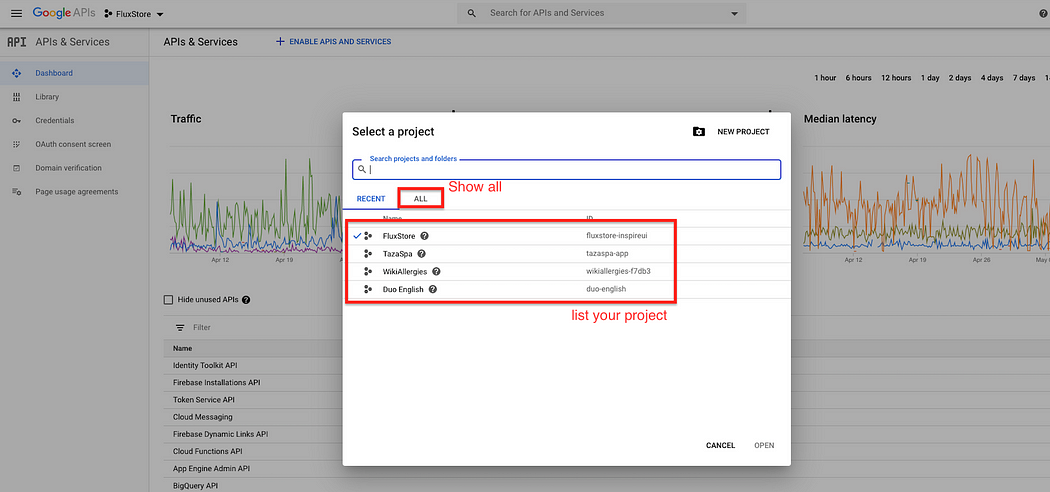
Step 2: Click the [Select a project] button:
or click the name of your projects (it may show the name of your projects):
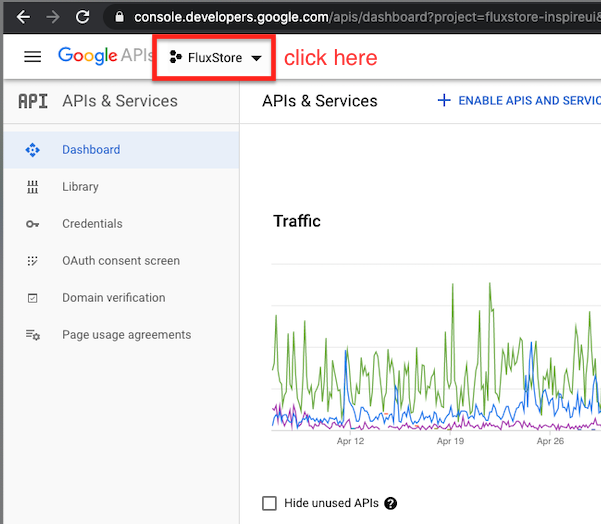
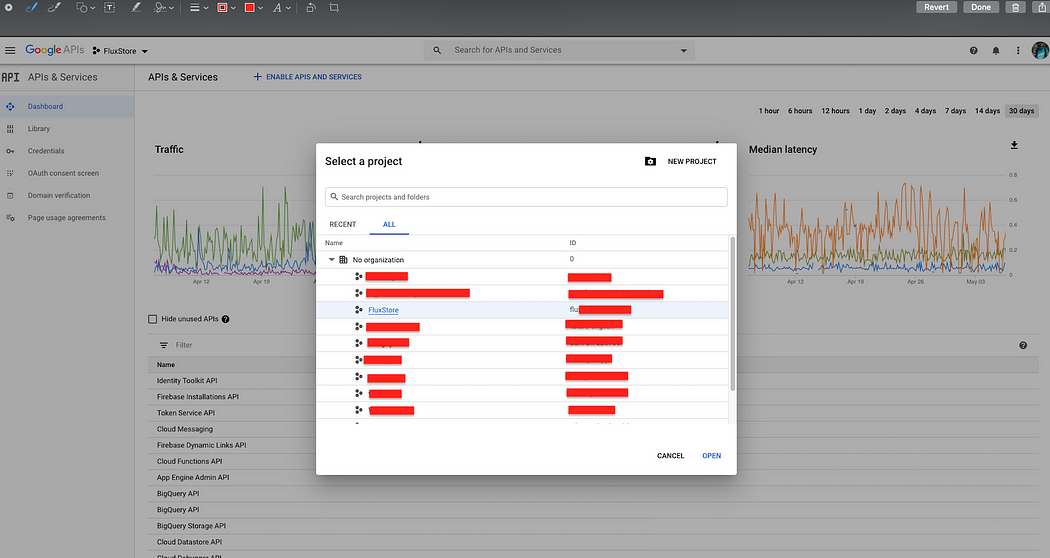
Select the project you want to setup. If you cannot find them in the RECENT project list, please click ALL to display them all and select the project:
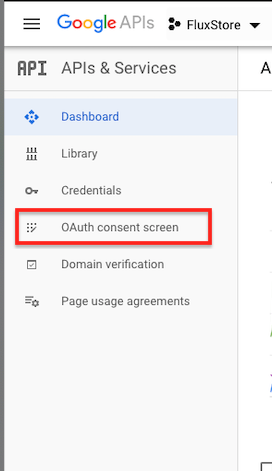
Step 3: On the left menu, select the OAuth consent screen
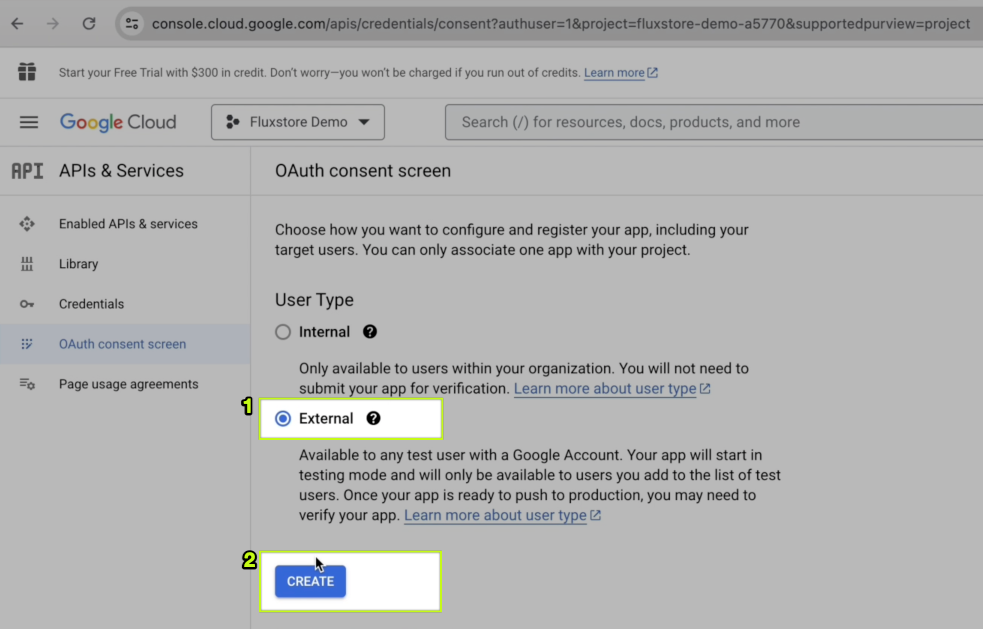
Step 4: Choose External and click CREATE
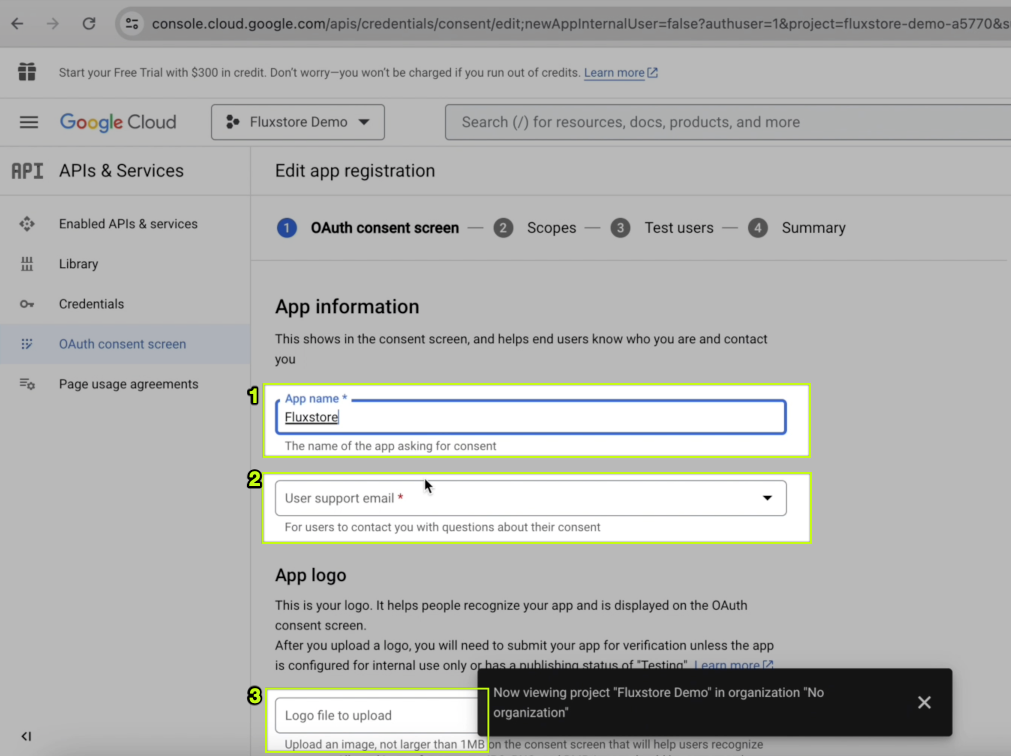
Step 5: Fill in some necessary information on the OAuth consent screen:
- Enter your [App name], [User support email], and Logo:
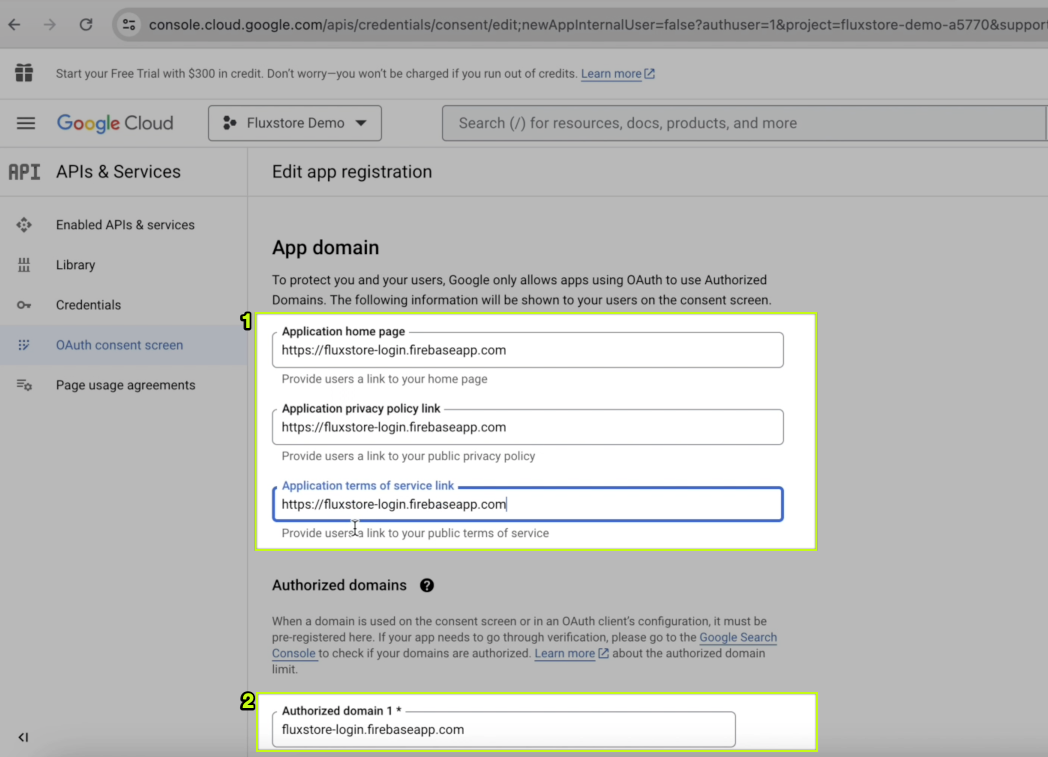
- Enter your [Application Homepage link], [Privacy policy link], and [Terms of Service link]. If you do not have these links, use the default link below (don't forget to add
https://). Enter your [Authorized domain] or use the default fluxstore-login.firebaseapp.com (The [Authorized domain] will not havehttps://)
- Enter the [Email addresses]. Click the [SAVE AND CONTINUE] buttons until finish the OAuth consent screen. Then select the [BACK TO DASHBOARD] button, you will see this screen:
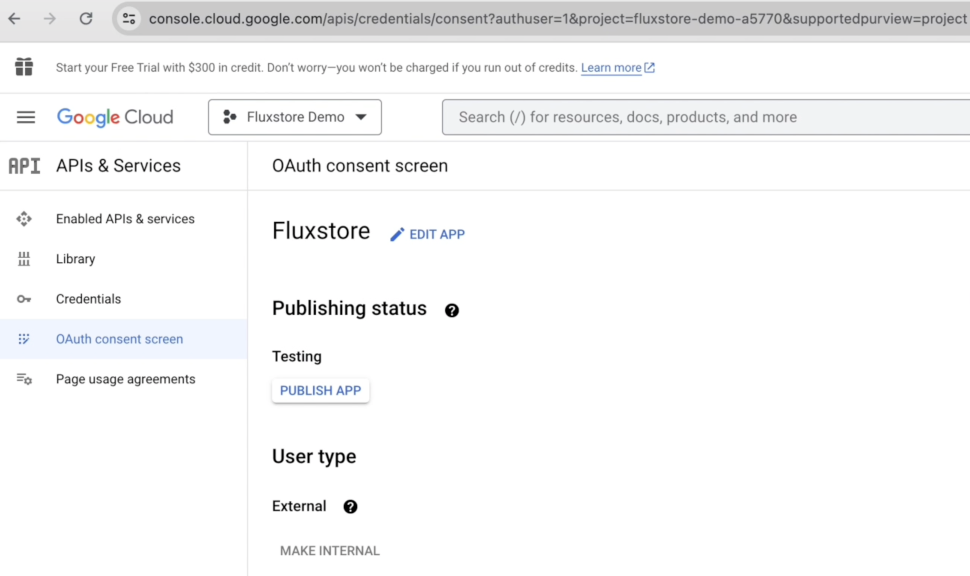
That’s all. You have set up the OAuth consent screen successfully.
3. Setup Google in Firebase project
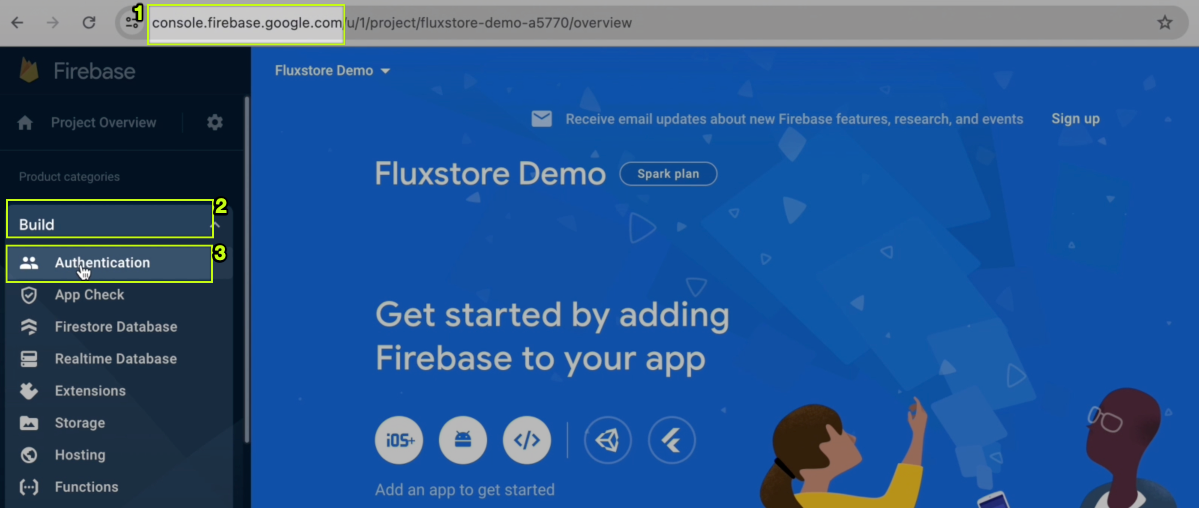
Step 1: Open the Firebase page https://console.firebase.google.com
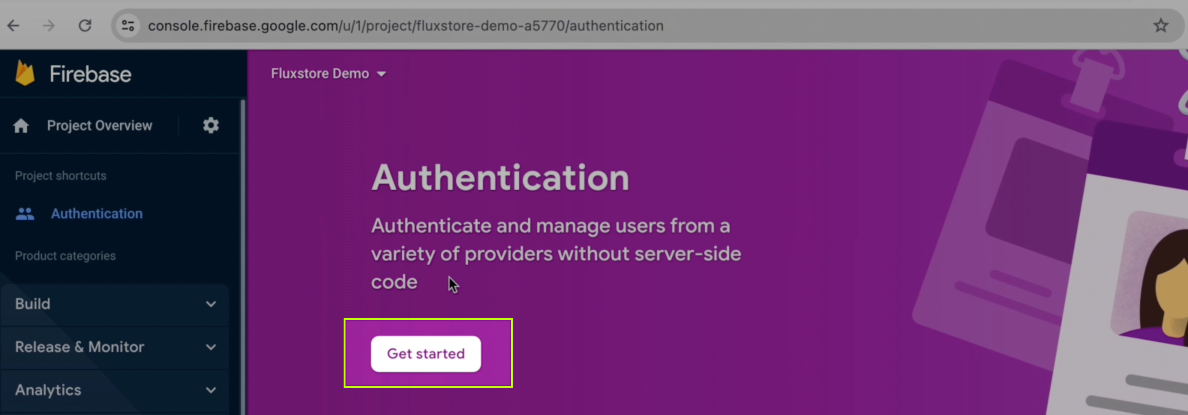
Step 2: Open your Firebase project. Then in the left menu bar, select the [Security], and click the [Authentication] item:
Step 3: Select the [Get Started] button:
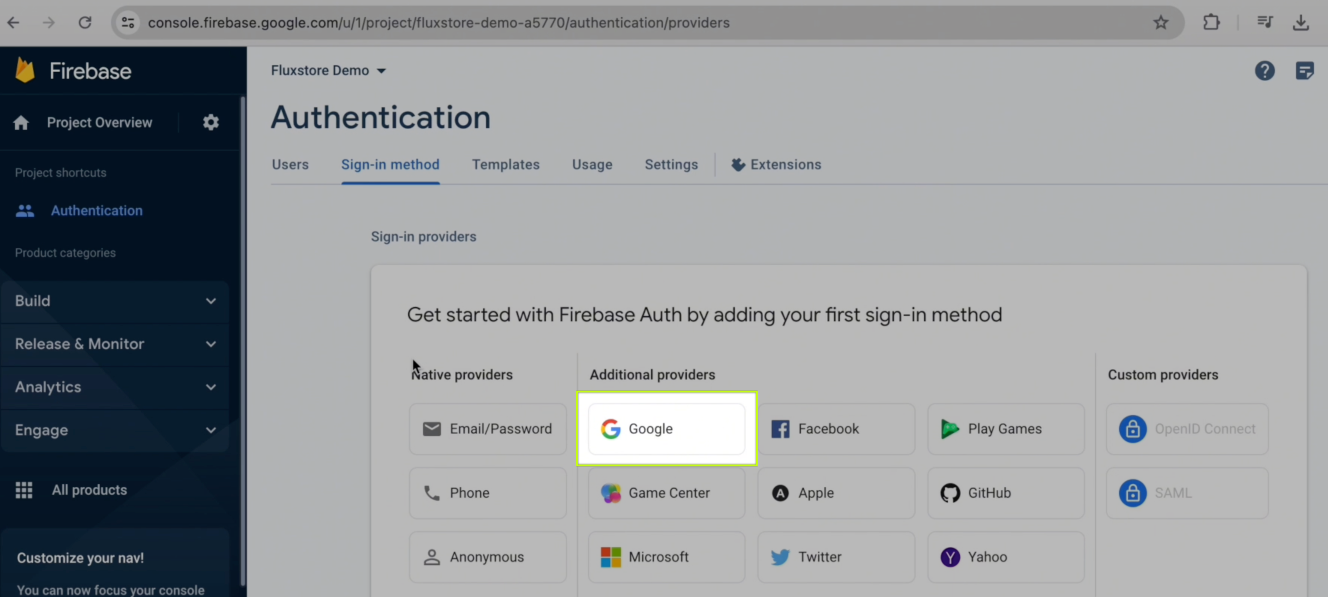
Step 4: Click the [Google] item:
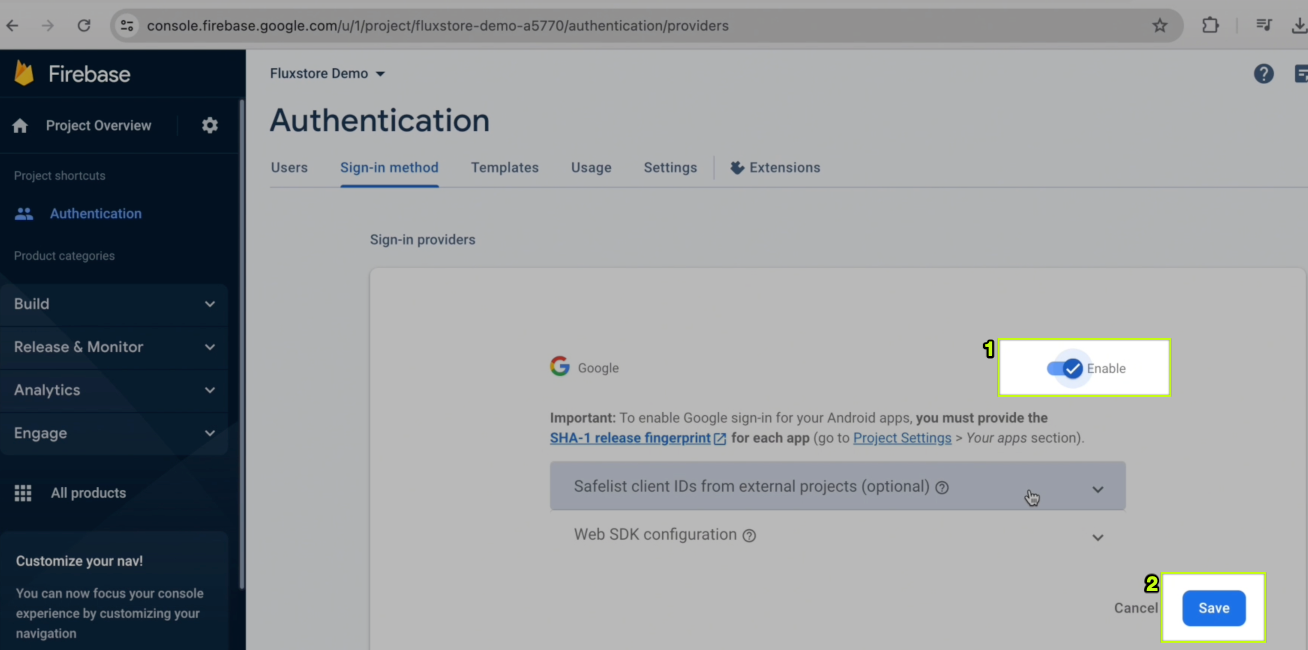
Step 5: Turn on the Enable option, then click the Save button:
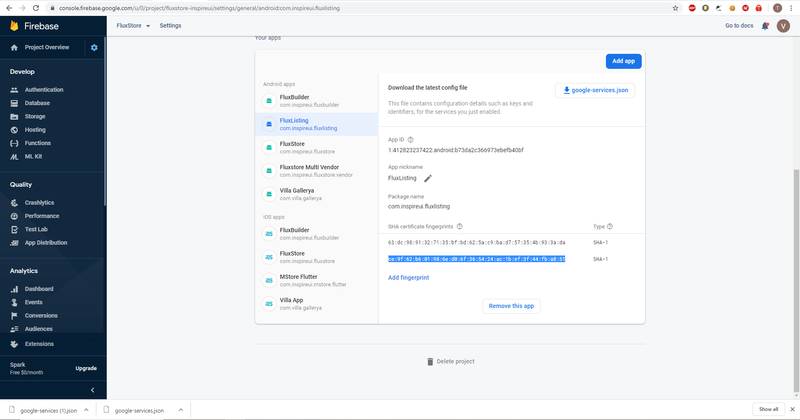
4. Update SHA-1 and SHA-256
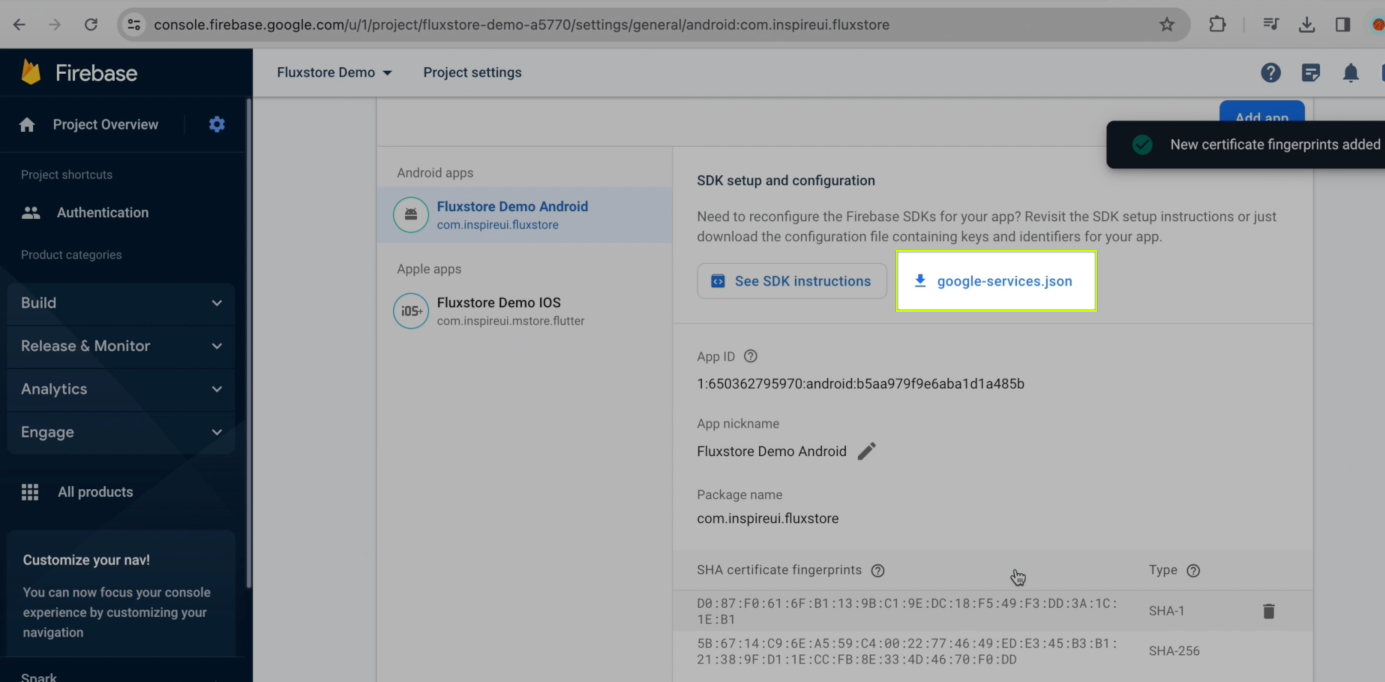
- Follow this guide to get and update SHA-1 and SHA-256 into your Android App in your Firebase project.
- When finishing settings, download the [google-services.json] file (and save this important file to use later)__:
5. Enable Google Login on FluxBuilder
Turn on the Google Login option on FluxBuilder by steps:
Step 1: On FluxBuilder, open your app.
Step 2: Select Features on left menu. Click Sign In/Sign Up button (in the General section).
Step 3: Enable Google login option.
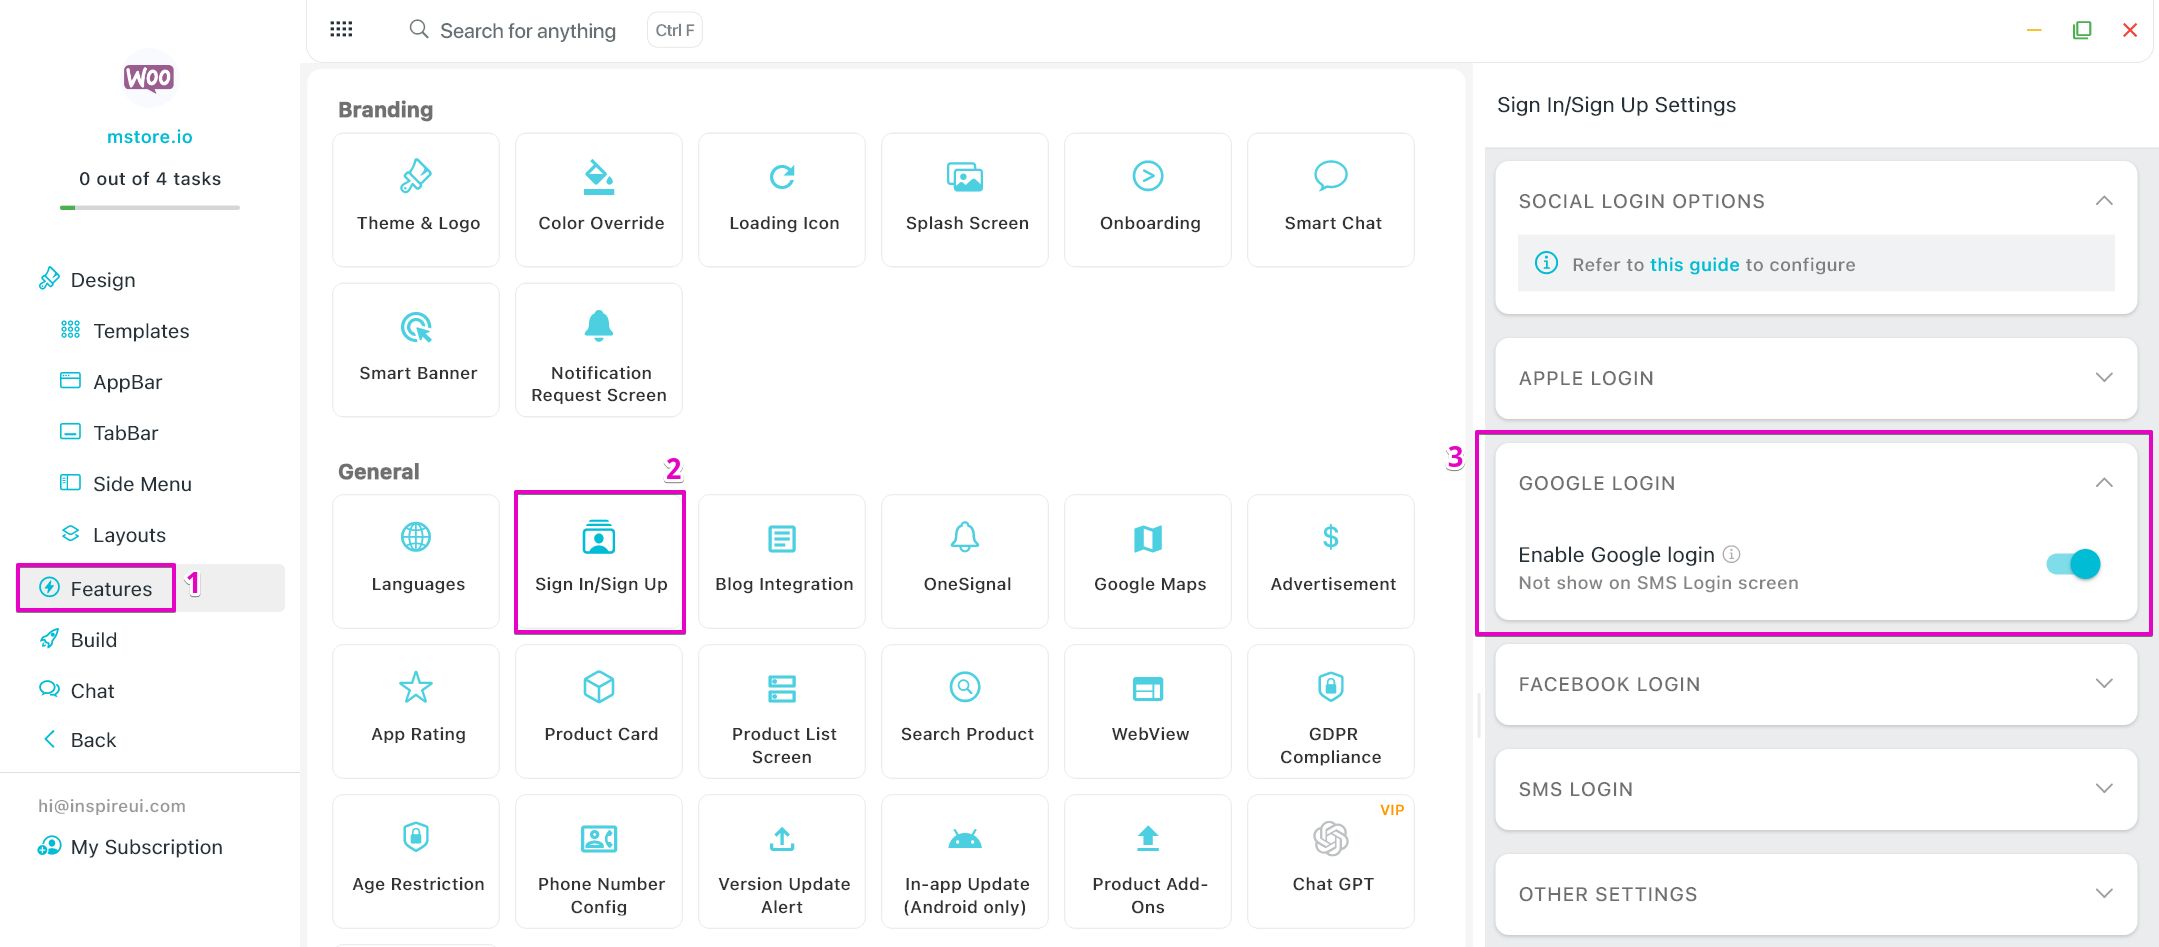
That’s all :)
Facebook Login
✅ This guide is for WooCommerce, Opencart, Magento, PrestaShop, WordPress.
❌ Not use for Shopify, BigCommerce, Notion, Strapi.
Follow steps below to enable Facebook Login:
1. Execute the Firebase Settings
Create your project on Firebase. Then add Android App and iOS App into your project following this guide Firebase Settings. (Skip this step if you already did)
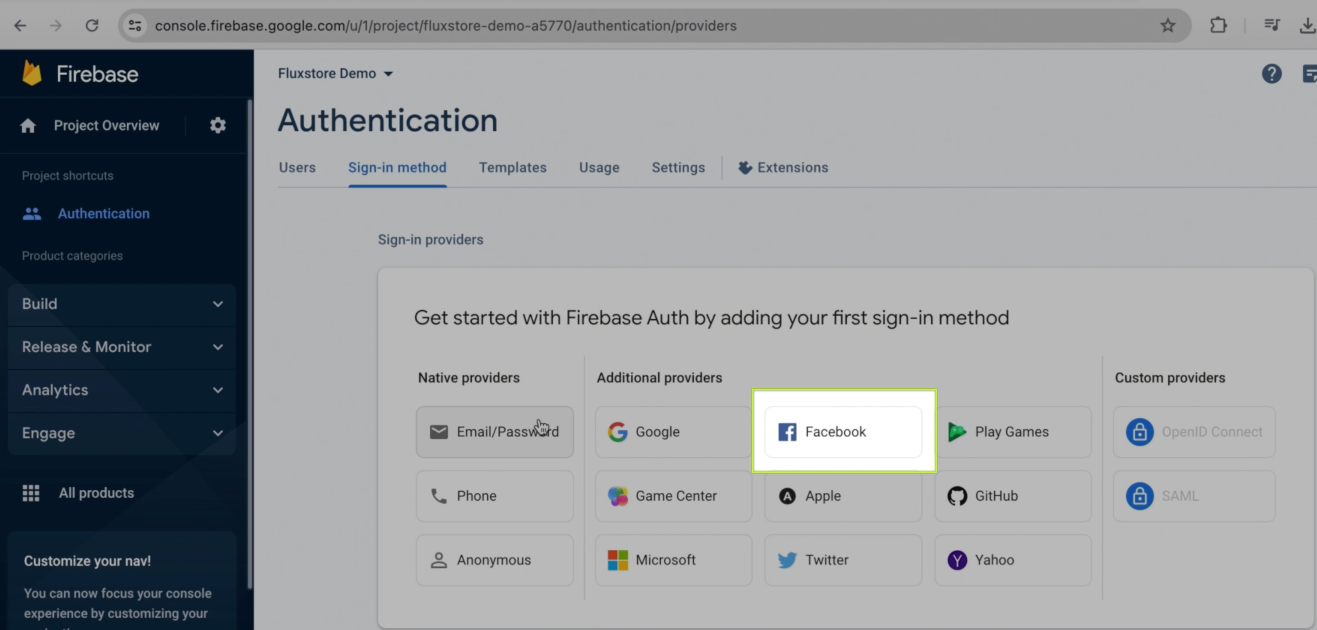
2. Setup Facebook in Firebase project
Step 1: Open the Firebase page https://console.firebase.google.com
Step 2: Open your Firebase project. Then in the left menu bar, select the [Security], and click the [Authentication] item:

Step 3: Select the [Get Started] button:

Step 4: Click the [Facebook] item:
Step 5: Turn on the Enable option
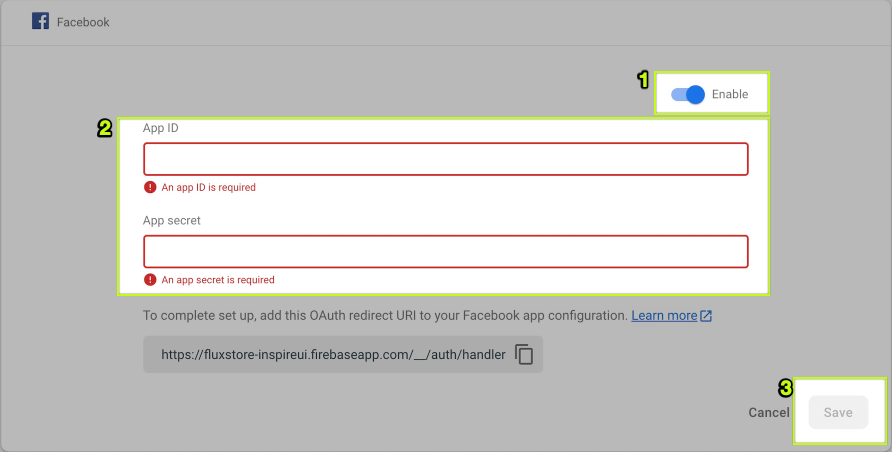
Enter facebook app and get them here. (Save them to a note for later usage)
Then click the Save button.
3. Add Facebook base64 keys
- Go to this site and convert the SHA-1 keys to base64. Copy the output base64 and paste them in Facebook Login -> QuickStart -> Android -> section 6.
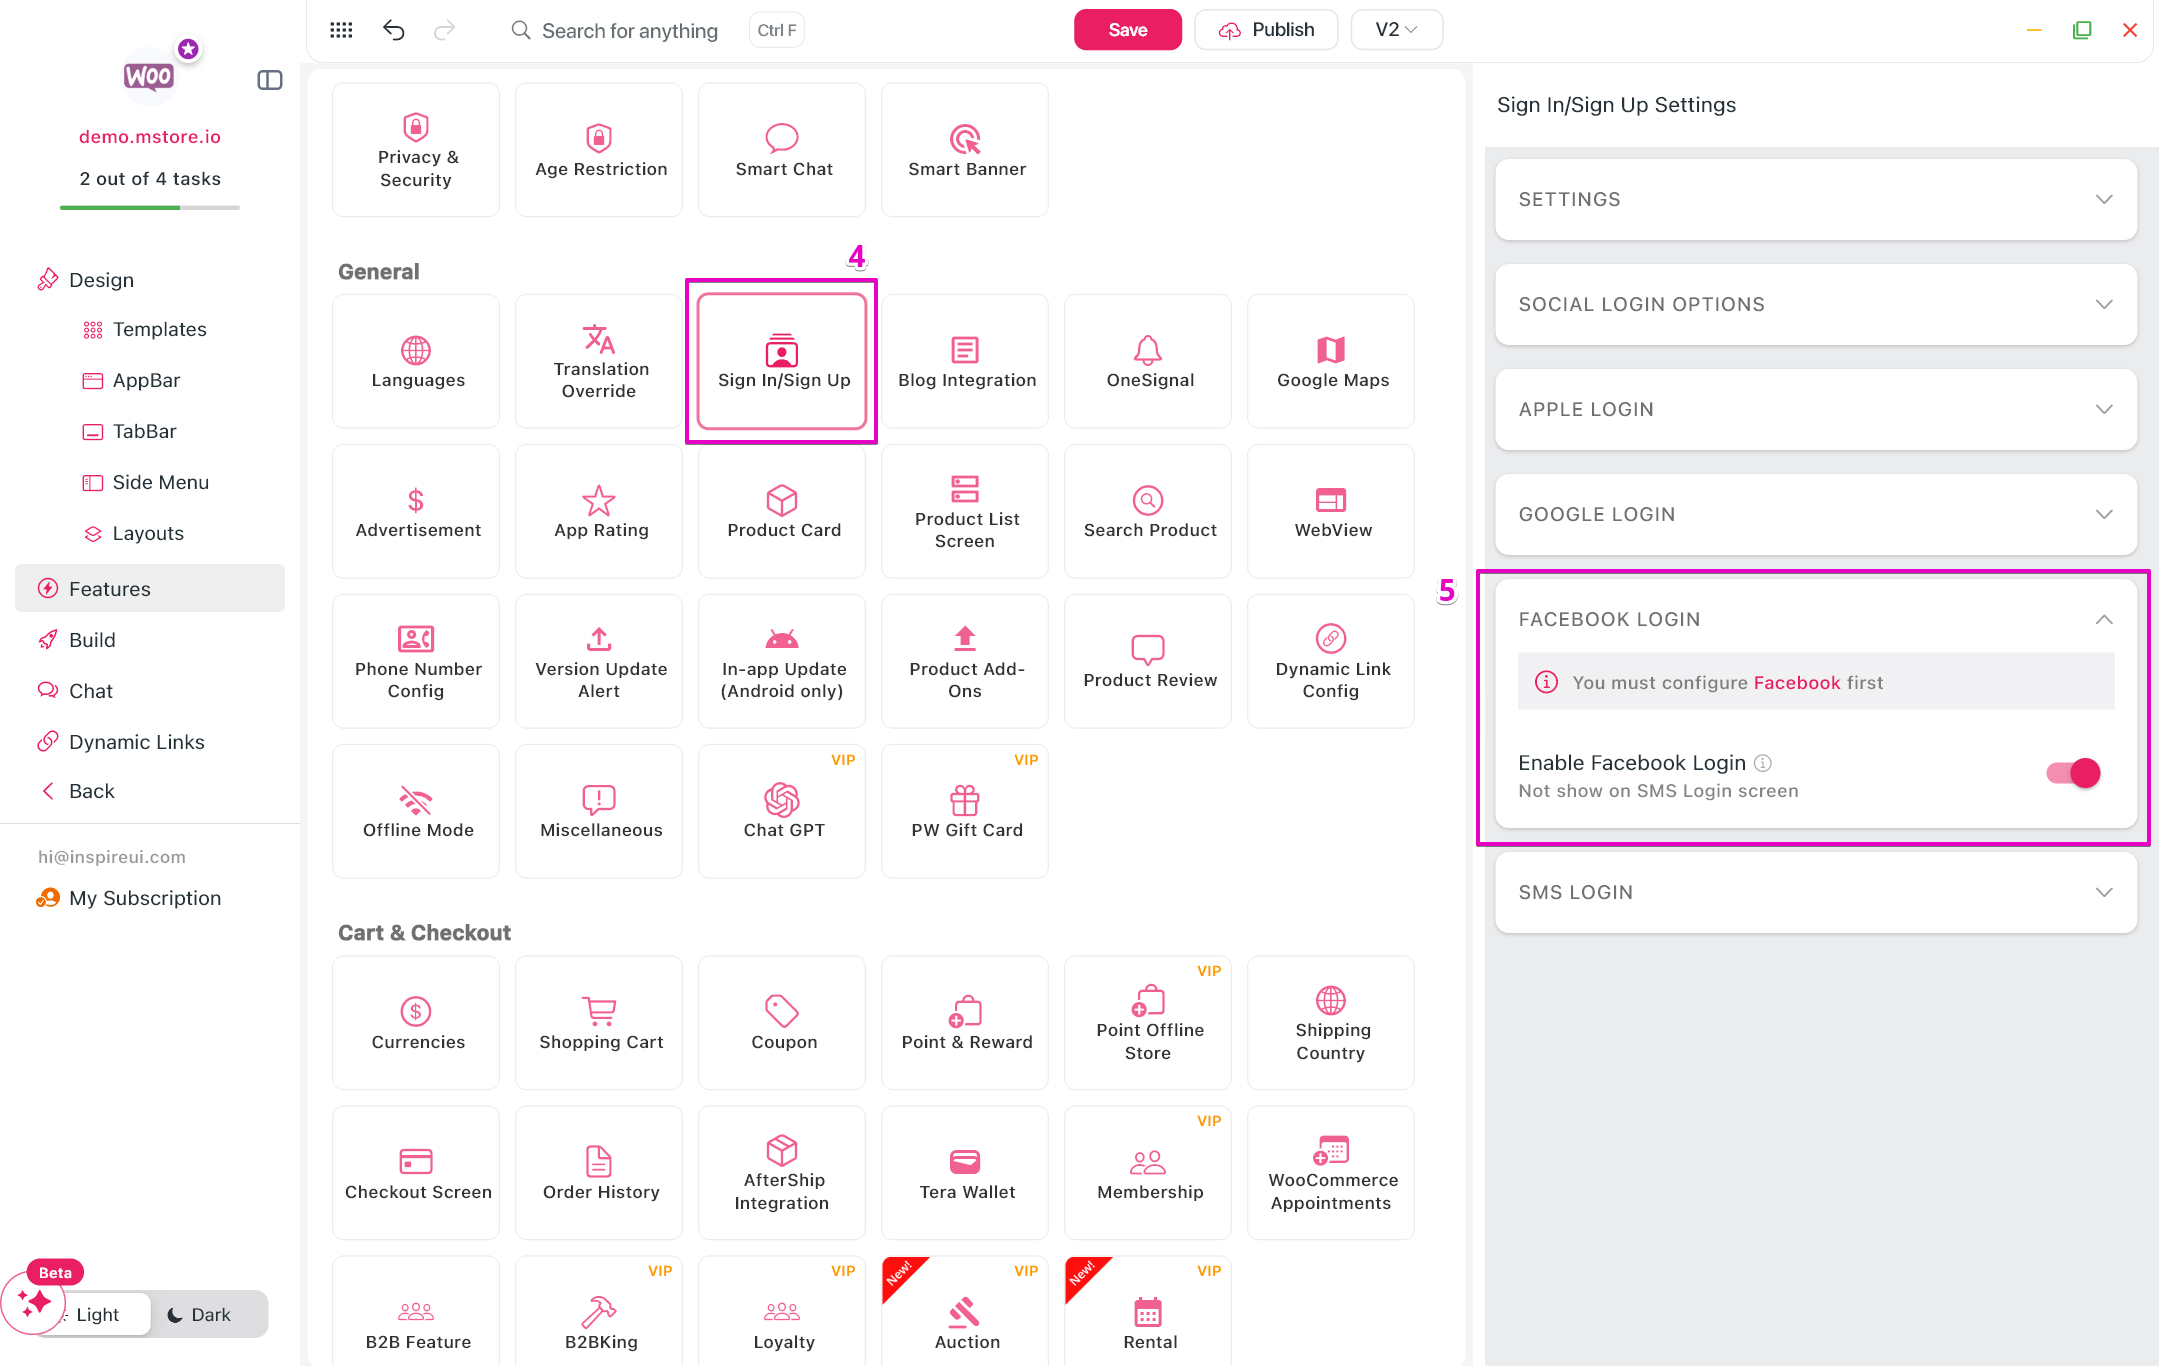
4. Enable Facebook Login on FluxBuilder
Turn on the Facebook Login option on FluxBuilder by steps:
Step 1: On FluxBuilder, open your app.
Step 2: Select Features on the left menu. Open FaceBook and enter your Facebook’s information.
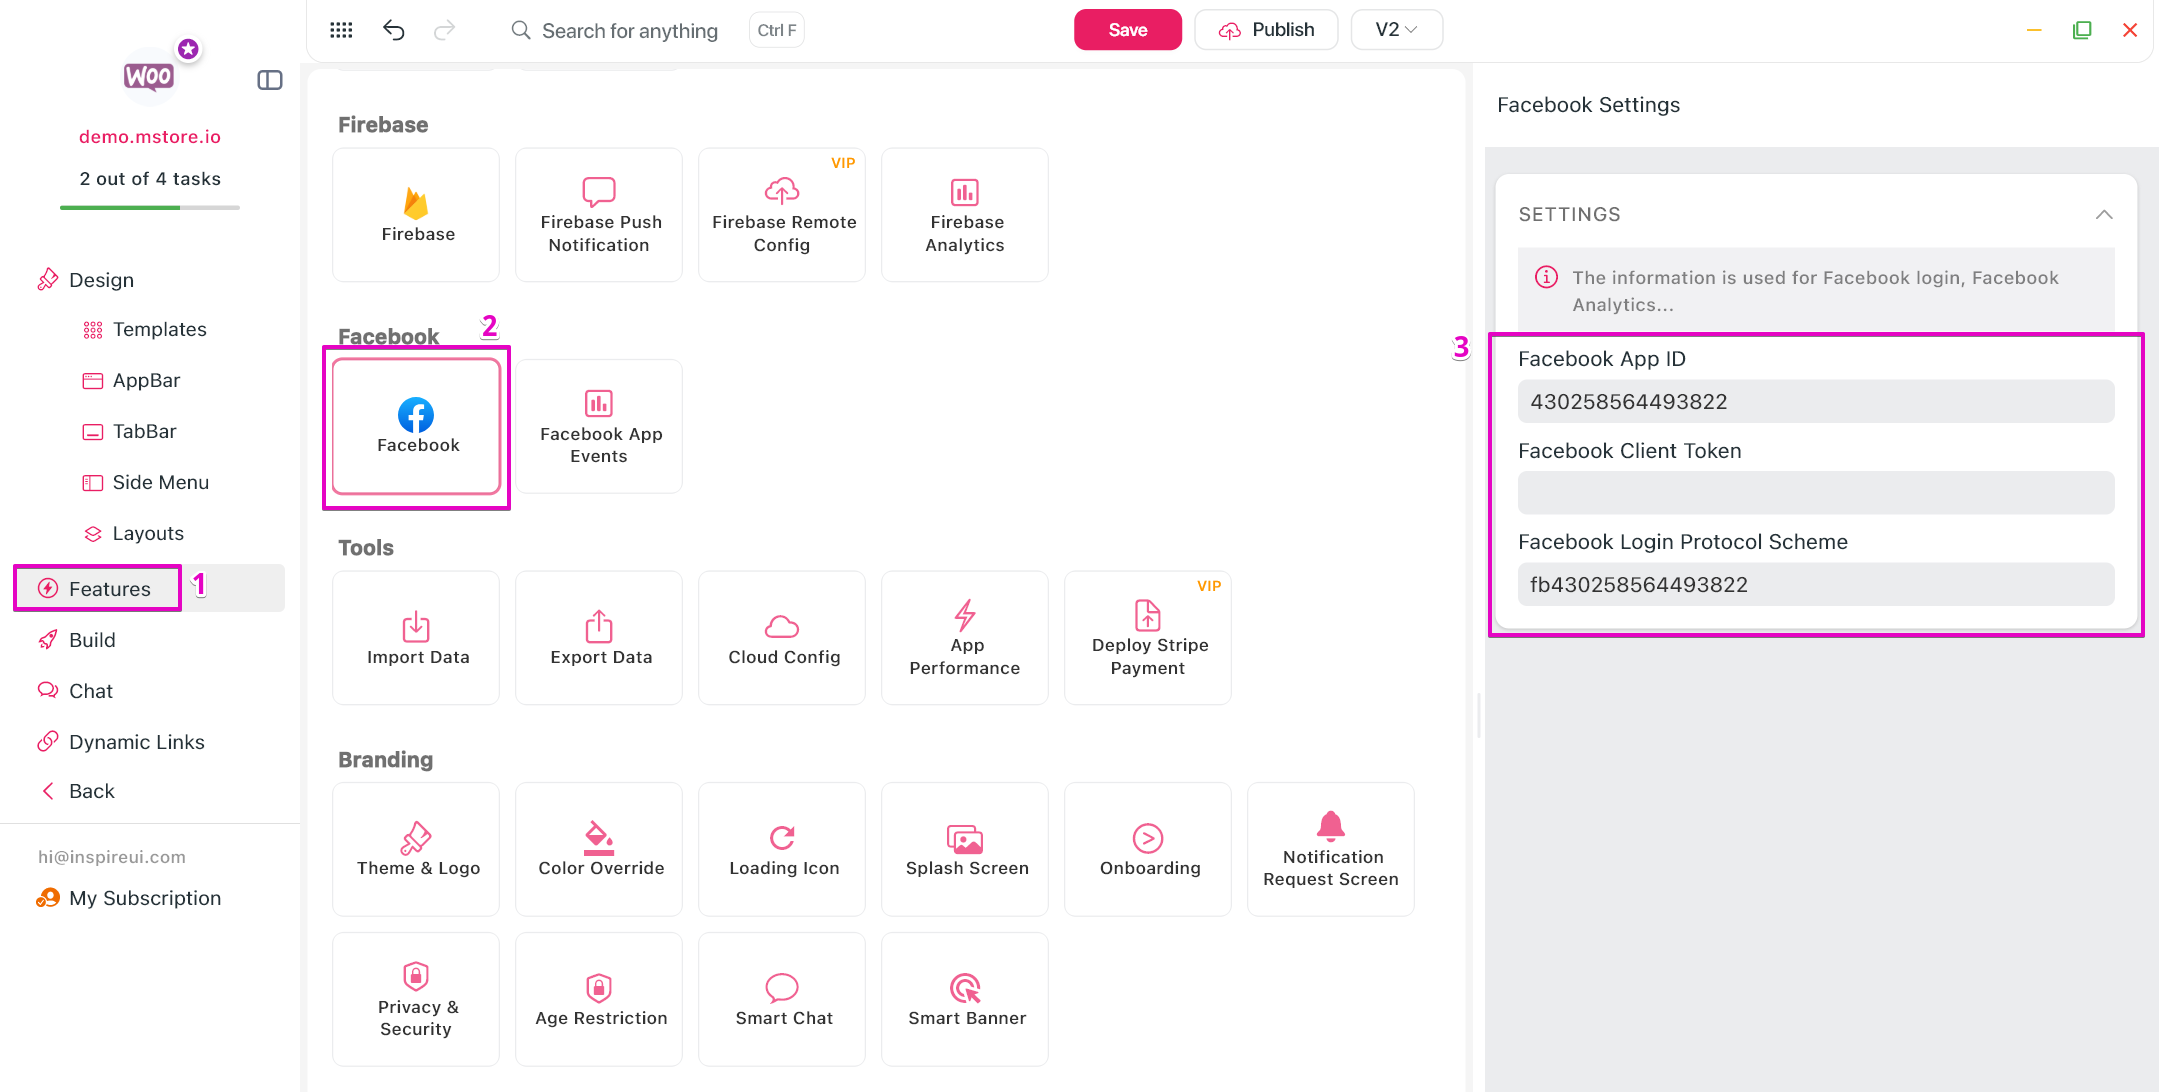
Step 3: In the General section, open Sign In/Sign Up option.
Step 3: Turn on Enable Facebook Login.
SMS Login
✅ This guide is for WooCommerce, Opencart, Magento, PrestaShop, WordPress.
❌ Not use for Shopify, BigCommerce, Notion, Strapi.
Starting September 2024, to improve the security and service quality of Phone Authentication, Firebase projects must be linked to a Cloud Billing account to enable and use the SMS Service". So you need to link your project to a Cloud Billing account if you plan to enable Phone Authentication, or currently have it enabled. And then upgrade the Firebase subscription plan to Blaze to be able to use phone authentication for your project.
Setup SMS Login
Follow steps below to enable SMS Login:
1. Execute the Firebase Settings
Create your project on Firebase. Then add Android App and iOS App into your project following this guide Firebase Settings. (Skip this step if you already did)
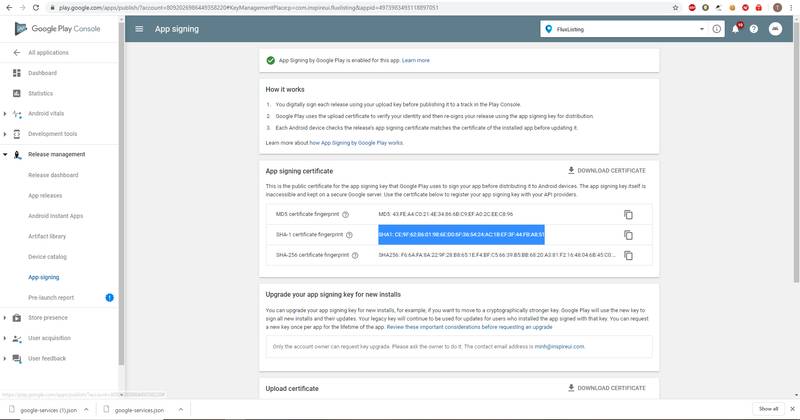
2. Update SHA-1 and SHA-256
- Follow this guide to get and update SHA-1 and SHA-256 into your Android App in your Firebase project.
- In case you meet this issue: After creating APK and releasing the app in App Stores, you may get an error when logging in with SMS Login. You need to go to the App stores and copy the SHA-1 and SHA-256 and paste to your Firebase setting:
3. Enable SMS Login on FluxBuilder
Turn on the SMS Login option on FluxBuilder by steps:
Step 1: On FluxBuilder, open your app.
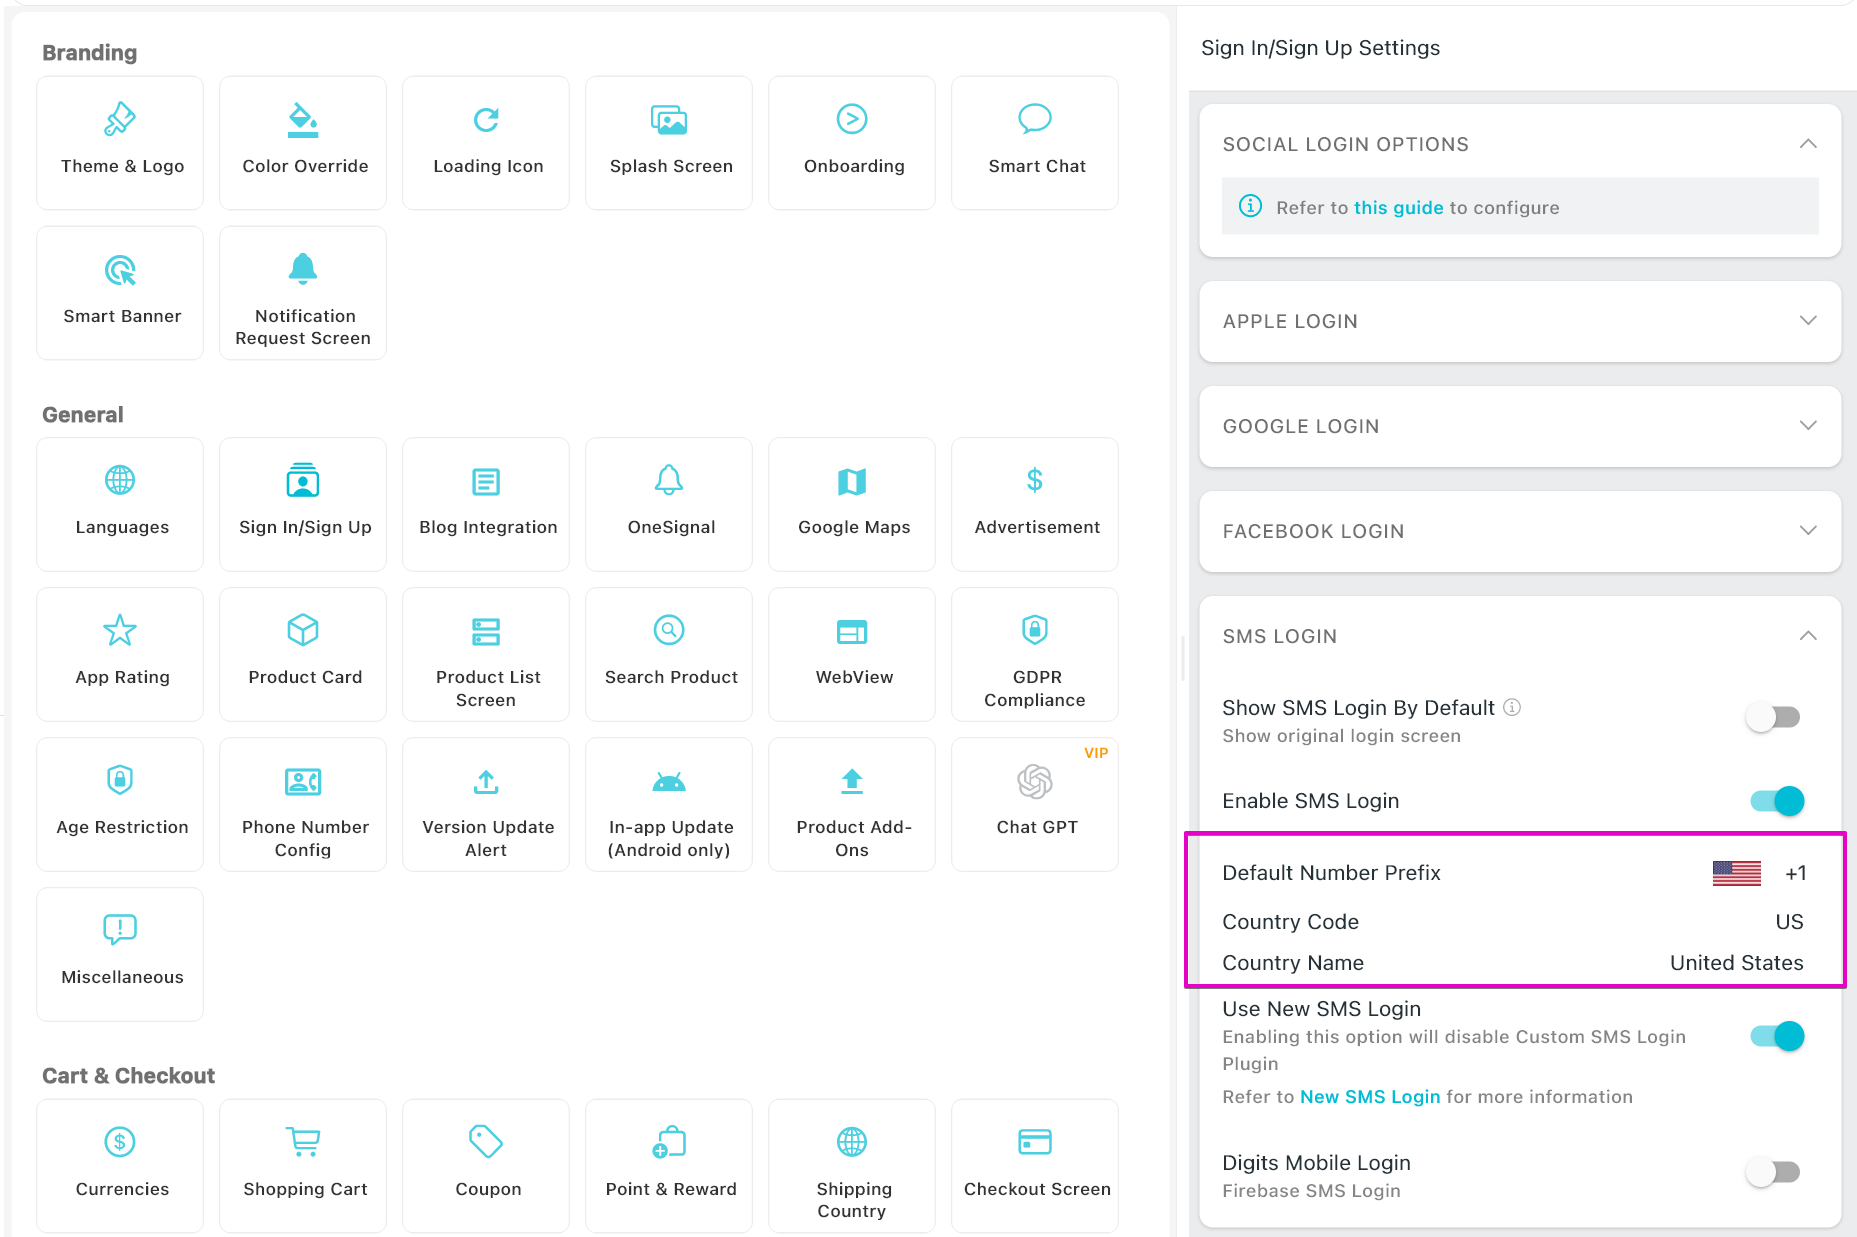
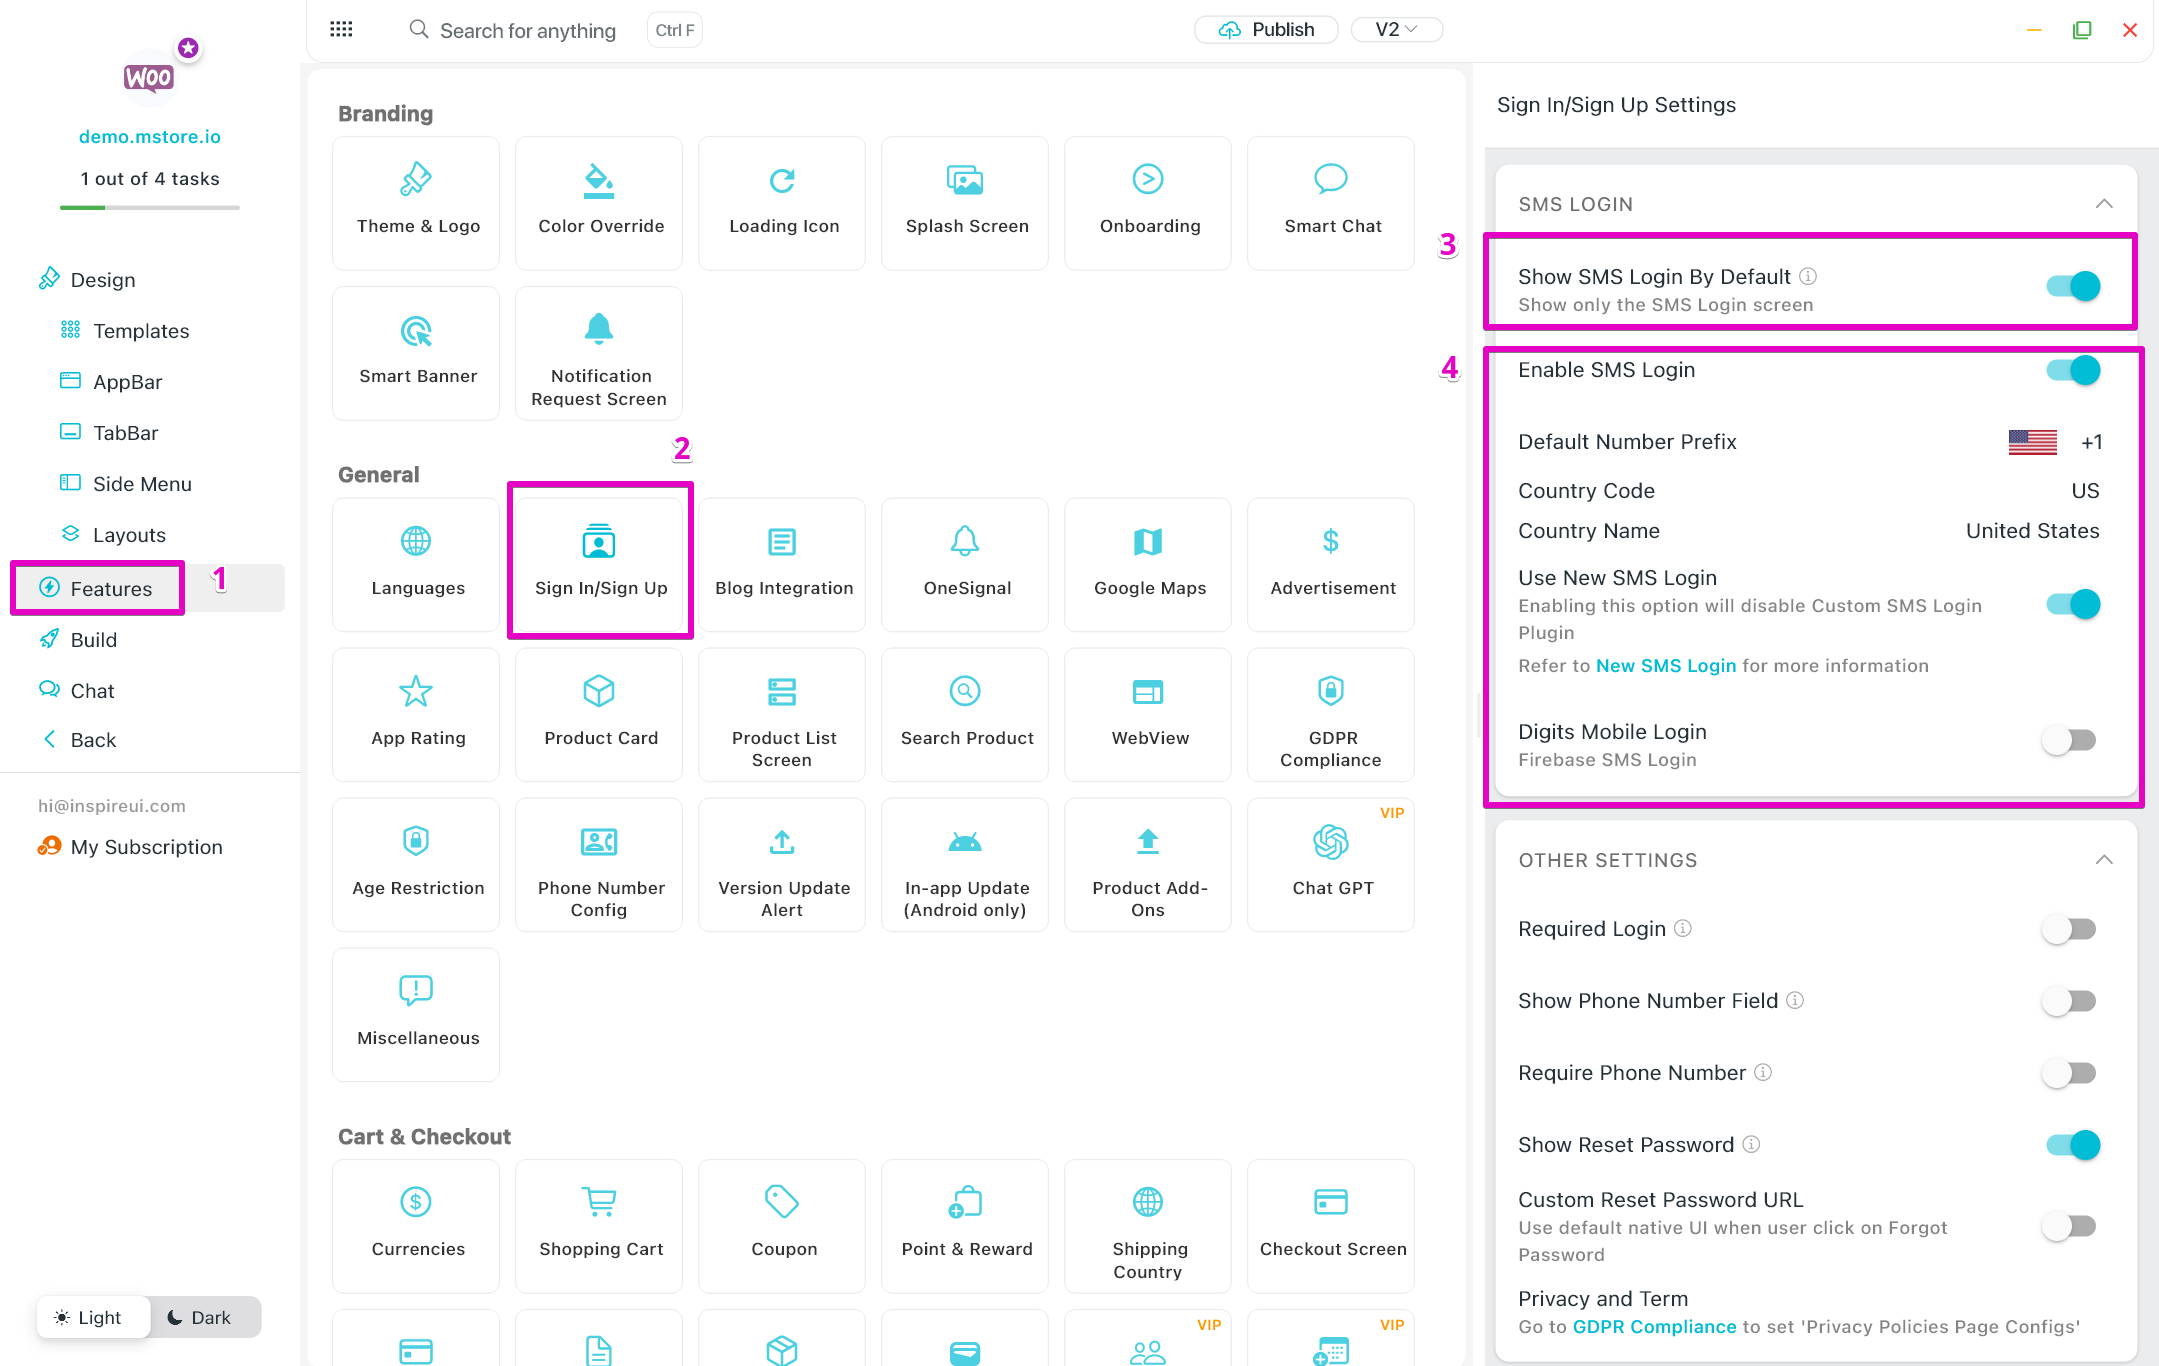
Step 2: Select Features on left menu. Click Sign In/Sign Up button (in the General section).

SMS Default Country
SMS Login by Default
You can set only allow login to the app via SMS.
New SMS Login
- Another UI of Registration Form of SMS login:
- Allow updating Email, Password after registration.
- Enable this new feature by go to Features > General > Sign In/Sign Up > enable SMS Login > enable Use New SMS Login
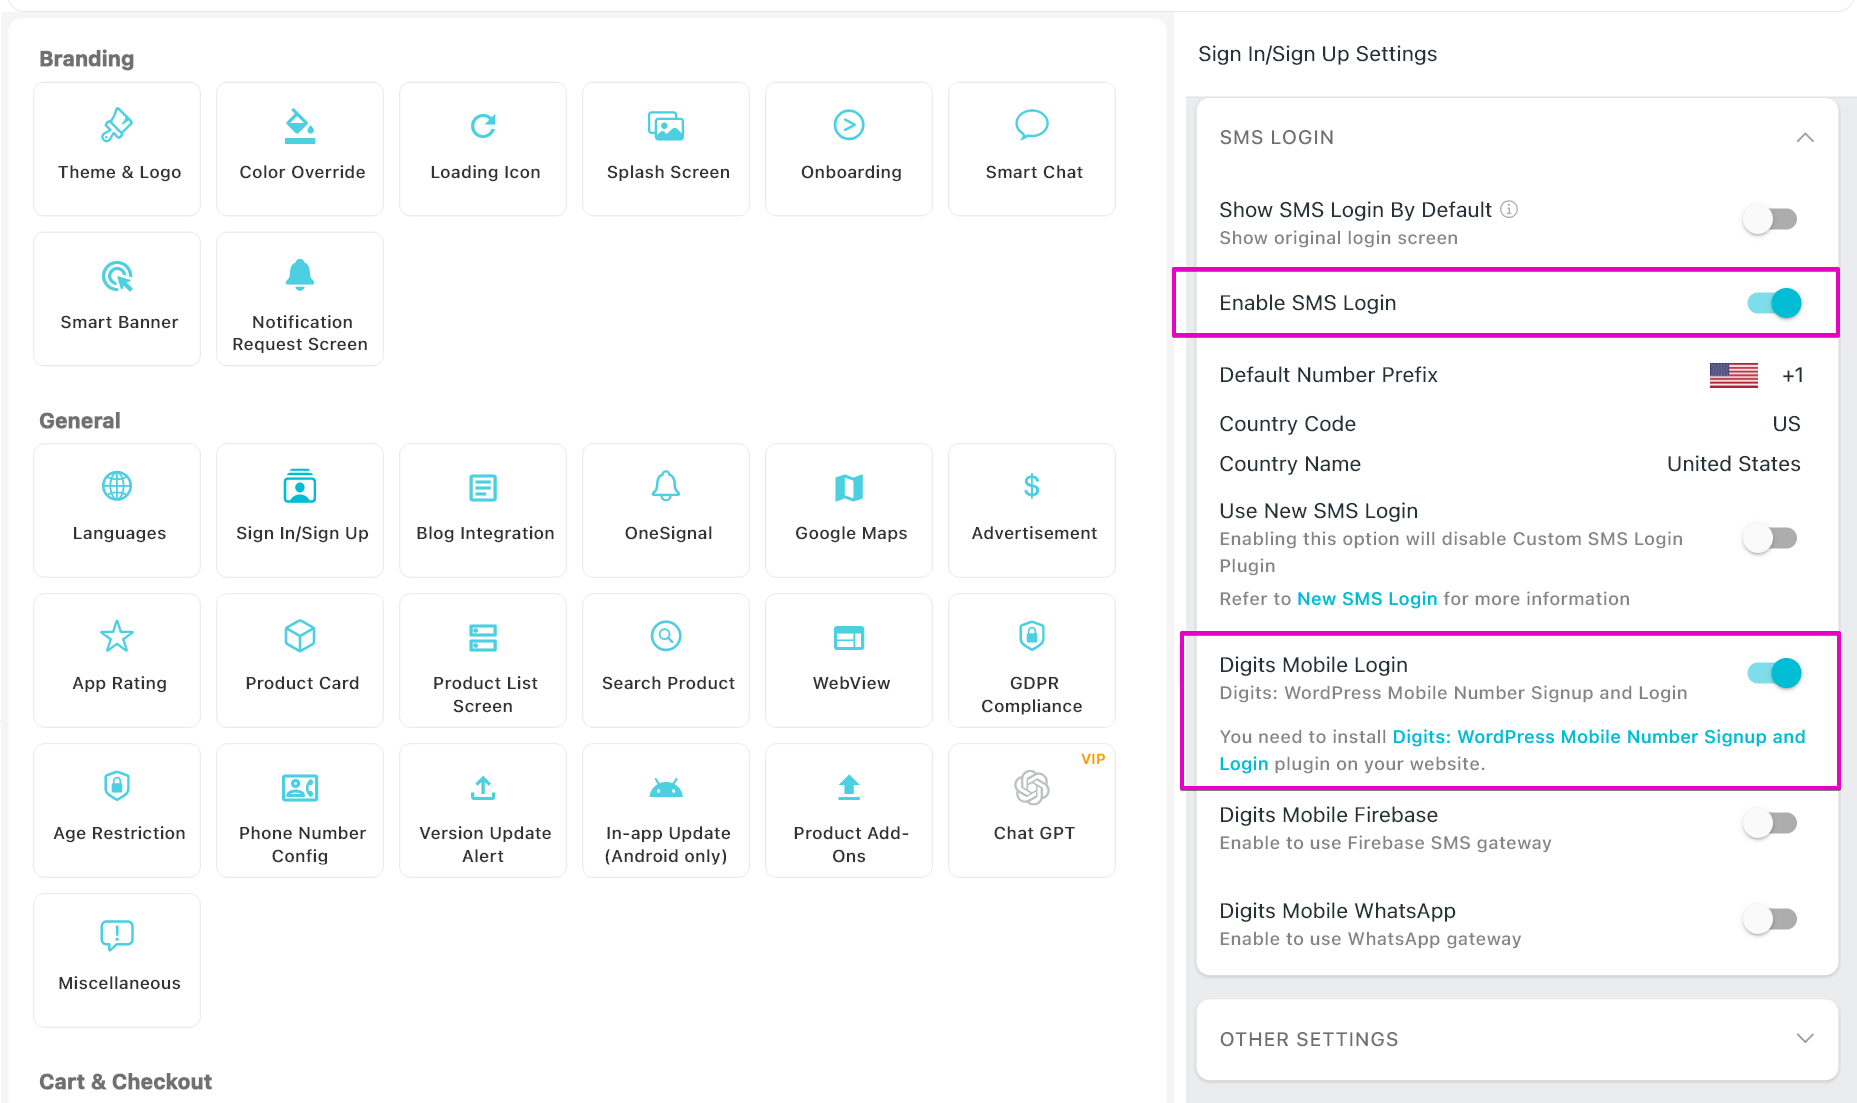
SMS OTP Digits plugin
This Digits WordPress plugin is Not compatible with 'New SMS Login' above. It is available for SMS Login (OTP SMS).
Instead of remembering a password, the feature supports users signing up and logging in with their Phone Number and One Time Passcode (OTP) on SMS. The feature also helps to avoid fake orders.
First, install the Digits: WordPress Mobile Number Signup and Login plugin on your website. Make sure that the plugin works well on your backend.
Then open app on FluxBuilder, go to Features > General > Sign In/Sign Up > enable SMS Login and Custom SMS Login Plugin:
Logo and Others
This guide shows the way to:
- Change Logo on Sign Up and Sign In screen
- Require users to login before using the app
- Show Phone field on the Sign Up screen
- Require users to input Phone Number on the Sign Up screen
- Show Reset Password and URL to reset on the Sign In screen.
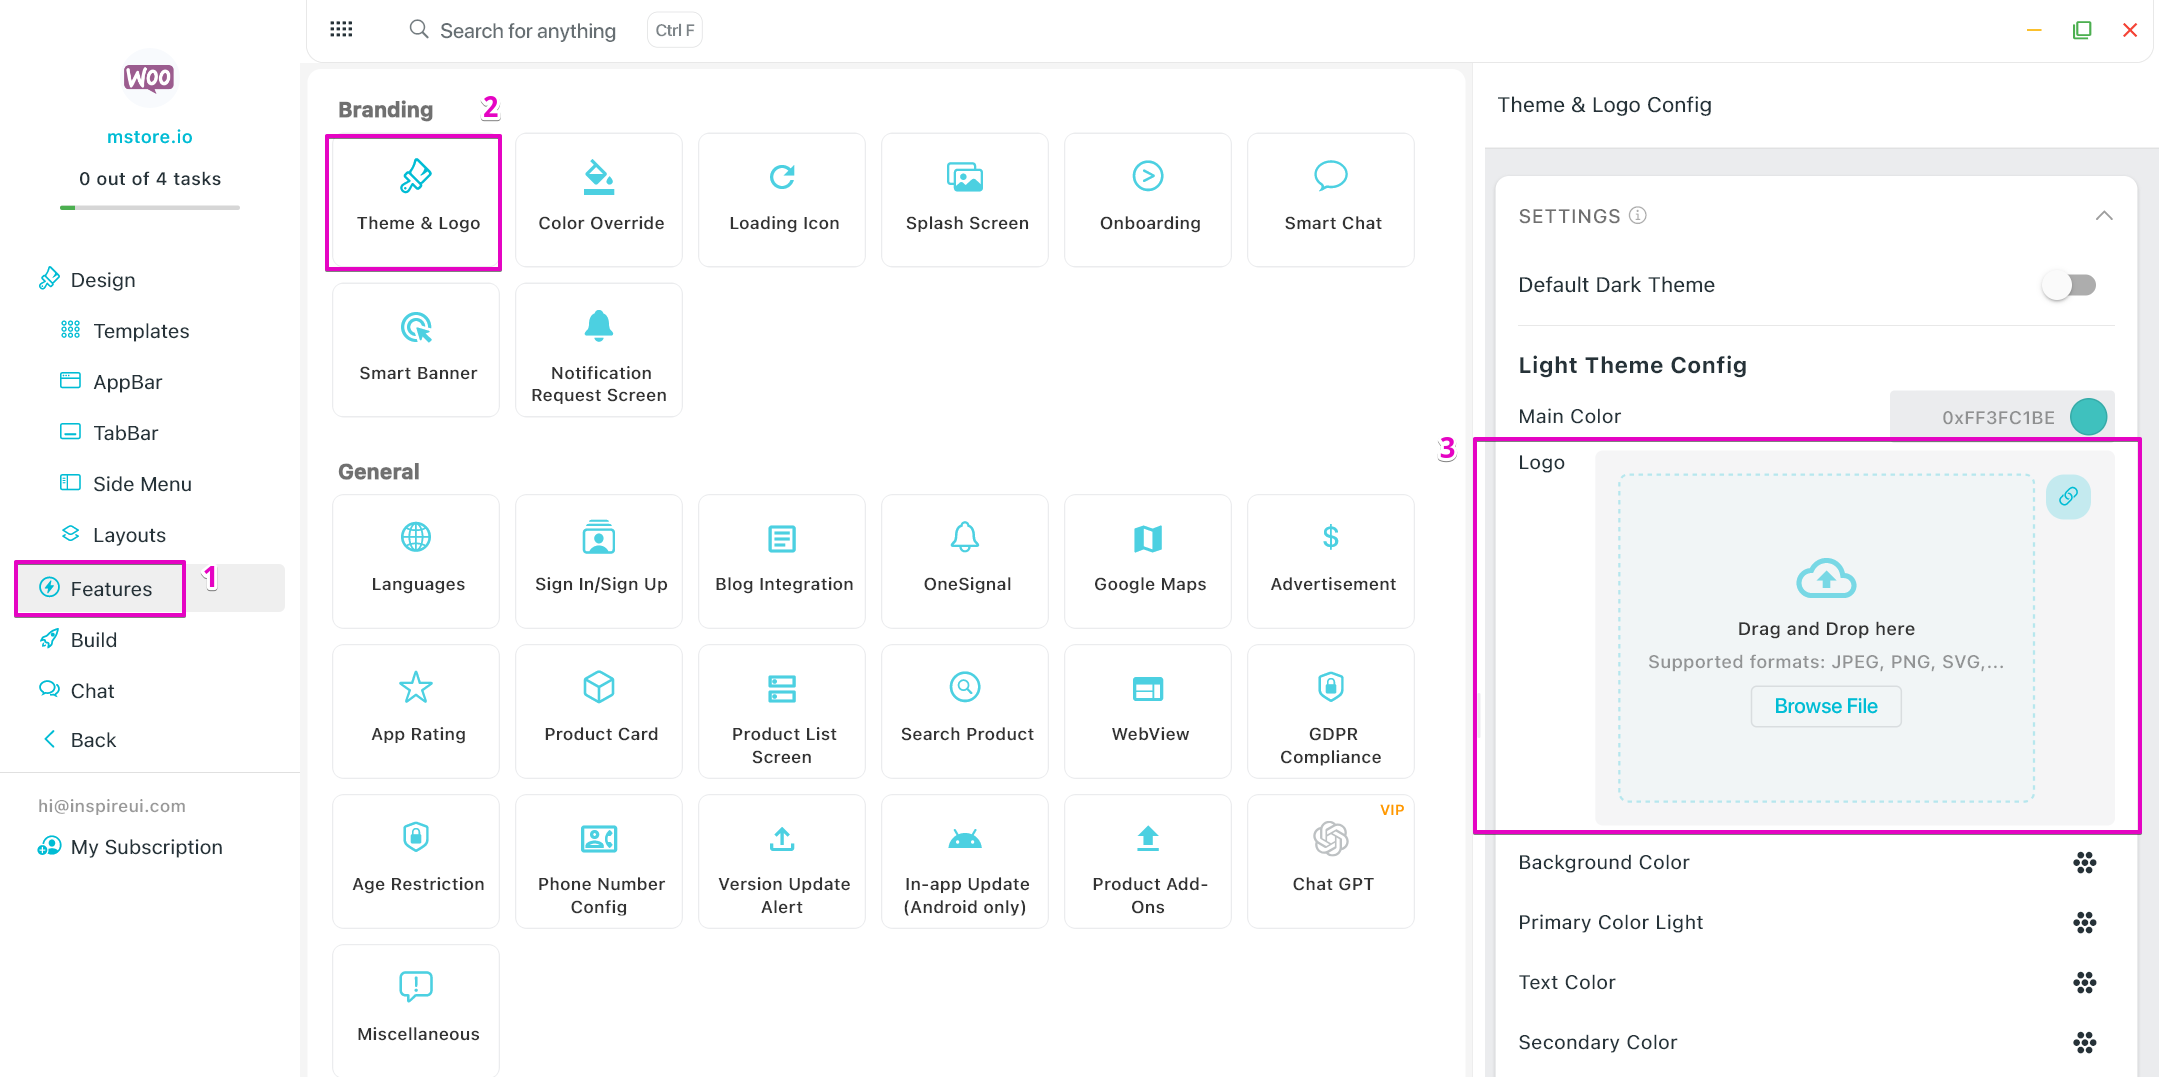
1. Logo
To change Logo on Login screen:
- Open app on FluxBuilder
- go to Features > Branding > Theme and Logo
- Add Theme Logo > click Update
2. Others
- Open app on FluxBuilder.
- Go to Features on the side menu.
- In General section, select Sign In/Sign Up.
- Enable these items if you need:
- Required Login: Require users to login before using the app
- Show Phone Number Field: Show Phone field on the Sign Up screen
- Require Phone Number: Require users to input Phone Number on the Sign Up screen
- Show Reset Password : Show Reset Password button on the Sign In screen
- Custom Reset Password URL: Edit the url of reset password